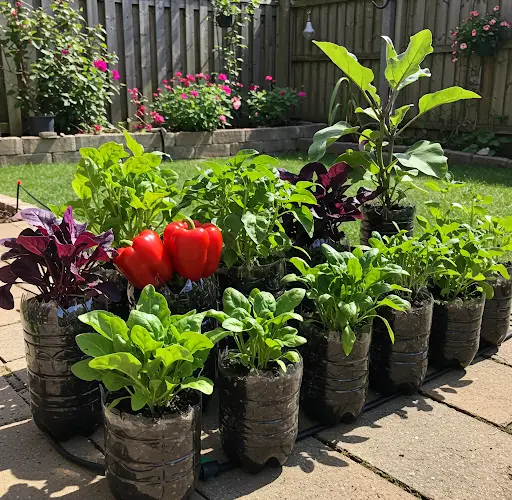
How to Grow Vegetables in Plastic Bottles: A Simple and Sustainable Method
In today’s world, urbanization and limited space are challenges that many gardeners face. Fortunately, you can still grow your own vegetables in small areas using an innovative and sustainable method: plastic bottle gardening. Not only does this method help reduce plastic waste, but it also provides you with a cost-effective and efficient way to grow fresh vegetables without the need for large plots of land. In this article, we’ll show you how to grow vegetables in plastic bottles, turning them into an ideal solution for apartment dwellers or anyone with limited outdoor space.
Why Grow Vegetables in Plastic Bottles?
Plastic bottles are often discarded as waste, but they can easily be repurposed into plant containers. This method of gardening has several benefits, including:
-
Space Efficiency: Plastic bottles are perfect for small spaces such as balconies, windowsills, or even indoors.
-
Cost-Effective: Recycling plastic bottles is an affordable way to create planters without the need to buy expensive pots or containers.
-
Sustainability: By reusing plastic bottles, you contribute to reducing plastic waste and promoting eco-friendly practices.
-
Accessibility: Plastic bottles are easy to find, and this method requires very few materials, making it ideal for beginners or anyone on a tight budget.
Materials Needed
To get started with plastic bottle gardening, you’ll need the following materials:
-
Plastic bottles (2-liter soda bottles, water bottles, or any other size that suits your space)
-
A sharp knife or scissors (to cut the bottles)
-
Drill or nail (to create drainage holes)
-
Soil (a good-quality potting mix suitable for vegetables)
-
Vegetable seeds or seedlings (such as lettuce, spinach, tomatoes, or herbs)
-
Watering can or spray bottle (to water your plants)
-
String or twine (if you wish to hang the bottles)
-
A tray or saucer (to catch excess water)
Step-by-Step Instructions
1. Prepare the Plastic Bottles
Start by thoroughly cleaning the plastic bottles to remove any labels, glue, or residue. If you’re using large soda bottles or similar-sized bottles, they make great planters for growing vegetables. For smaller plants or herbs, smaller water bottles can also work well.
Once the bottles are clean, use a sharp knife or scissors to cut them in half. For larger bottles, you can cut them vertically into two halves, creating two planters from one bottle. Alternatively, you can cut just the top off and leave the bottom as the base. If you’re planning to hang the bottles, leave the top portion intact for a more stable container.
2. Add Drainage Holes
Vegetables need good drainage to prevent root rot, so it’s essential to create drainage holes in the bottom of the bottle. Use a drill or a nail to puncture several small holes in the bottom. These holes will allow excess water to escape, ensuring that your plants’ roots don’t become waterlogged. If you’re using the top portion of the bottle as a planter, you can place it upside down inside the bottom portion to create a self-watering effect.
3. Fill with Soil
Now that the bottle is prepared, fill it with soil. Use a high-quality potting mix that is rich in organic matter to promote healthy vegetable growth. Fill the bottle about three-quarters full, leaving enough room at the top for the seeds or seedlings. You can use a small hand trowel or a spoon to fill the bottle with soil, ensuring it’s packed down gently but not too tight.
4. Plant the Seeds or Seedlings
Once your bottle is filled with soil, it’s time to plant your vegetables. For seeds, follow the planting instructions on the seed packet. Typically, seeds should be planted at a depth of 1-2 inches, depending on the type of vegetable. Lightly cover the seeds with soil and water gently.
If you’re using seedlings, create a small hole in the soil and place the seedling in, ensuring that the roots are fully covered. Press the soil around the seedling to hold it in place.
5. Water the Plants
After planting, give your vegetables a thorough watering to help the soil settle and the seeds or seedlings establish their roots. Make sure the water drains properly from the bottom of the bottle. Going forward, water your plants as needed, keeping the soil moist but not overly saturated. A spray bottle is ideal for watering smaller plants, as it provides a gentle mist that won’t disturb the soil.
6. Provide Support for Climbing Vegetables
If you’re growing vegetables that require support, like tomatoes or cucumbers, you may need to add stakes or use string to help the plants grow upright. Insert a small stick or bamboo pole into the soil when planting, and as the plants grow, tie the vines to the support using soft twine or string. This keeps the plants neat and prevents them from sprawling.
7. Place the Bottles in the Right Location
Plastic bottle planters need plenty of sunlight to grow successfully. Place your bottles in a sunny spot where they will receive at least 6 hours of direct sunlight each day. If you’re growing indoors, a south-facing window or a windowsill with good light is ideal. For outdoor gardening, you can place the bottles on your balcony, patio, or any other sunny spot.
8. Maintain the Plants
Regular care is essential for growing vegetables in plastic bottles. Check the soil moisture daily and water when necessary. As the plants grow, remove any dead leaves or stems to keep them healthy. Keep an eye out for pests and address any issues with organic pest control methods if needed.
Benefits of Growing Vegetables in Plastic Bottles
Growing vegetables in plastic bottles offers numerous advantages:
-
Space-saving: Perfect for apartment balconies, patios, or windowsills.
-
Sustainability: By reusing plastic bottles, you reduce waste and promote eco-friendly gardening.
-
Cost-effective: Plastic bottles are often free, making this method an affordable way to grow your own food.
-
Easy maintenance: Plastic bottles are lightweight and easy to move around, making them ideal for small-scale gardening.
Conclusion
With plastic bottles, you don’t need to buy vegetables from the store anymore. This simple and sustainable method allows anyone, regardless of space, to grow fresh, nutritious vegetables at home. By recycling plastic bottles and following the steps outlined in this guide, you can create your own mini garden and enjoy homegrown vegetables year-round. Whether you’re an experienced gardener or a beginner, growing vegetables in plastic bottles is an excellent and rewarding project that benefits both the environment and your health.


