Think you need a garden or a big budget to grow your own vegetables? Think again. With just a few plastic bottles and a little creativity, you can grow fresh, healthy vegetables at home—no soil, no large space, and no complicated setup required. This method is ideal for beginners, renters, or anyone who wants a low-cost, eco-friendly way to produce their own food year-round.
Reusing plastic bottles for gardening not only helps reduce waste but also transforms everyday trash into a practical tool for growing vegetables. Whether you’re on a balcony, windowsill, or small porch, you can create a productive mini-garden with almost zero investment.
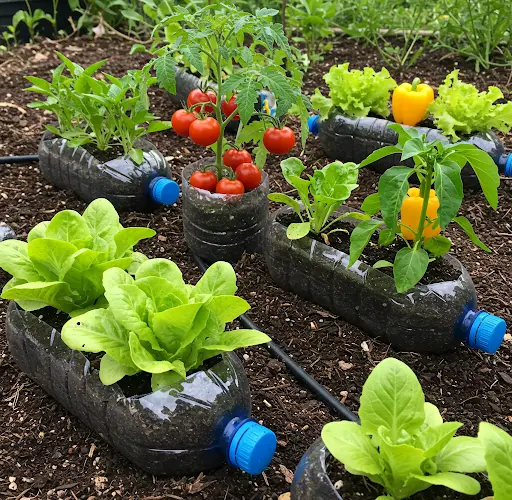
Why Use Plastic Bottles for Growing Vegetables?
Plastic bottles are lightweight, waterproof, and easy to modify. They make great containers for growing a variety of vegetables and herbs. Most importantly, they are free and abundant. By repurposing plastic bottles, you contribute to reducing plastic waste while gaining a sustainable source of food.
Benefits include:
-
Low or no cost
-
Perfect for small spaces
-
Easy to move around
-
Ideal for hydroponic or soil-free setups
-
Great for beginners and kids
What You Can Grow
Many leafy greens and compact vegetables thrive in bottle gardens. Here are a few excellent options:
-
Lettuce – fast-growing and shallow-rooted
-
Spinach and mustard greens – great for cooler seasons
-
Green onions and chives – regrow easily in water or shallow soil
-
Basil, mint, and cilantro – perfect for small spaces
-
Pak choi and kale – very productive in small containers
-
Tomatoes (dwarf or cherry varieties) – need a bit more care but can be done with larger bottles
With the right planning, you can harvest these vegetables repeatedly and keep a fresh supply going throughout the year.
Materials You’ll Need
To get started, gather the following:
-
Empty plastic bottles (1.5L to 5L sizes work best)
-
Scissors or a sharp knife
-
A nail or screwdriver to poke holes
-
Potting mix, compost, or organic growing media
-
Seeds or seedlings
-
String or wire (for hanging setups)
-
Optional: hydroponic nutrient solution if growing in water
Step-by-Step Instructions
1. Prepare the Bottles
-
Clean the bottles thoroughly and remove labels.
-
Cut a window or section out of the side (or top) of the bottle to create an opening where you’ll plant your vegetables.
-
Make drainage holes at the bottom if you’re using soil, or keep the bottle intact if growing hydroponically.
2. Add Growing Medium
-
For soil-based growing: Fill the bottle with a mix of potting soil and compost.
-
For water-based setups: Fill with clean water and add a few drops of liquid nutrients. You can suspend seedlings with cotton or sponge near the opening, ensuring roots touch the water.
3. Plant Your Seeds or Seedlings
-
Sow seeds according to their recommended depth.
-
If using seedlings, plant them gently and press the soil around them for support.
-
Mist with water to settle the medium and keep it moist.
4. Position for Sunlight
-
Place bottles in a sunny spot with at least 4–6 hours of light per day. A windowsill, balcony railing, or even a vertical hanging setup works well.
-
You can attach them to a wooden board or hang them with wire to maximize space.
5. Maintain Your Mini Garden
-
Water regularly if using soil. Keep the soil moist, not soaked.
-
For hydroponic setups, replace the water every 7–10 days to prevent algae and bacteria buildup.
-
Fertilize lightly every 2–3 weeks with organic or water-soluble fertilizer.
Harvesting and Replanting
One of the best parts of growing vegetables this way is that many of them regrow quickly after harvest. Leafy greens can be harvested by cutting the outer leaves and allowing the center to continue producing. Herbs can be trimmed regularly, encouraging bushier growth.
When plants begin to decline, simply remove them and replant with new seeds. The cycle continues all year round with very little cost and effort.
Tips for Success
-
Rotate your containers occasionally so each plant gets balanced sunlight.
-
Group similar plants together (for example, place all shade-tolerant plants on one side).
-
Reuse old soil by refreshing it with compost or organic fertilizer before planting again.
-
Always clean bottles between growing cycles to avoid disease buildup.
Final Thoughts
Growing vegetables at home doesn’t have to be expensive, time-consuming, or complicated. With just a few plastic bottles and a little care, you can set up a productive and eco-friendly mini-garden that feeds your family with fresh, organic produce throughout the year.
This method is not only sustainable but also satisfying. It brings the joy of gardening to anyone, anywhere—no matter how small the space or how limited the budget.
So grab a few plastic bottles, some seeds, and get growing. Your year-round supply of homegrown vegetables is just a few steps away!


