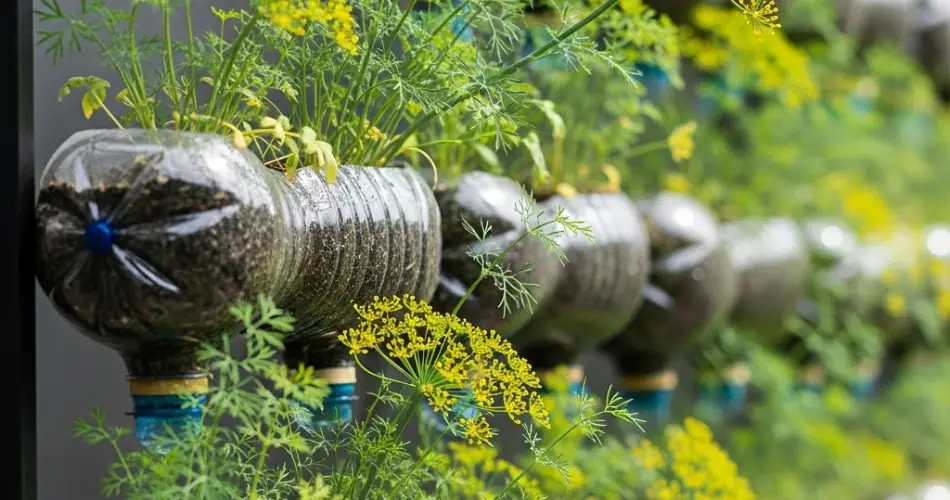
If you love cooking with fresh herbs but are short on garden space, vertical bottle gardening offers a simple, space-saving solution. This sustainable method transforms empty plastic bottles into productive planters that can be mounted on any sunny wall or fence. Dill, with its feathery leaves and unique flavor, is an ideal herb to grow in this setup.
Whether you have a balcony, patio, or just a spare wall, growing dill vertically is easy, rewarding, and eco-friendly.
Why Grow Dill?
Dill is a fast-growing annual herb with aromatic leaves that enhance the flavor of fish dishes, salads, soups, and pickles. It also produces umbrella-shaped yellow flowers that attract beneficial pollinators. Dill is lightweight, shallow-rooted, and thrives in containers, making it perfect for vertical gardens made from recycled plastic bottles.
In addition to being useful in the kitchen, dill also deters pests like aphids, which makes it a good companion plant in herb gardens.
Materials You’ll Need
To grow dill on a vertical wall garden, gather the following supplies:
-
Clean 1.5- to 2-liter plastic bottles
-
Sharp scissors or a craft knife
-
A small drill or heated nail (for drainage holes)
-
Potting soil or herb-friendly mix
-
Dill seeds
-
Twine, wire, or zip ties
-
A vertical surface such as a wooden board, fence, or wall
-
Optional: gravel or small stones for extra drainage
Step 1: Prepare the Bottles
Start by rinsing and removing labels from your plastic bottles. Use scissors or a knife to cut a rectangular window into one side of the bottle—large enough to fill with soil and accommodate the dill plant’s growth.
Puncture 3–5 small drainage holes in the bottom of each bottle. This ensures excess water can escape, keeping the roots from becoming waterlogged.
Step 2: Set Up the Vertical Frame
Choose a sturdy, sunlit wall or frame where your bottle planters will be mounted. There are several vertical setup options:
-
Twine Hanging Method: Thread strong twine or wire through holes near the top and bottom of each bottle and hang them vertically in a column.
-
Fixed Panel Design: Screw the bottles onto a wooden board or fence, either in rows or staggered columns.
-
Stacked Drainage System: Mount bottles so that the runoff from one bottle can drip into the next one below, reducing water waste.
Ensure that the setup is stable, and bottles are slightly tilted upward to retain soil and moisture.
Step 3: Add Soil and Plant Seeds
Place a thin layer of gravel or small stones at the bottom of each bottle for added drainage. Then, fill the bottles about three-quarters full with a well-draining potting mix. Dill prefers slightly acidic to neutral soil with good aeration.
Sprinkle a few dill seeds onto the soil surface and lightly cover with a fine layer of soil (around ¼ inch). Dill seeds are small and don’t need to be buried deep. Gently water the soil using a spray bottle or a watering can with a narrow spout.
Step 4: Position for Optimal Sunlight
Dill grows best in full sunlight—at least 6 hours a day. Choose a wall that receives ample sun, preferably one that faces south or west. If growing indoors or in a shaded location, use a grow light to supplement natural light.
During germination, keep the soil consistently moist. Seeds typically sprout within 10–14 days. Once seedlings emerge, thin them to about 4–6 inches apart to allow space for proper growth.
Step 5: Watering and Fertilizing
Dill is relatively low-maintenance once established. Water when the top inch of soil feels dry, but avoid overwatering, especially in bottle gardens where drainage is limited.
Feed the plants every 3–4 weeks with a diluted, balanced organic fertilizer to support healthy growth and fuller leaves.
Step 6: Ongoing Care
Dill can grow up to 2 feet tall, so occasional pruning will help control height and promote bushier plants. If the plant begins to flower too early (bolting), pinch off the flower heads to prolong leaf production.
To avoid overcrowding in your vertical garden, harvest regularly and remove any weak or yellowing leaves. Dill is generally pest-resistant, but keep an eye out for caterpillars or aphids, which can be managed with natural sprays like neem oil.
Step 7: Harvesting Dill
You can begin harvesting dill once the plant reaches about 6 to 8 inches tall. Use scissors to snip the outer leaves first, allowing the inner growth to continue developing. Frequent harvesting encourages more leafy growth.
For maximum flavor, harvest in the morning when the oils are most concentrated. Dill can be used fresh or dried and stored in an airtight container for later use.
If you let the plant flower and go to seed, you can also harvest the dill seeds. These are great for seasoning pickles and other dishes—or saved to plant next season.
Final Thoughts
Creating a vertical dill garden using plastic bottles is a smart way to combine sustainability with practicality. This approach turns waste into a valuable gardening resource while providing you with a constant supply of fragrant, flavorful herbs. Whether you’re new to gardening or looking for creative ways to expand your herb collection, vertical bottle gardening with dill is a beautiful and functional project to try.


