Sage is a classic Mediterranean herb, valued for its aromatic leaves, resilience, and versatility in the kitchen. Whether you’re flavoring roast meats, seasoning pasta, or brewing herbal tea, fresh sage offers a richness of flavor that dried leaves simply can’t match. But what if you don’t have a large garden? With a little creativity, you can grow sage vertically using upcycled plastic bottle planters.
This method turns everyday waste into an attractive, space-saving garden solution, perfect for small balconies, sunny walls, or even kitchen interiors with enough light.
Why Choose Vertical Sage Gardening?
A vertical bottle planter system offers several advantages:
-
Space Efficiency – Ideal for compact living areas with little or no garden bed space.
-
Sustainability – Reduces waste by reusing plastic bottles that might otherwise end up in landfills.
-
Easy Access – Keeps fresh herbs within reach for cooking and brewing tea.
-
Pest Reduction – Elevating plants can help limit exposure to crawling pests.
-
Decorative Value – Adds greenery and life to otherwise plain or unused walls.
Sage adapts well to this style of growing because it thrives in well-drained soil, tolerates drought, and stays relatively compact.
Selecting the Best Location
Sage loves sunlight. Choose a spot where your vertical garden will receive at least six to eight hours of direct sun daily. A south-facing wall is usually ideal. If your climate is extremely hot, a location with light afternoon shade can help prevent leaf burn.
Because vertical containers dry out more quickly than ground soil, position your garden where watering is convenient. Also, protect plants from strong winds that can stress or damage them.
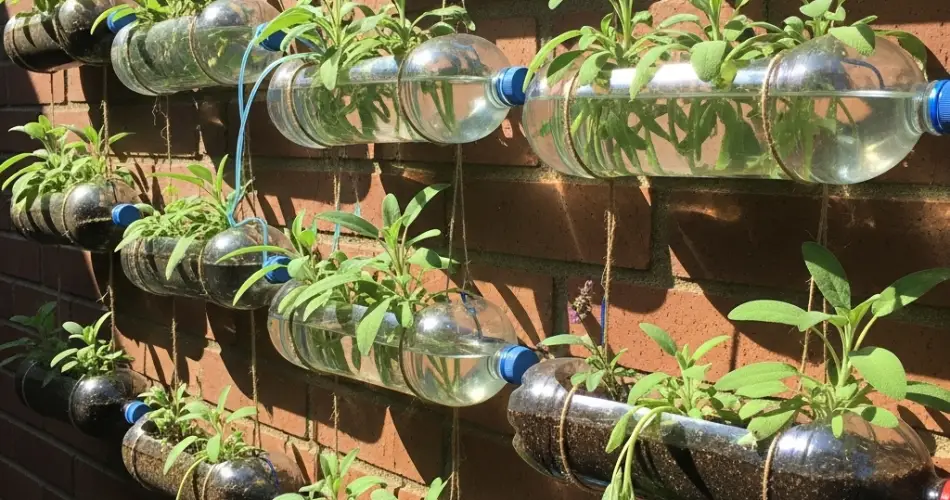
Preparing the Upcycled Bottles
You’ll need clean, sturdy 1.5-liter or 2-liter plastic bottles. Clear bottles work, but painting or wrapping them helps protect roots from excessive sunlight and gives your wall a cohesive look.
Steps to prepare the bottles:
-
Mark and Cut the Opening – Lay the bottle on its side and cut a rectangular hole along the upper curve. This will be the planting space.
-
Add Drainage – Puncture 3–4 small holes in the base for water runoff.
-
Mount the Bottles – Secure bottles to a wooden frame, fence, or wall using nails, screws, or strong cable ties. Arrange them in rows or a staggered pattern for better sunlight coverage and easy watering.
-
Optional Decoration – Paint the bottles with non-toxic outdoor paint or cover them with burlap or jute for an attractive, rustic finish.
Soil Mix for Sage
Sage prefers well-draining, slightly sandy soil. In a small container, drainage is critical to prevent root rot. A good mix is:
-
2 parts quality potting soil
-
1 part compost
-
1 part coarse sand or perlite
This combination balances nutrient content with airflow around the roots.
Planting Methods
You can start sage from seeds, cuttings, or ready-to-plant seedlings:
-
Seeds – Sow directly into bottles about 0.5 cm deep. Keep the soil lightly moist until germination, which takes 10–21 days. Sage grows slowly from seed, so patience is required.
-
Cuttings – Take 8–10 cm softwood cuttings from a healthy plant. Remove the lower leaves, place the cutting in water or damp potting mix until roots form, then transplant into the bottle planter.
-
Seedlings – Gently transplant nursery plants, ensuring the root ball sits just below the top of the soil level.
One plant per bottle is ideal, giving enough space for healthy root and leaf growth.
Watering and Feeding
Sage does not like to be constantly wet. Allow the top 2–3 cm of soil to dry between waterings, then water deeply until excess drains from the holes. Overwatering is the most common cause of plant failure in container gardens.
Feed lightly every 4–6 weeks with a balanced, all-purpose organic fertilizer or a diluted compost tea. Too much fertilizer, especially nitrogen, can produce lush foliage with less flavor.
Maintenance and Pruning
Regular pruning keeps sage plants compact and productive. Pinch off tips to encourage bushier growth, and remove any yellowing or damaged leaves. Pruning after flowering helps maintain flavor and vigor.
Pests and Diseases
Sage is generally resilient but can be affected by spider mites, aphids, or whiteflies in warm, dry weather. Combat these naturally with a light spray of soapy water, and ensure your vertical arrangement allows good air circulation between plants.
Powdery mildew can appear if airflow is poor or leaves remain wet for long periods. Always water at the base of the plant, not over the foliage.
Harvesting Sage
Once plants are established, begin harvesting outer leaves as needed. For drying, cut whole stems just before flowering, when essential oil levels are highest. Hang the stems in a dry, shaded place until crisp, then store leaves in an airtight container away from direct light.
Benefits of an Upcycled Bottle Sage Wall
-
Fresh herbs within arm’s reach year-round.
-
Attractive greenery for bare walls or balcony railings.
-
Eco-friendly reuse of common waste materials.
-
Easy to maintain, even in limited space.
Final Thoughts
Upcycling plastic bottles into vertical planters for sage is a smart way to combine sustainability with the joy of fresh cooking herbs. With a sunny wall, a few basic tools, and a little care, you can create a fragrant green display that’s as practical as it is beautiful.
This project not only reduces plastic waste but also brings flavor and freshness into your meals—proof that even the smallest space can become a thriving herb garden.


