Pothos (Epipremnum aureum), also known as devil’s ivy, is one of the most popular indoor plants thanks to its beautiful trailing vines, glossy green leaves, and reputation for being nearly indestructible. It thrives in a variety of conditions and is incredibly easy to propagate—making it perfect for both beginners and seasoned plant lovers. Best of all, you don’t need to invest in expensive planters to grow pothos. With a little creativity, an old plastic bottle can be transformed into the perfect pothos planter.
This guide will walk you through how to upcycle plastic bottles into attractive and functional homes for your pothos cuttings, combining sustainability, simplicity, and indoor greenery in one easy project.
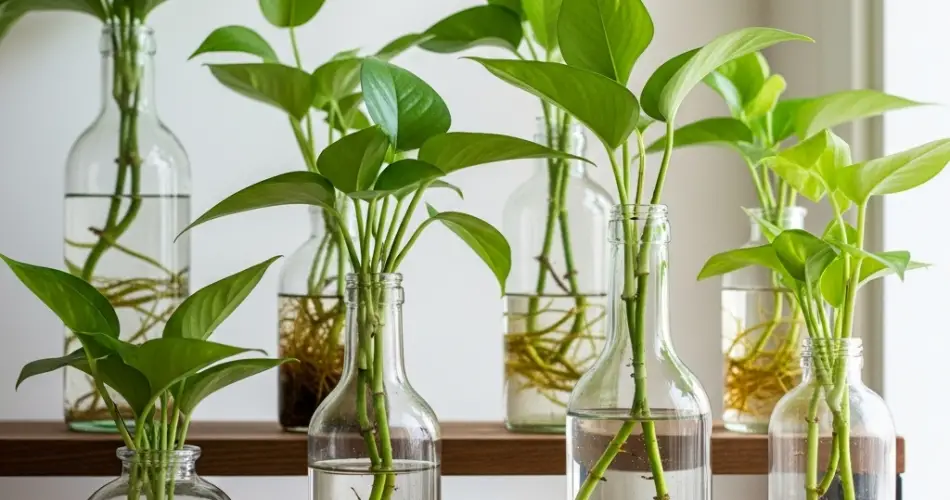
Why Grow Pothos in a Plastic Bottle?
Plastic bottles are more than just waste—they can be repurposed into lightweight, compact, and practical planters. Here’s why they’re ideal for pothos propagation and growth:
-
Eco-friendly: Keeps plastic out of landfills by giving it a second life.
-
Cost-effective: No need to buy pots or containers.
-
Clear view of roots: Great for monitoring propagation progress.
-
Perfect for small spaces: Fits on windowsills, shelves, desks, or hanging displays.
-
Customizable: Easy to cut, shape, and decorate to suit your style.
Upcycled bottle planters are especially great for water propagation, which pothos responds to exceptionally well.
Materials You’ll Need
-
A healthy pothos cutting (1–2 nodes with leaves)
-
A clean plastic bottle (500 ml to 2 liters)
-
Scissors or utility knife
-
Filtered or dechlorinated water
-
Optional: activated charcoal to keep water fresh
-
Optional: decorative materials (twine, paint, fabric)
Step-by-Step Guide to Creating a Bottle Planter
1. Prepare the Pothos Cutting
Take a cutting from an existing pothos vine. Make sure your cutting includes at least one healthy node—this is the small bump where roots will form. Two to three nodes are even better. Trim just below the node using clean, sharp scissors.
Remove any leaves that would sit below the waterline, leaving only the top leaves above the node.
2. Cut and Clean the Bottle
Wash the bottle thoroughly and remove the label. Then:
-
Cut the bottle about one-third from the top to create a cup-like container.
-
Alternatively, you can use the full bottle and insert the cutting through the neck after removing the cap.
-
Smooth any sharp edges with sandpaper or by carefully sealing them with heat.
If you’d like to make your planter more attractive, wrap the bottle in twine, paint it, or use fabric scraps for a decorative touch.
3. Fill with Water
Fill the container with room-temperature, filtered or dechlorinated water. Tap water can contain chlorine and fluoride, which some plants are sensitive to.
Submerge the node or nodes in the water, ensuring that no leaves are underwater. Too much moisture around the leaves can cause rot.
For added freshness and to reduce algae or bacteria, you can add a small piece of activated charcoal to the bottom.
Ideal Placement and Light Conditions
Pothos thrives in bright, indirect light, but it can also tolerate lower-light areas. Place your bottle planter:
-
Near a window with filtered sunlight
-
On a well-lit shelf or table
-
Away from intense direct sunlight, which can overheat the bottle and damage the plant
Consistent lighting will help encourage healthy root development and vibrant growth.
Maintaining Your Bottle-Grown Pothos
Water propagation is easy to manage, but routine care helps ensure success:
-
Change the water every 7–10 days to keep it clean and oxygen-rich.
-
Rinse the cutting and container with fresh water before refilling.
-
Remove any yellowing leaves or debris from the water.
You should see roots start to develop within 1–3 weeks. They will appear as white or cream-colored strands growing from the submerged node.
Transplanting (Optional)
Once the roots grow to about 2–3 inches long, you have two options:
-
Keep it in water indefinitely: Pothos can thrive in water alone as long as you maintain the conditions.
-
Transplant to soil: Move your rooted cutting into a small pot with well-draining houseplant soil. Water lightly and continue to provide indirect sunlight.
If you choose to transplant, allow the plant to adjust gradually and avoid overwatering in the early days.
Creative Ideas for Displaying Your Bottle Pothos
-
Hang several bottle planters vertically using string or macramé for a cascading green wall.
-
Place bottles in a wooden crate or on a sunny shelf for a mini indoor garden.
-
Use bottles of different shapes, colors, or sizes to add visual interest.
Because pothos is such a fast grower, you can propagate new plants regularly and share them as gifts or decorate multiple areas in your home.
Troubleshooting Tips
-
Yellowing leaves: Could be a sign of overwatering, poor water quality, or low light. Adjust accordingly.
-
No root growth after a few weeks: Move the cutting to a brighter location or try a fresh cutting.
-
Cloudy water: Change the water more frequently or rinse the cutting thoroughly before re-submerging.
Final Thoughts
Growing pothos in upcycled plastic bottles is an enjoyable and environmentally friendly way to bring more greenery into your life. It’s a creative, low-cost solution that works beautifully for propagation and indoor plant displays. With just a bit of water, light, and care, your cuttings will soon flourish—proving that plant growth doesn’t require fancy materials or expensive containers.
By turning trash into treasure, you not only support sustainable living but also get to enjoy the joy of watching your pothos grow and thrive in its new recycled home.


