If you’ve been struggling to root plant cuttings or branches, you’re not alone. Many people face this challenge, but there’s a simple and effective technique that can help you root any type of cutting with just one key ingredient. This method is easy, cost-effective, and doesn’t require expensive rooting hormones or complicated steps. Let’s dive into the process of rooting any type of branch, from herbs like rosemary and mint to fruit tree cuttings such as citrus or guava.
The Key to Successful Rooting: One Ingredient
The secret to successfully rooting any cutting lies in the soil mixture and the way you prepare your cuttings. Here’s a step-by-step guide to help you achieve strong, healthy roots in your cuttings.
1. Prepare the Cuttings
The first step is to prepare the branches or cuttings you want to root. When cutting the branches, make sure to cut them diagonally. This is important because a diagonal cut increases the surface area for the cutting to develop roots. If you don’t use this method, you may find that the cutting doesn’t root well and may take a much longer time to establish itself.
2. Prepare the Soil Mixture
Next, you’ll need to prepare the perfect soil mixture. The key here is to use a combination of two types of soil: black soil (also known as garden soil) and sand. Black soil provides essential nutrients while sand helps improve drainage, which is crucial to avoid overwatering and root rot.
To prepare the mixture:
-
Mix one part black soil with one part construction sand.
-
Stir the mixture thoroughly for 2-3 minutes to ensure it’s homogeneous.
The sand helps keep the soil well-drained, preventing the cutting from sitting in wet, soggy conditions that can lead to rot. The black soil will supply the nutrients your cuttings need to establish roots.
3. Set Up the Pot
Next, you’ll need a pot or container with drainage holes at the bottom. This is essential to allow any excess water to drain away and avoid stagnant moisture at the roots. Fill the pot with the soil mixture you just prepared, making sure to leave some space at the top.
4. Plant the Cuttings
Once your soil is ready, it’s time to plant the cuttings. Insert each cutting into the soil, ensuring that the base of the cutting is submerged in the mixture. Press the soil around the cutting to secure it in place.
The key to success at this stage is to keep the soil consistently moist. It’s important not to let the soil dry out, as moisture is needed for the cuttings to form roots. Water the cuttings twice a day, once in the morning and once in the evening. Keeping the soil damp, but not waterlogged, will ensure your cuttings develop strong, healthy roots.
5. Wait for the Roots to Form
The time it takes for roots to form can vary depending on the type of cutting you’re working with. For most cuttings, you should expect roots to develop in about 30-75 days. However, some plants may root faster than others, while others may take a bit longer.
During this waiting period, make sure to keep the soil moist, and be patient. Avoid disturbing the cuttings, as moving them too much can delay the rooting process.
6. Check for Roots
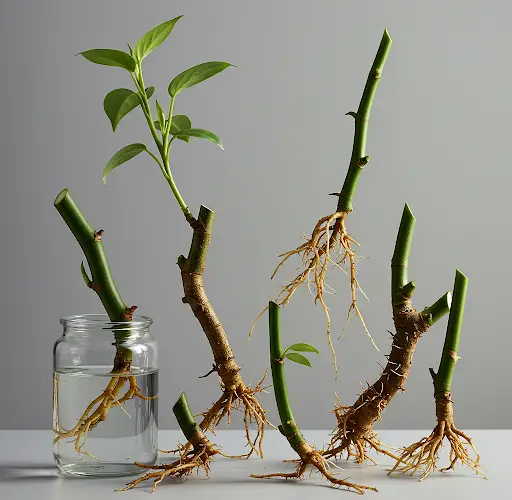
After the waiting period, check for signs of roots. You can gently pull the cutting to see if it’s secured by roots. If the cutting resists being pulled up, it means roots have formed successfully. Look for small roots growing at the base of the cutting. If you see them, that’s a clear sign that your cutting is ready to be potted in a larger container or transplanted into your garden.
7. The Result
When you successfully root your cuttings, you’ll have strong, well-developed plants that will thrive in your garden. The best part is that you did it all with a simple soil mixture of black soil and sand—no expensive rooting hormones or complex procedures required.
This technique works for a variety of plants, from simple herbs like mint and oregano to fruit trees like citrus, guava, and even flowering plants like bougainvillea. It’s a great way to propagate plants without spending money on store-bought seedlings or expensive rooting chemicals.
Why This Method Works
The reason this method works so well is that it provides the perfect balance of nutrients and drainage. The black soil ensures the cuttings have access to the nutrients they need, while the sand allows the water to drain away, preventing root rot. The consistent moisture helps keep the cuttings hydrated and promotes root growth. This simple, natural approach is a fantastic way to propagate plants at home, especially if you’re looking to save money and time.
Conclusion
Rooting plant cuttings is a simple process that doesn’t need to be expensive or complicated. By using this soil mixture of black soil and sand, you can successfully root any type of branch or cutting. Whether you’re looking to grow herbs, fruit trees, or ornamental plants, this method will give you the best chance of success. So, grab your scissors, a pot, and some sand and black soil, and start rooting your favorite plants today!


