Green beans are one of the most beginner-friendly and rewarding vegetables to grow at home. They are fast growers, highly productive, and can be harvested multiple times throughout the season. For gardeners with limited space, wooden box planters are an excellent solution, offering both practicality and rustic charm. Whether you have a balcony, patio, or a small backyard, a wooden box garden allows you to grow fresh green beans with ease. By following a step-by-step approach, you can set up your own container garden and enjoy a steady supply of crisp, homegrown beans.
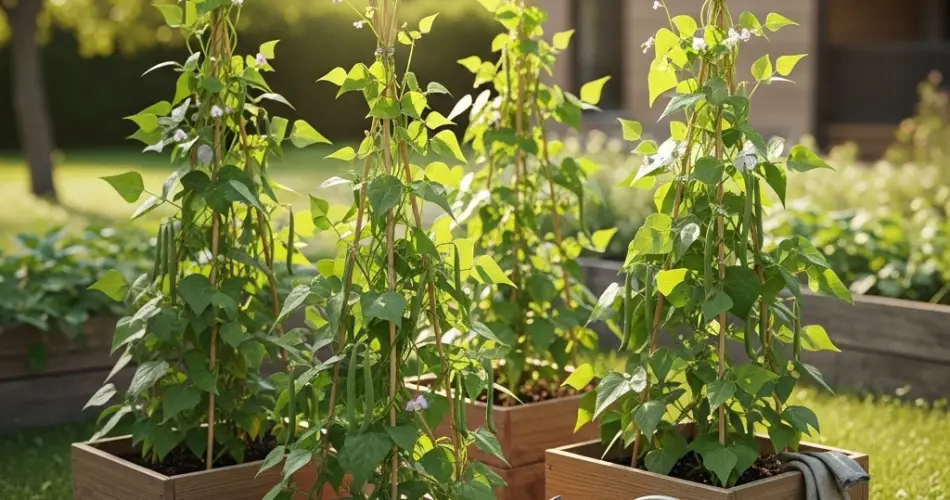
Step 1: Choosing the Right Wooden Box
The first step is selecting or building a wooden box that fits your space and the type of green beans you plan to grow. Green beans come in two main varieties: bush beans and pole beans.
-
Bush beans are compact, reaching 18–24 inches tall, and do not require support. A shallow but wide box (12–15 inches deep, at least 24 inches wide) works best for them.
-
Pole beans are climbers that grow up to 8 feet tall and need a trellis or support system. These require a deeper and wider box, at least 18 inches deep, with space for stakes or poles.
Whichever type you choose, ensure your container has proper drainage. Drill several holes in the bottom if necessary, since excess water can cause root rot. Cedar and pine are great wood options because they resist rot and are safe for edible plants.
Step 2: Preparing the Soil
Green beans thrive in loose, fertile, and well-draining soil. In wooden containers, a good mix includes:
-
40% garden soil or topsoil
-
40% compost or organic matter
-
20% perlite, coarse sand, or coconut coir for drainage
Avoid overly rich soil, especially with too much nitrogen, as this promotes leafy growth instead of beans. Before planting, mix in a small amount of balanced, slow-release fertilizer to give the seedlings a strong start.
Step 3: Planting the Seeds
Unlike some vegetables, green beans grow best when sown directly into the soil rather than transplanted. Wait until the danger of frost has passed and soil temperatures have warmed to at least 60°F (16°C).
-
For bush beans, sow seeds about 1 inch deep and 3 inches apart in rows.
-
For pole beans, plant seeds 1 inch deep and 4 inches apart in a circle or row near the trellis or stakes.
Cover the seeds lightly with soil and water gently. Germination usually occurs within 7 to 10 days. To ensure continuous harvests, consider planting new seeds every 2 to 3 weeks during the growing season.
Step 4: Providing Sunlight and Water
Green beans love the sun. Position your wooden box where it will receive at least 6–8 hours of direct sunlight daily. Sunlight is critical for flowering and pod development.
Watering should be consistent but moderate. The soil should remain evenly moist but not soggy. Because wooden boxes can dry out faster than garden beds, check the soil often and water when the top inch feels dry. Adding mulch, such as straw or shredded leaves, helps retain moisture and prevents weeds from sprouting.
Step 5: Supporting the Plants
Bush beans usually do not need support, but pole beans must have something to climb. Before planting seeds, place bamboo poles, trellises, or a string net inside the wooden box. This ensures the young vines latch onto the supports as they grow. A stable support system not only encourages healthy growth but also makes harvesting easier.
Step 6: Fertilization and Ongoing Care
Green beans are light feeders, so they don’t need heavy fertilization. Apply a diluted organic fertilizer, such as compost tea or fish emulsion, every 3 to 4 weeks to keep plants productive. Avoid fertilizers high in nitrogen, as this will lead to lush leaves but fewer beans.
Check the plants regularly for pests such as aphids, spider mites, and bean beetles. If you notice damage, treat it with natural remedies like neem oil or insecticidal soap. Companion planting with herbs like basil or flowers such as marigolds can also deter pests naturally.
Step 7: Harvesting Green Beans
Bush beans are typically ready for harvest 50–60 days after planting, while pole beans may take a little longer. Harvest when pods are firm, crisp, and about the thickness of a pencil. Picking regularly encourages the plants to produce more beans. Use scissors or gently snap the pods off the plant to avoid damaging the stems.
Green beans taste best when harvested young and tender. They can be eaten raw, steamed, sautéed, or added to soups and stir-fries. For longer storage, beans can be blanched and frozen.
Benefits of Wooden Box Gardening for Beans
Growing green beans in wooden containers offers several advantages:
-
Space-saving: Perfect for small gardens, patios, or balconies.
-
Soil control: You can create the ideal growing medium for beans.
-
Fewer weeds and pests: Raised boxes minimize many common garden problems.
-
Mobility: Containers can be moved to catch sunlight or shield plants from heavy rain.
-
Aesthetic value: Wooden boxes add a rustic, decorative element to your space.
Final Thoughts
Planting green beans in wooden boxes is a simple, rewarding way to grow your own vegetables, even with limited space. By following these step-by-step instructions—choosing the right box, preparing the soil, planting seeds, and providing care—you can enjoy fresh, crunchy beans all season long. Whether you grow bush or pole varieties, your wooden box garden will provide not only food but also the joy of harvesting homegrown produce right at your doorstep.


