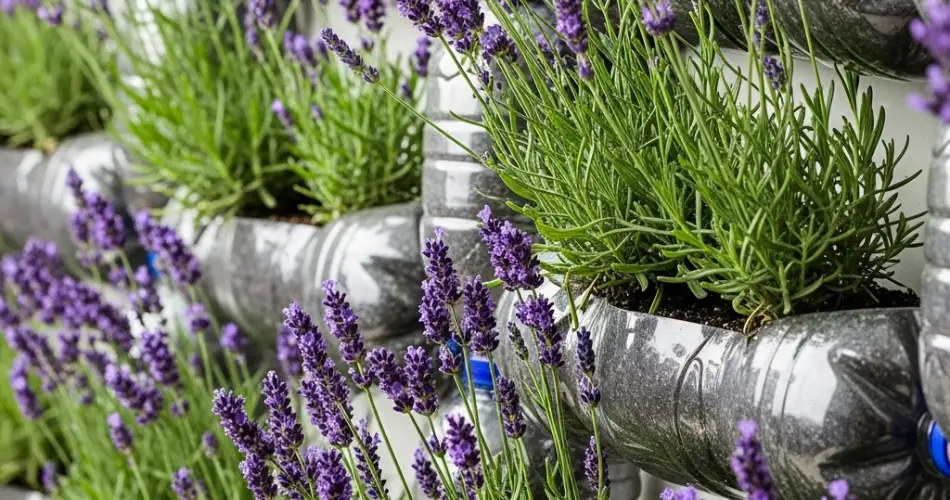
Lavender is a timeless favorite in herb gardens thanks to its calming scent, striking purple blooms, and culinary and medicinal versatility. Whether you’re looking to create a peaceful corner, infuse your home with natural fragrance, or harvest your own lavender buds for tea and crafts, growing lavender in a wall-mounted garden using recycled plastic bottles is a clever and space-saving solution.
This DIY vertical garden is perfect for small spaces and urban homes. With just a few materials, you can turn a sunny wall or balcony into a lush, aromatic lavender display—one that’s not only practical but also eco-conscious.
Why Grow Lavender in a Vertical Bottle Garden?
Lavender thrives in containers and loves full sun, making it an excellent candidate for vertical gardening. Here’s why it works especially well in recycled plastic bottles:
-
Compact root system: Lavender doesn’t need deep soil, just well-drained space.
-
Minimal water requirements: It prefers dry conditions, ideal for small containers with good drainage.
-
Sun-loving: A wall garden ensures exposure to ample sunlight.
-
Fragrant and ornamental: Lavender adds beauty, fragrance, and pollinator appeal to your wall garden.
-
Eco-friendly: Using recycled bottles helps reduce waste and environmental impact.
What You’ll Need
To set up your lavender wall garden, gather these materials:
-
Several clean 1.5- or 2-liter plastic bottles
-
Scissors or a utility knife
-
A drill or heated nail for creating holes
-
Twine, wire, or zip ties
-
A sunny wall, fence, or wooden frame for mounting
-
Well-draining potting mix
-
Small lavender plants or cuttings
-
Small stones or charcoal for drainage (optional)
This system is customizable depending on how many lavender plants you want and the space available.
Preparing the Bottles
-
Create a planting window: Lay each bottle horizontally and cut out a rectangular opening on one side. This will be where you add soil and place your plant.
-
Make drainage holes: Use a drill or heated nail to make several small holes in the bottom of each bottle to ensure proper drainage.
-
Add hanging holes: Puncture two holes near the top and bottom of each bottle on opposite sides. These will be used for threading wire or tying the bottles to a frame or fence.
-
Add drainage layer: Place a small handful of gravel, pebbles, or charcoal at the bottom of each bottle to prevent soggy roots.
-
Fill with soil: Use a gritty, fast-draining mix formulated for Mediterranean herbs. Leave an inch of space at the top for watering.
Best Soil Mix for Lavender
Lavender requires well-drained, slightly alkaline soil. Heavy or moisture-retaining soil will lead to root rot.
Ideal potting mix:
-
2 parts cactus or succulent mix
-
1 part coarse sand or perlite
-
Optional: a teaspoon of crushed eggshells or lime to raise pH
Lavender dislikes rich soil. Avoid adding compost or manure, which may encourage fungal diseases and reduce fragrance.
Planting Lavender
Lavender grows best from young nursery plants or cuttings rather than seeds, which germinate slowly and unevenly.
-
Transplants: Gently remove the plant from its original pot and settle it into the soil in the bottle. Firm the soil gently around the roots.
-
Cuttings: Rooted cuttings can be planted the same way as transplants.
Place the containers in a location that gets at least 6 to 8 hours of full sun per day. Light is essential for strong growth, fragrance development, and flower production.
Mounting the Bottle Garden
There are several ways to install your lavender bottle garden:
-
Vertical hanging: Thread string or wire through the holes and hang the bottles from a rod, railing, or hooks.
-
Wall-mounted: Attach bottles directly to a wooden frame, pallet, or fence using zip ties or hooks.
-
Grid layout: Create a rectangular display with bottles spaced evenly to allow good airflow and sunlight exposure.
Ensure the structure is secure and stable, especially as the bottles will become heavier when filled with soil and watered.
Watering and Maintenance
Lavender prefers dry conditions, so be conservative with watering.
-
Water only when the top 1–2 inches of soil are completely dry.
-
During hot weather, check more often, but avoid keeping the soil constantly moist.
-
Ensure bottles drain well and never sit in water.
Fertilizing is rarely necessary. Overfeeding can lead to excessive foliage and weak flowering. If needed, apply a diluted liquid fertilizer once in early spring.
Pruning and Harvesting
Lavender benefits from regular pruning to stay compact and healthy.
-
Prune lightly after the first bloom, and more heavily after the second flowering (usually in late summer).
-
Never cut into the woody stems—only prune green growth.
-
Harvest flower spikes when they’re just beginning to bloom for the best fragrance and oil content.
-
Dry harvested stems in a cool, dark place for use in sachets, teas, or crafts.
Common Problems and How to Avoid Them
-
Root rot: Caused by overwatering or poor drainage. Always ensure proper drainage holes.
-
Leggy growth: Results from insufficient sunlight. Relocate to a sunnier area if needed.
-
Powdery mildew: A risk in damp conditions. Provide adequate air circulation and avoid overhead watering.
With the right setup and a bit of care, lavender is a resilient, rewarding herb to grow in containers.
Final Thoughts
A scented wall garden featuring lavender in recycled bottles is a beautiful and practical way to bring fragrance and greenery into small or vertical spaces. It transforms everyday materials into functional garden planters while conserving space and supporting sustainable practices. Whether you’re growing for aroma, decoration, or culinary use, your upcycled lavender wall will offer beauty and relaxation all year long.


