Rosemary is one of the most beloved herbs in home cooking, known for its pine-like aroma and strong, earthy flavor. It’s a staple in roasted dishes, stews, and marinades, and adds beauty to any garden with its woody stems and needle-like leaves. Fortunately, propagating rosemary is both simple and rewarding. One of the easiest ways to root new rosemary plants is by using a plastic bottle—an accessible, low-cost method perfect for small spaces and beginner gardeners.
This propagation technique uses a recycled plastic bottle to create a moist, contained environment ideal for root development. Whether you want to expand your herb garden or share plants with others, this DIY method makes multiplying rosemary fast and efficient.
Why Propagate Rosemary from Cuttings?
Rosemary can be grown from seed, but the process is slow and germination can be inconsistent. Propagating rosemary from cuttings not only saves time but also guarantees that the new plants are clones of the parent, ensuring consistent flavor and growth patterns.
Rosemary has a semi-woody structure and thrives in warm, dry climates. When given the right conditions, its cuttings can root in just a few weeks. Propagating using a bottle setup is a great way to provide those ideal conditions without needing specialized tools or a greenhouse.
Materials You’ll Need
To begin rooting rosemary cuttings using a bottle, you’ll need the following:
-
Fresh rosemary cuttings (10–15 cm long)
-
A clean plastic bottle (1–2 liters)
-
Sharp scissors or pruning shears
-
Light potting mix or seed-starting soil
-
A pencil or stick (for poking holes in soil)
-
Spray bottle with water
-
Optional: rooting hormone powder
Make sure your cuttings come from a healthy rosemary plant. Avoid using overly woody or flowering stems—young, green, non-flowering stems root best.
How to Prepare the Cuttings
-
Select a stem: Choose a flexible green stem and cut a piece 10–15 cm long, just below a leaf node. This node is where roots are most likely to form.
-
Strip the leaves: Remove the leaves from the lower half of the cutting. This clears space for the cutting to be inserted into the soil and reduces water loss from transpiration.
-
Optional rooting hormone: Dip the base of each cutting in rooting hormone to encourage quicker root development. While not essential, it can help improve success rates.
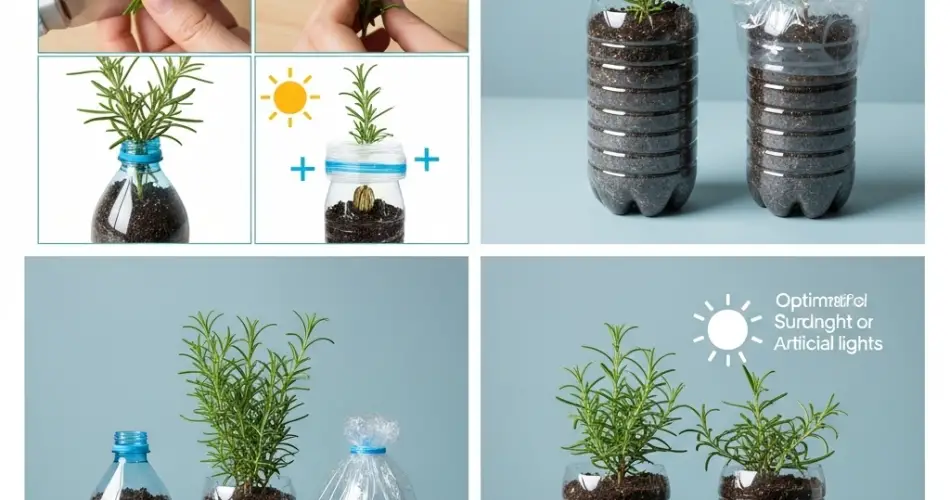
Creating the Bottle Propagation Setup
-
Cut the bottle: Slice the bottle in half horizontally. The bottom half will serve as your mini planter, while the top half becomes a humidity dome.
-
Prepare the soil: Fill the bottom half of the bottle with a well-draining potting mix. Rosemary prefers slightly sandy soil, so you can mix in a bit of coarse sand or perlite for better drainage.
-
Plant the cuttings: Use a pencil or stick to make a small hole in the soil. Insert the stripped end of the cutting 3–5 cm deep and gently press the soil around it to secure.
-
Water and mist: Lightly water the soil to moisten it. Avoid making it soggy. Then, mist the inside of the bottle and the cuttings to raise the humidity.
-
Add the dome: Place the top half of the bottle over the bottom to create a greenhouse effect. This dome helps trap moisture and keeps the environment humid, which is ideal for rooting rosemary.
Caring for the Cuttings
Place your bottle setup in a warm area with bright, indirect sunlight. Avoid direct sun, which can cause overheating inside the dome. A kitchen counter near a window or a shaded balcony works well.
Check moisture levels daily. Mist the soil and the inner bottle if it begins to dry out. You can remove the dome for an hour each day to improve airflow and prevent mold.
Rooting typically takes 3 to 4 weeks. You’ll know the process is working when new leaves begin to grow, or when gentle tugging meets resistance—indicating roots have formed.
Transplanting the Rooted Cuttings
Once roots are 5 cm or longer and the plant shows signs of new growth, it’s ready for transplanting. Carefully remove each cutting and plant it into a larger pot with well-draining soil, or directly into the garden if the climate is suitable.
Rosemary prefers full sun and dry conditions. Water sparingly and allow the soil to dry slightly between waterings. Avoid overwatering, which can cause root rot.
To encourage bushy growth, pinch off the tips of the new plant as it grows. Regular trimming keeps the rosemary compact and encourages more flavorful foliage.
Final Tips for Success
-
Use multiple cuttings at once to increase your success rate.
-
Label the bottle with the date to track rooting progress.
-
If using rainwater or distilled water, you’ll avoid mineral buildup from tap water.
-
Sanitize your tools and containers to prevent fungal or bacterial issues.
Conclusion
Rooting rosemary cuttings in a simple bottle setup is an easy and effective way to grow your herb garden. With just a few basic materials and a bit of patience, you can propagate healthy, fragrant rosemary plants from existing stems. This method is perfect for anyone looking to garden sustainably, reuse plastic, and enjoy the satisfaction of growing new plants from scratch.


