Recycling Plastic Bottles to Grow Herbs at Home Is Beautiful and Practical
Recycling isn’t just about reducing waste—it’s also a creative and sustainable way to enhance your living space. One of the most charming and practical ideas is using plastic bottles to grow herbs at home. This simple gardening method is not only eco-friendly, but also allows anyone—regardless of space or budget—to enjoy fresh herbs year-round.
From basil and mint to thyme and coriander, growing herbs in recycled plastic bottles is an easy project that can transform your kitchen, balcony, or windowsill into a mini herb garden. Here’s how to do it, why it works, and how you can make the most of your plastic bottle herb garden.
Why Use Recycled Plastic Bottles for Gardening?
Plastic bottles are everywhere—and unfortunately, they often end up in landfills or oceans. By reusing them creatively, we can turn potential waste into something both beautiful and functional.
Benefits of using plastic bottles to grow herbs:
-
Eco-Friendly: Reduces plastic waste and promotes recycling.
-
Low-Cost: No need to purchase expensive pots or planters.
-
Space-Saving: Ideal for small spaces like apartments or urban homes.
-
Customizable: Bottles can be cut, stacked, painted, or hung to suit any style or need.
-
Portable: Lightweight and easy to move as needed for sun exposure or decoration.
Best Herbs to Grow in Plastic Bottles
Most herbs are well-suited to container gardening, especially in the shallow space a plastic bottle provides.
Here are some popular choices:
-
Basil
-
Mint
-
Parsley
-
Thyme
-
Cilantro (Coriander)
-
Chives
-
Oregano
-
Rosemary (small varieties)
These herbs grow well with limited root space and thrive with regular watering and sunlight.
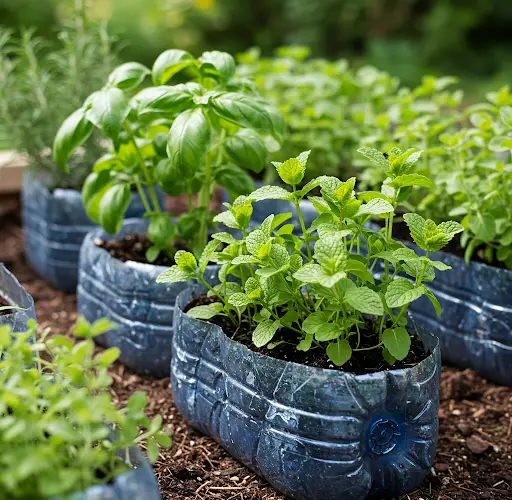
How to Make a Plastic Bottle Herb Planter
You don’t need any special tools or materials—just a bit of creativity and some basic supplies.
What You’ll Need:
-
Clear plastic bottles (1-liter or 2-liter sizes work best)
-
Scissors or a utility knife
-
Potting soil or compost
-
Herb seeds or seedlings
-
Small stones or gravel (for drainage)
-
String or wire (optional, for hanging)
-
A marker or paint (optional, for labeling or decorating)
Step-by-Step Instructions:
1. Clean the Bottles
Rinse thoroughly to remove any residue or labels.
2. Cut Openings for Planting
Depending on your design, you can:
-
Cut the bottle in half horizontally to make a small pot.
-
Cut a rectangular window into the side to create a horizontal planter.
-
Use the top half inverted into the bottom for a self-watering container.
Make sure to poke drainage holes in the bottom to prevent waterlogging.
3. Add Drainage Layer
Place a few small stones or gravel at the bottom of the bottle to help water drain properly.
4. Fill with Soil
Use good-quality potting soil or compost, filling the bottle about three-quarters full.
5. Plant the Seeds or Seedlings
Follow the spacing and depth instructions on the seed packet. For seedlings, gently place them into the soil and firm the soil around the roots.
6. Water Gently
Moisten the soil with a spray bottle or watering can. Keep the soil damp but not soggy.
7. Place in Sunlight
Most herbs need 4–6 hours of direct sunlight per day. A sunny windowsill or balcony is perfect.
8. Label Your Herbs (Optional)
You can use paint or waterproof markers to label each bottle, especially if you’re growing multiple types.
Vertical Herb Gardens from Bottles
If you’re tight on space, consider building a vertical herb garden:
-
Stack bottles horizontally with openings cut on the side.
-
Attach bottles to a wooden frame, wall, or fence using nails, zip ties, or wire.
-
Leave enough room between levels so each herb receives light and space to grow.
This not only saves space but also makes for a visually stunning green wall.
Caring for Your Herbs
Once planted, herbs are relatively low-maintenance.
Watering
-
Check the soil regularly. Water when the top inch feels dry.
-
Avoid overwatering—this is a common mistake in small containers.
Harvesting
-
Begin harvesting once your herbs have at least 4–6 inches of growth.
-
Snip the top leaves first to encourage bushier growth.
-
Don’t remove more than one-third of the plant at a time.
Feeding
-
Fertilize every 3–4 weeks with a diluted liquid organic fertilizer.
-
If using compost-rich soil, fertilizing may not be necessary.
Decorative Ideas
You can easily turn your bottle garden into a piece of home décor:
-
Paint or decorate bottles to match your interior.
-
Hang them in front of windows or along balcony railings.
-
Use colored bottles or wrap them in jute or fabric for a rustic look.
The combination of greenery and upcycled design adds charm to any space, turning your herb garden into both a culinary and visual delight.
Final Thoughts
Recycling plastic bottles to grow herbs at home is not just a smart and eco-conscious choice—it’s also a beautiful way to bring life into your home. Whether you’re new to gardening or just looking for a sustainable DIY project, this method offers a rewarding experience.
With minimal investment and a little care, you’ll soon be harvesting fresh, fragrant herbs right from your window—proving that sustainability can be simple, stylish, and delicious.

