Recycling Plastic Bottles into Hanging Garden Planter Pots
In recent years, creative and sustainable gardening solutions have gained popularity as people look for ways to recycle everyday household waste. One of the best ways to contribute to environmental conservation while adding greenery to your home is by repurposing plastic bottles into hanging garden planter pots. This method not only reduces plastic waste but also creates an innovative and space-saving gardening system that is perfect for small homes, balconies, and urban spaces. In this guide, we will walk you through the step-by-step process of converting plastic bottles into hanging garden planter pots.
Benefits of Using Plastic Bottles for Hanging Planters
- Eco-Friendly Solution – Reusing plastic bottles helps reduce landfill waste and environmental pollution.
- Cost-Effective – Instead of purchasing expensive pots, you can create your own planters using items you already have at home.
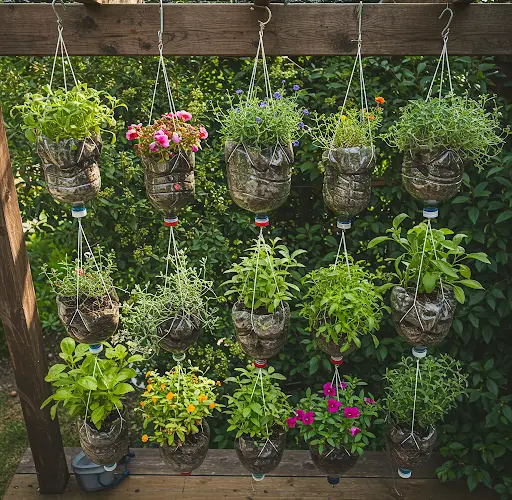
- Space-Saving – Hanging planters are ideal for vertical gardening, maximizing limited space.
- Customizable – You can decorate and design the bottles to match your home’s aesthetic.
- Efficient Drainage – With the right modifications, plastic bottle planters ensure proper water drainage, preventing root rot.
Materials Needed
- Empty plastic bottles (1- or 2-liter size works best)
- Scissors or a utility knife
- A nail or heated needle (for making drainage holes)
- Twine, wire, or strong string for hanging
- Potting soil
- Small plants, herbs, or flowers of your choice
- Paint or decorative tape (optional for customization)
- A drill (optional, for creating holes more easily)
Step-by-Step Guide to Creating Hanging Planter Pots
Step 1: Preparing the Plastic Bottles
Start by thoroughly cleaning your plastic bottles to remove any residue or labels. You can soak them in warm, soapy water for easier label removal. Once dry, decide whether you want to cut the bottle horizontally or vertically based on your desired planting style.
Step 2: Cutting the Bottles
- Horizontal Planter: Cut a rectangular opening on one side of the bottle, leaving enough space at the edges to hold the soil.
- Vertical Planter: Cut off the top portion of the bottle and use the remaining bottom part as a planting container.
Ensure that the edges are smooth to prevent injuries while handling.
Step 3: Creating Drainage Holes
Using a nail, heated needle, or drill, poke a few holes in the bottom of the bottle to allow excess water to drain. Proper drainage prevents overwatering and root rot.
Step 4: Adding Hanging Support
For horizontal planters, make two small holes on each side near the top edge of the bottle. For vertical planters, make holes near the bottle’s rim. Thread twine, wire, or string through the holes and securely tie them to create a hanging loop.
Step 5: Filling with Soil and Planting
- Add a layer of small pebbles at the bottom for additional drainage.
- Fill the bottle with high-quality potting soil, leaving some space at the top.
- Gently place your chosen plant or seeds into the soil and press lightly to secure them.
- Water the soil until it is moist but not overly saturated.
Step 6: Decorating (Optional)
To enhance the appearance of your hanging planter, you can paint the bottle, wrap it with decorative tape, or attach stickers. This adds a personal touch and makes your recycled planters more visually appealing.
Step 7: Hanging Your Planters
Choose a suitable location to hang your planters. Ideal spots include balconies, fences, kitchen windows, patios, or even an indoor wall that receives adequate sunlight. Use hooks or nails to secure your planters in place.
Best Plants for Hanging Bottle Planters
- Herbs: Basil, mint, thyme, cilantro
- Flowers: Petunias, marigolds, pansies
- Small vegetables: Cherry tomatoes, chili peppers, lettuce
- Succulents: Aloe vera, jade plants, sedum
Maintenance Tips
- Watering – Check the soil moisture regularly and water as needed. Hanging planters dry out faster than ground plants.
- Sunlight Exposure – Position the planters where they receive adequate sunlight according to the plant’s needs.
- Fertilizing – Use organic fertilizer every few weeks to ensure healthy plant growth.
- Pruning – Trim dead leaves and flowers to promote new growth.
- Pest Control – Keep an eye out for pests and treat them with natural solutions if necessary.
Conclusion
Recycling plastic bottles into hanging garden planter pots is a sustainable, cost-effective, and creative way to grow plants at home. Whether you have a small balcony or an indoor gardening space, this method allows you to cultivate herbs, flowers, and vegetables in a stylish and eco-friendly manner. By following these simple steps, you can turn waste into a functional garden while making a positive impact on the environment. Start your DIY hanging garden project today and enjoy the beauty of homegrown greenery!


