Indoor orchids are a joy for all, even those without a green thumb, as they require minimal care. By following a few tricks and essential rules, you can enjoy year-round blooms effortlessly. Proper placement, correct watering, and natural fertilizers are key to ensuring your orchids thrive.
If you’re dealing with a rootless orchid, don’t despair! We have the solution used by expert nursery growers, and you can replicate it easily. Here, we present a step-by-step method to rejuvenate your rootless orchid and witness its stunning resurgence.
Rejuvenating a Rootless Orchid: Simple Steps
Reviving a rootless orchid is a straightforward process, manageable even for beginners. If you have a rootless plant, follow these steps carefully, and your orchid will thank you for its renewed vitality.
- Assess the Roots: Examine the plant’s roots and remove any completely black, dried roots. Healthy roots have a greenish tinge with a touch of gray. Remove any roots that don’t match this description, leaving only the base of the plant.
- Thorough Cleaning: Use scissors to clean the plant’s base diligently. Ensuring a clean and healthy base is essential for successful revival.
- Harness the Power of Garlic: Garlic has potent antibacterial properties, acting as a natural antiseptic. Crush a garlic clove in a bowl and add half a liter of water. Strain the water to remove any residue, creating a garlic-infused solution.
- Apply Garlic Water: Soak a cotton pad in the garlic-infused water and gently wipe it across all the plant’s leaves. This garlic treatment will promote a conducive environment for the orchid’s revival.
- Create a Nurturing Environment: Take a glass and insert the plant’s stem into the bottom. Pour the garlic water until it covers the stem. Add terracotta seeds into the remaining water in the glass and place a soft, highly absorbent cloth (like gauze) on top of them.
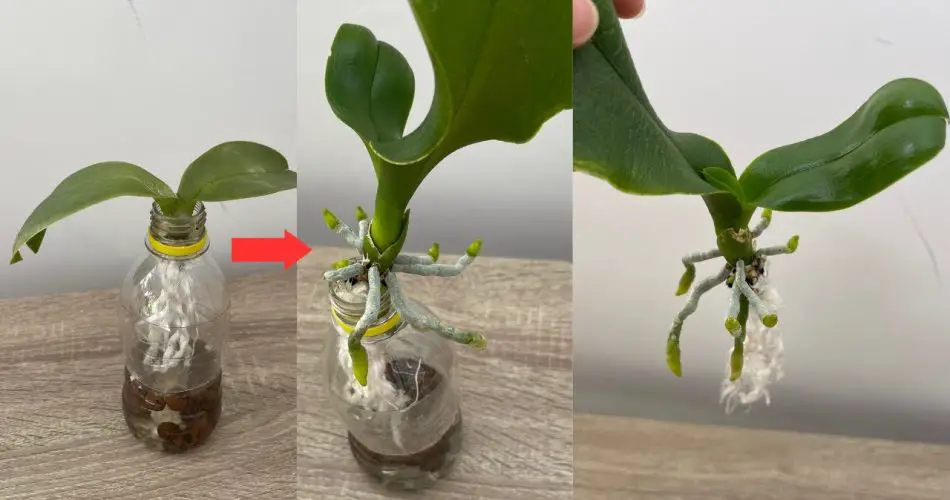
- The Bottle Technique: Take a bottle and cut it, retaining the neck and bottom. Approximately 5 centimeters for the neck and 10 centimeters for the bottom will suffice. Squeeze the cloth and wrap it around the orchid stem, then insert it into the bottle neck from the narrow end.
- Maintain Moisture: Add clean water to the bottom of the bottle, and the cloth will absorb the water, keeping the base of the plant consistently moist. Store this bottle in a cool place for around 2 weeks, misting the leaves every 2 days. Replace the water when necessary.
- Observe Growth: After about 2 months, you’ll notice results as the roots grow. When the roots reach approximately 6 to 7 centimeters, it’s time for transplantation.
By following these steps, you’ll witness your rootless orchid coming back to life, thriving with lush blooms. Reviving an orchid is a gratifying experience, and with a little care and patience, your plant will flourish once more. Share this inspiration with your friends!


