Chives are one of the easiest and most rewarding herbs to grow. With their mild onion flavor, they’re perfect for sprinkling over baked potatoes, mixing into salads, or adding a fresh garnish to soups. If you have limited space or simply want a creative and eco-friendly way to garden, a vertical chive garden made from recycled plastic bottles is an excellent option.
This project not only gives you fresh herbs at your fingertips but also reduces plastic waste by transforming bottles into functional planters. Even a small wall or balcony can become a productive herb garden with the right setup.
Why Choose a Vertical Chive Garden?
Chives thrive in containers, making them a great match for vertical gardening. A bottle wall setup offers:
-
Space-Saving – Grow herbs even in the smallest of apartments.
-
Sustainability – Reuse plastic bottles that would otherwise end up in the trash.
-
Ease of Care – Easy to water, prune, and harvest without bending over.
-
Aesthetic Appeal – Create a green wall that’s as beautiful as it is useful.
Choosing the Right Location
Chives prefer full sun but can tolerate partial shade. Ideally, choose a spot where your garden will get 6–8 hours of sunlight per day. A south-facing wall, balcony railing, or even a sunny kitchen wall works well.
Good airflow is important to prevent disease, and having the bottles positioned for easy watering will make maintenance simpler.
Preparing the Bottles
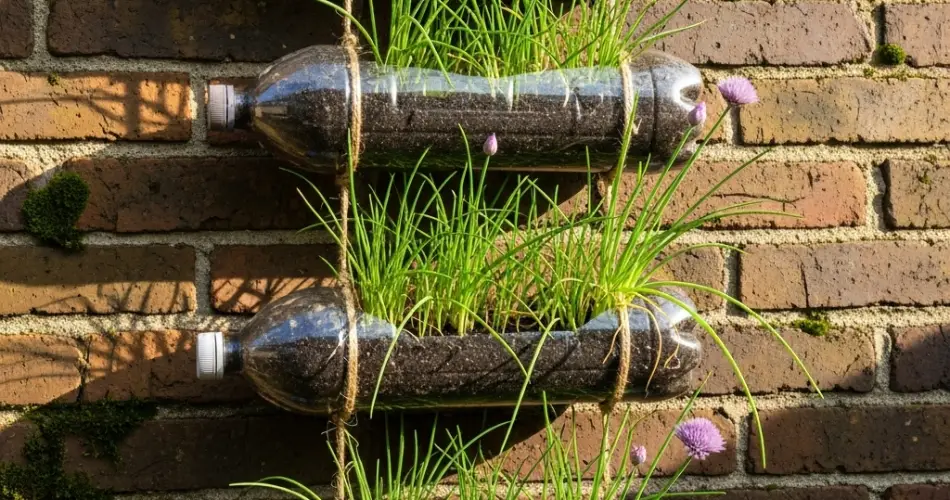
You’ll need sturdy 1.5- or 2-liter plastic bottles. Transparent bottles are fine, but consider painting them or covering them with fabric to protect the roots from direct sunlight and to give a more uniform appearance.
Step-by-step bottle preparation:
-
Clean the Bottles – Wash thoroughly to remove any labels and residues.
-
Cut Openings – Lay the bottle on its side and cut a rectangular hole in the upper curve for planting.
-
Drainage Holes – Puncture 3–4 small holes in the bottom to allow excess water to escape.
-
Mounting System – Attach bottles to a wooden frame, fence, or wall using screws, nails, or strong cable ties. Arrange them in rows or a staggered pattern so plants receive adequate light.
Soil and Planting
Chives prefer rich, well-draining soil. A good mix includes:
-
2 parts potting soil
-
1 part compost
-
1 part perlite or coarse sand
You can grow chives from seed, seedlings, or divisions from an existing plant:
-
Seeds – Sow about 1 cm deep and keep the soil moist until germination, which usually takes 10–14 days.
-
Seedlings – Gently transplant from nursery pots into the bottles.
-
Divisions – Split an established clump of chives and replant in your vertical garden for a faster harvest.
Plant only one clump per bottle to avoid overcrowding.
Watering and Fertilizing
Chives like consistently moist soil, but not soggy conditions. Water when the top layer feels dry, ensuring that excess drains away. Because vertical gardens tend to dry out faster, check moisture levels more often, especially in warm weather.
Feed every 4–6 weeks with a balanced organic fertilizer or diluted compost tea. Avoid over-fertilizing, as too much nitrogen can lead to lush leaves with a weaker flavor.
Pruning and Maintenance
To encourage healthy growth, snip chive leaves regularly. Use sharp scissors and cut leaves about 2–3 cm above the base. This encourages the plant to produce new shoots.
Remove any yellow or wilted leaves promptly, and watch for pests like aphids, which can be rinsed off with a gentle spray of water.
Preventing Problems
Good airflow in a vertical arrangement helps prevent fungal diseases like powdery mildew. Water at the base rather than overhead to keep leaves dry.
If plants start to look crowded after a year or two, divide the clumps and replant them to maintain vigor.
Harvesting Chives
Once your plants are established, you can harvest them throughout the growing season. Regular cutting keeps the plants productive and prevents them from flowering too early.
If you want chive flowers—which are edible and have a mild onion flavor—allow some plants to bloom. The blossoms make a beautiful garnish and can be infused into vinegar for a delicate onion taste.
Advantages of Upcycled Bottle Chive Gardens
-
Fresh herbs just steps away from your kitchen.
-
Eco-friendly reuse of common household waste.
-
Minimal cost compared to buying planters.
-
Attractive vertical greenery that improves your space’s aesthetics.
Final Thoughts
A vertical chive garden using recycled bottles is an easy and satisfying project for any herb lover. With simple materials, a sunny wall, and a little care, you’ll have a thriving, aromatic herb supply year-round.
Not only will you enjoy the taste of fresh chives in your cooking, but you’ll also take pride in knowing you’ve created a sustainable gardening solution that works in even the smallest spaces.


