Thyme is a hardy, low-growing herb that adds a delightful aroma and flavor to many dishes. Whether you’re growing it for culinary purposes, ground cover, or pollinator support, expanding your thyme collection is both simple and rewarding. One of the most efficient ways to do this is by taking cuttings from an existing healthy plant. Propagating thyme through cuttings not only saves money but also ensures you get a clone of a plant you already know and love. Here’s a step-by-step guide to successfully propagate thyme using cuttings.
Why Choose Cuttings Over Seeds?
While thyme can be grown from seeds, it’s often a slow and inconsistent process. Germination can take a few weeks, and the resulting plants may vary in flavor and appearance. Cuttings, on the other hand, produce genetically identical plants, grow faster, and are more reliable for propagation.
When to Take Thyme Cuttings
The best time to take thyme cuttings is during the plant’s active growing season—usually in late spring to early summer. At this point, the stems are flexible but mature enough to root well. Avoid taking cuttings during flowering or dormancy, as energy is not focused on vegetative growth at those times.
What You’ll Need
To propagate thyme cuttings successfully, gather the following tools and materials:
-
A sharp, clean pair of scissors or pruning shears
-
A healthy, mature thyme plant
-
A small pot or tray
-
Well-draining potting mix (or a mix of perlite and peat moss)
-
Rooting hormone (optional but helpful)
-
Clear plastic bag or humidity dome (for moisture retention)
-
Spray bottle or watering can with fine nozzle
Step-by-Step Guide to Propagating Thyme Cuttings
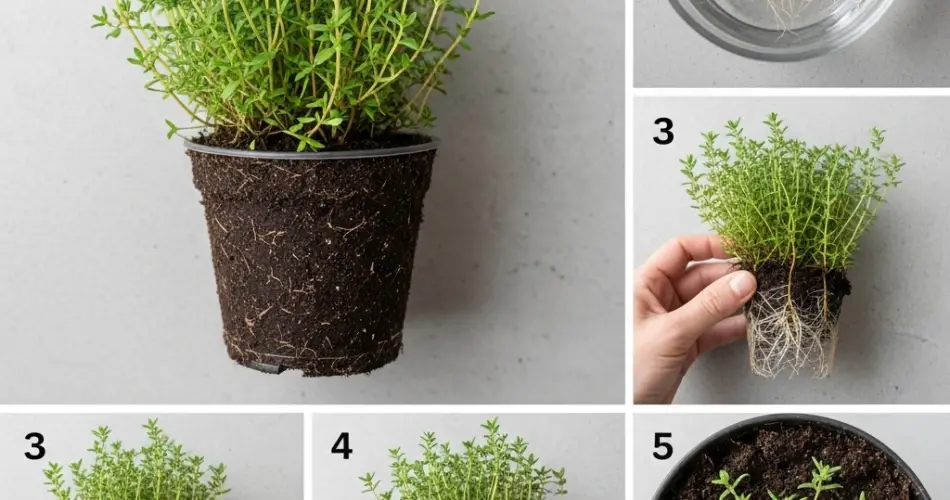
1. Select a Healthy Stem
Look for a non-flowering stem on the parent plant that is green and healthy. Choose one that is about 4–6 inches long and has several leaf nodes. Avoid woody or dried-out stems, as they are less likely to root successfully.
2. Make a Clean Cut
Using sanitized shears or scissors, cut the stem just below a leaf node (the point where leaves grow from the stem). A clean cut promotes faster healing and reduces the risk of disease.
3. Strip the Lower Leaves
Remove the leaves from the bottom half of the cutting. These nodes will be buried in the soil and are the points from which roots will emerge. Be gentle to avoid damaging the stem.
4. Apply Rooting Hormone (Optional)
Dip the cut end of the stem into a rooting hormone powder or gel. While thyme can root without it, rooting hormone increases your success rate, especially in cooler or less humid conditions.
5. Plant the Cutting
Insert the cutting into a small pot filled with a moist, well-draining propagation mix. A good blend might be half peat moss and half perlite or sand. Firm the soil around the cutting to keep it stable.
6. Maintain Humidity
To prevent the cutting from drying out, cover the pot with a clear plastic bag or humidity dome. This creates a mini greenhouse effect that retains moisture. Ensure the cover doesn’t touch the leaves by using stakes or a wire frame if needed.
7. Provide Light and Warmth
Place the pot in a bright location with indirect sunlight. Avoid direct sun, which can overheat the cutting. The ideal temperature range is 65–75°F (18–24°C). Too much cold can slow or stop rooting entirely.
8. Keep the Soil Moist
Use a spray bottle or gentle watering method to keep the soil consistently moist, but not soggy. Overwatering can lead to stem rot. Check the moisture level daily, especially if the air in your home is dry.
How Long Does It Take to Root?
Thyme cuttings generally begin forming roots within 2 to 4 weeks, depending on temperature, humidity, and stem condition. You can test root development by gently tugging the cutting—if you feel resistance, roots have likely formed.
Transplanting Rooted Cuttings
Once the roots are about an inch long and the plant shows new leaf growth, it’s ready to move to a larger pot or garden bed.
-
Acclimate gradually if moving outdoors. Introduce the young plant to outdoor conditions over a few days.
-
Transplant to well-draining soil in a sunny location. Thyme loves full sun and doesn’t tolerate soggy roots.
-
Water deeply once after transplanting, then reduce frequency. Allow the top inch of soil to dry between waterings.
Care Tips After Propagation
-
Avoid fertilizing right away—too much nitrogen can lead to leggy growth.
-
Prune lightly once the plant is established to encourage bushier growth.
-
Harvest sparingly at first, giving the plant time to develop a strong root system.
Conclusion
Propagating thyme from cuttings is a simple and effective way to expand your herb garden. With minimal tools and some patience, you can create multiple new thyme plants that are exact copies of your favorite variety. This method saves time compared to seed-starting and allows you to enjoy fragrant, flavorful thyme much sooner. Whether you’re growing it in pots, raised beds, or as part of a border garden, thyme is a valuable herb worth multiplying.


