How to Propagate Sweet Potatoes in Water for Maximum Roots and Tubers
Sweet potatoes are a nutritious and versatile crop that can be easily propagated in water before transplanting into soil. This method ensures strong root development and a higher yield of tubers. If you want to grow sweet potatoes successfully and maximize their production, follow this step-by-step guide to propagating sweet potatoes in water.
Why Propagate Sweet Potatoes in Water?
Growing sweet potatoes in water before planting in soil offers several benefits:
- Faster Root Development: Water propagation encourages a strong root system before transplanting.
- Higher Yield: A well-rooted plant is more likely to produce abundant tubers.
- Early Start: You can begin propagation indoors before the growing season starts.
- Pest-Free Growth: Growing in water initially prevents soil-borne diseases and pests.
- Easy Observation: You can monitor root development and health before planting.
Selecting the Best Sweet Potatoes for Propagation
Not all sweet potatoes sprout equally. Choose the right ones to ensure successful propagation:
- Select organic or untreated sweet potatoes, as some store-bought ones are treated with sprout inhibitors.
- Look for medium to large sweet potatoes with smooth, unblemished skin.
- Choose varieties suited to your climate, such as Beauregard, Jewel, or Okinawan sweet potatoes.
Step-by-Step Guide to Propagating Sweet Potatoes in Water
1. Prepare the Sweet Potato for Sprouting
- Wash the sweet potato thoroughly to remove any dirt or residues.
- Cut the sweet potato in half or keep it whole, depending on the container size.
- If using half, ensure you are using the bottom portion, where most roots will emerge.
2. Select the Right Container
- Use a clear glass jar or a plastic container that allows for root visibility.
- The container should be large enough to hold the sweet potato with enough space for roots to grow.
3. Insert the Sweet Potato in Water
- Place toothpicks around the middle of the sweet potato to suspend it in the jar.
- Position it so that the bottom half is submerged in water while the top remains above.
- Ensure at least one-third of the sweet potato is in water to encourage rooting.
4. Choose the Right Environment
- Place the jar in a warm, sunny location (preferably near a window with indirect sunlight).
- Maintain a temperature of 70-80°F (21-27°C) for optimal sprouting.
- Avoid direct exposure to harsh sunlight, which can dry out the potato.
5. Change the Water Regularly
- Replace the water every 2-3 days to prevent bacterial growth.
- Use room-temperature water to avoid shocking the roots.
- Ensure the water level remains consistent to keep the bottom submerged.
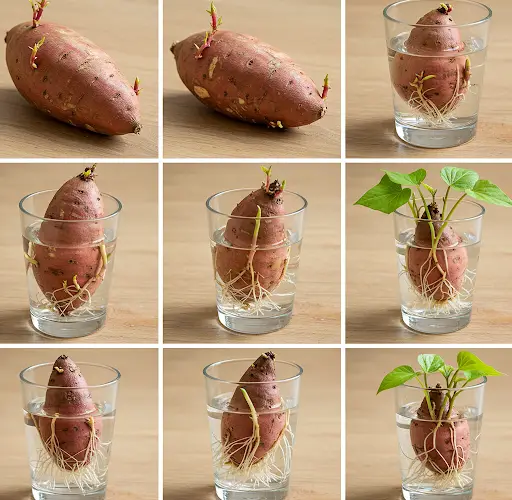
6. Wait for Sprouts and Roots to Develop
- After 1-2 weeks, roots will start growing from the submerged section.
- Slips (vine-like sprouts) will begin appearing from the upper part in 2-4 weeks.
- Let the slips grow 4-6 inches before separating them.
Separating and Planting Sweet Potato Slips
Once your sweet potato has produced healthy slips, it’s time to separate and plant them for tuber production.
1. Removing the Slips
- Gently twist or cut the slips from the sweet potato base.
- Ensure each slip has a few strong roots attached.
- If a slip has no roots, place it in water separately to encourage root growth.
2. Preparing the Slips for Soil Transplanting
- Keep slips in a shallow container with water for another 3-5 days to develop more roots.
- Once roots are about 2 inches long, they are ready for planting in soil.
Planting the Slips in Soil for Maximum Tubers
1. Selecting the Best Planting Location
- Choose a well-draining, loose, sandy loam soil for planting.
- Ensure full sun exposure for at least 6-8 hours daily.
- Avoid planting in areas prone to waterlogging.
2. Preparing the Soil
- Mix in compost or organic matter to enrich the soil.
- Avoid nitrogen-rich fertilizers, as they encourage foliage growth over tuber production.
3. Planting the Slips
- Dig holes 4-6 inches deep and 12 inches apart in rows.
- Plant each slip deeply, covering the roots and part of the stem.
- Water immediately after planting to settle the soil.
4. Caring for the Plants
- Water consistently, especially in the first few weeks to establish roots.
- Use mulch to retain moisture and suppress weeds.
- Train vines outward to prevent overcrowding and improve air circulation.
Tips for Maximizing Root and Tuber Production
1. Control Watering
- Provide deep watering once a week rather than frequent shallow watering.
- Reduce watering slightly after 90 days to encourage tuber formation.
2. Provide Proper Nutrients
- Use potassium-rich fertilizers (like wood ash or bone meal) to enhance tuber development.
- Avoid high nitrogen fertilizers that lead to excessive vine growth.
3. Monitor for Pests and Diseases
- Keep an eye out for aphids, sweet potato weevils, and fungal diseases.
- Rotate crops each season to prevent disease buildup in the soil.
4. Harvesting Sweet Potatoes
- Sweet potatoes are ready to harvest in 90-120 days after planting.
- Gently dig up tubers without damaging them.
- Cure sweet potatoes by storing them in a warm, humid place for 10-14 days to enhance sweetness.
Final Thoughts
Propagating sweet potatoes in water is an effective way to ensure strong roots and a bountiful harvest. By following these simple steps, you can grow healthy sweet potatoes with maximum tubers in your garden. Whether you’re a beginner or an experienced gardener, this method guarantees a productive and rewarding growing season. Happy gardening!


