Creating your own potting mix is not only a cost-effective solution for gardeners, but it also allows you to control the quality and ingredients of the soil you use for your plants. Whether you’re growing flowers, vegetables, or houseplants, a good potting mix is essential for healthy root growth and strong plant development. While store-bought potting mixes can be expensive, making your own is easy, inexpensive, and gives you the flexibility to customize the blend to suit your specific plants. In this guide, we’ll show you how to make your own potting mix in just a few simple steps.
Why Make Your Own Potting Mix?
Buying pre-mixed potting soil from garden centers can be convenient, but it often comes with a hefty price tag. Commercial potting mixes can also contain additives that may not suit your gardening needs, such as unnecessary fertilizers or chemicals. By making your own mix, you can avoid these concerns and ensure that you’re using only natural, organic ingredients.
Another benefit of creating your own potting mix is the ability to adjust the components based on the plants you’re growing. For example, cactus and succulent mixes require more sand and less organic matter, while mixes for tropical plants need more moisture retention and aeration.
Making your own mix can also help reduce waste. Instead of buying pre-packaged bags of soil, you can reuse materials you already have, such as compost, which not only saves money but also promotes a more sustainable gardening practice.
What You’ll Need to Make Your Own Potting Mix
To make your own potting mix, you’ll need three key ingredients: a base material, a drainage material, and an organic matter. The proportions of these ingredients can be adjusted based on the specific needs of your plants. Here are the essential ingredients to get started:
-
Base Material: This serves as the foundation for the mix. It provides structure and aeration, allowing roots to grow and access oxygen.
-
Peat Moss: Peat moss is a popular base material that helps retain moisture while ensuring good drainage. It’s acidic and perfect for acid-loving plants like azaleas and blueberries.
-
Coconut Coir: Coconut coir is a more sustainable alternative to peat moss. It retains moisture similarly to peat moss but is less acidic and more environmentally friendly.
-
-
Drainage Material: This is crucial for creating a potting mix that doesn’t become waterlogged. Proper drainage ensures that water doesn’t sit around the roots, which can lead to rot.
-
Perlite: Perlite is a lightweight volcanic mineral that helps increase aeration and drainage in potting mixes. It’s commonly used in many potting soil recipes and is ideal for plants that require well-draining soil.
-
Vermiculite: Vermiculite is another mineral that improves moisture retention and drainage. It helps the mix hold onto water and nutrients, making it great for plants that need more consistent moisture, such as ferns and begonias.
-
-
Organic Matter: This ingredient provides nutrients for plant growth and helps with moisture retention. Organic matter also promotes beneficial microorganisms in the soil.
-
Compost: Compost is one of the best sources of organic matter and essential nutrients for your plants. It also improves soil structure and encourages healthy root growth.
-
Worm Castings: Worm castings are rich in nutrients and can be added to potting mix to boost the nutrient content. They’re especially beneficial for young plants and seedlings.
-
-
Optional Additives: Depending on your plant’s specific needs, you might consider adding a few additional ingredients to your mix:
-
Lime: If you’re using peat moss and want to neutralize the acidity, add a small amount of lime.
-
Sand: For plants like succulents and cacti, sand helps improve drainage and prevents the mix from becoming too dense.
-
Basic Potting Mix Recipe
Now that you have your ingredients, you can create a basic potting mix. Here’s a simple recipe that you can customize based on your needs:
-
2 parts base material (peat moss or coconut coir)
-
1 part drainage material (perlite or vermiculite)
-
1 part organic matter (compost or worm castings)
For example, if you’re making a large batch, you could mix 2 cups of peat moss, 1 cup of perlite, and 1 cup of compost. This formula can be scaled up or down depending on how much potting mix you need.
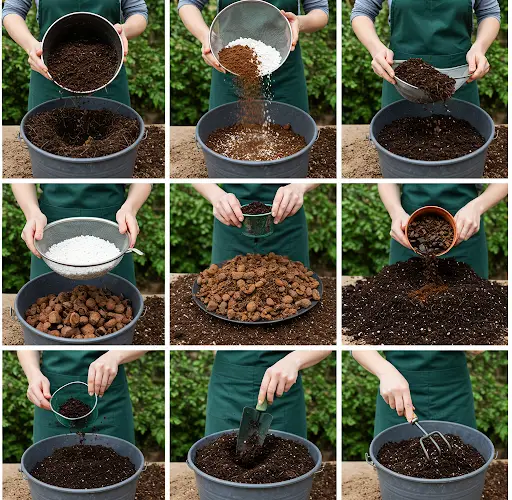
How to Mix Your Own Potting Mix
-
Prepare Your Workspace: Lay down a tarp or large plastic sheet to mix the ingredients. This will help contain any mess and make it easier to mix everything evenly.
-
Measure Your Ingredients: Use a measuring cup or container to measure the ingredients based on the proportions above. You can use a wheelbarrow or large container for mixing larger batches.
-
Mix the Ingredients: Start by adding your base material (peat moss or coconut coir) to your mixing area. Then, add the drainage material (perlite or vermiculite) and the organic matter (compost or worm castings). Use a shovel or your hands to mix everything thoroughly. Be sure to break up any clumps of peat moss or coconut coir.
-
Adjust the Mix: If the mix feels too dry, add a bit of water to moisten it. If the mix is too dense, add more perlite or vermiculite for better aeration.
-
Store Your Mix: Once your potting mix is ready, store it in a large plastic bag or container. It’s best to use the mix within a few weeks to ensure freshness. If you’re storing it for a longer period, make sure it’s kept in a cool, dry place.
Tips for Customizing Your Potting Mix
-
For Succulents and Cacti: Add extra sand or perlite to increase drainage and prevent water retention. A mix of 2 parts coir, 1 part perlite, and 1 part sand works well.
-
For Seedlings: Use a finer mix with more compost to provide the nutrients seedlings need for healthy growth.
-
For Orchids: Add bark chips or perlite to your mix for better aeration and drainage.
Final Thoughts
Making your own potting mix is an easy and cost-effective way to provide your plants with the best soil for healthy growth. With just a few basic ingredients, you can create a custom blend that meets the needs of your specific plants, whether they’re houseplants, vegetables, or flowers. Not only will you save money, but you’ll also have the satisfaction of knowing exactly what’s going into the soil that’s supporting your plants.


