Watering plants efficiently is key to a successful garden, but traditional methods can waste water and take up a lot of time. A simple solution is to create a homemade drip irrigation system. With just a few inexpensive materials and a little time, you can build a system that keeps your plants healthy and hydrated with minimal effort.
This guide will show you how to set up a fast, easy, and low-cost drip irrigation system for your garden using basic items that are often already available at home.
materials you will need
-
Clean plastic bottles (1-liter or 2-liter sizes work best)
-
A sharp knife or scissors
-
A small nail, needle, or pin
-
A lighter or candle (optional, for heating the nail)
-
String, wire, or small stakes (optional)
-
Mulch (optional, to improve moisture retention)
These simple materials allow you to create a reliable irrigation system without needing to buy expensive equipment.
step 1: clean and prepare the bottles
Begin by cleaning the plastic bottles thoroughly. Remove any labels and wash out any residues to avoid introducing unwanted chemicals into your soil.
Choose bottle sizes based on your plants’ needs:
-
2-liter bottles are great for larger plants like tomatoes, peppers, or small fruit trees.
-
1-liter bottles work well for herbs, leafy greens, and smaller vegetable plants.
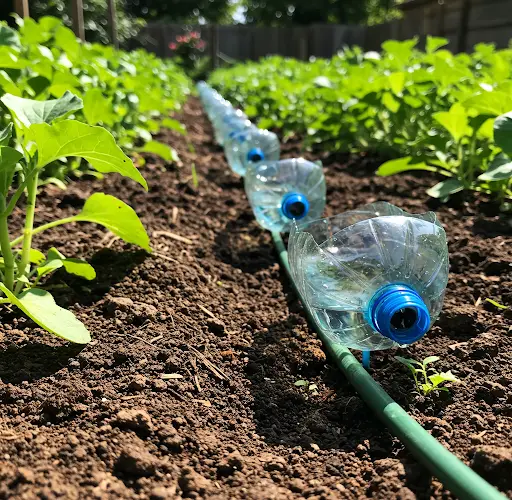
step 2: create the drip holes
Use a small nail, pin, or needle to puncture the bottles. Heating the nail slightly with a lighter or candle can make it easier to create clean holes.
There are two popular options:
-
Cap method: poke 2 to 5 small holes in the bottle cap. Water will drip out as the bottle is placed upside down near the plant’s roots.
-
Side method: poke small holes near the base of the bottle if you plan to stand the bottle upright in the soil.
The size and number of holes will affect the water flow rate. For slow, steady watering, make smaller holes and fewer of them. It’s a good idea to test a bottle first by filling it with water and observing how fast it empties.
step 3: install the drip bottles
Decide how you want to install the bottles:
-
Upside-down installation: bury the bottle neck-down in the soil close to the plant. Leave the bottom of the bottle exposed for easy refilling.
-
Standing upright installation: bury the bottle about one-third deep with the holes below the soil surface.
Both methods ensure that water drips slowly and reaches the plant roots directly. Position the bottle about 10 to 15 centimeters (4 to 6 inches) from the base of the plant for best results.
If needed, secure the bottles with small stakes or wire to prevent them from tipping over.
step 4: test and adjust
Fill the bottles with water and observe the drip rate:
-
If the water drains too quickly, create fewer or smaller holes next time.
-
If the drip is too slow, carefully enlarge the holes.
The goal is to have a consistent, slow drip that maintains soil moisture over several hours or even days, depending on the size of the bottle and the weather conditions.
For larger garden beds or rows of plants, install multiple bottles spaced evenly to ensure good water coverage.
step 5: optional improvements
To make your homemade drip irrigation even more efficient, consider these enhancements:
-
Use mulch around the plant and the bottle to help retain soil moisture and reduce evaporation.
-
Shade the bottles if possible, to prevent algae growth inside and to keep the water cooler.
-
Rainwater collection: refill your bottles with rainwater for a more eco-friendly watering system.
step 6: maintenance
Although low maintenance, a few simple checks will keep your system working well:
-
Refill the bottles as needed, usually every few days.
-
Clean the bottles and holes if they become clogged with soil or algae.
-
Replace bottles when they become brittle or damaged.
By maintaining the system, you ensure a constant and reliable water source for your plants throughout the growing season.
benefits of homemade drip irrigation
-
Water conservation: water is delivered directly to the roots, minimizing waste.
-
Cost savings: uses recycled materials and requires no special equipment.
-
Time savings: reduces the need for daily hand-watering.
-
Healthier plants: consistent watering prevents plant stress and promotes better growth.
-
Eco-friendly: reuses plastic bottles that would otherwise go to waste.
This simple system is especially ideal for vegetable gardens, raised beds, container gardens, and even indoor plants.
final tips
-
Adjust the number of bottles based on the plant density and water needs.
-
Check the soil moisture occasionally to make sure the plants are getting enough water.
-
During very hot periods, you might need to refill the bottles more often.
-
Combine this drip system with other sustainable gardening practices for the best results.
Creating a homemade drip irrigation system is one of the easiest and most affordable ways to improve your garden’s health while saving time, money, and resources. With just a few materials and a little setup time, you can enjoy a greener, more efficient garden.


