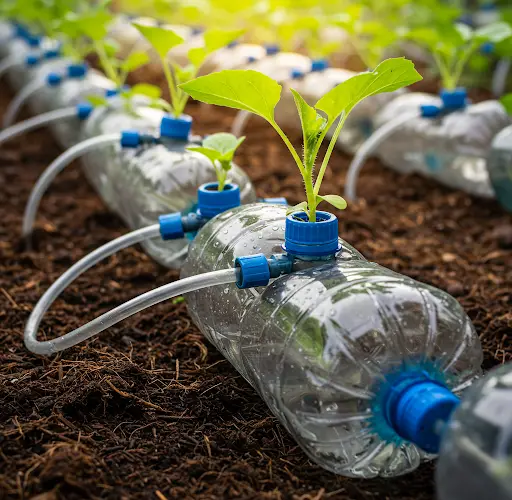
Watering your garden efficiently is key to ensuring healthy plant growth, but traditional watering methods can often lead to water waste. Drip irrigation, however, is a fantastic solution, delivering water directly to the roots of plants where it’s needed most. The good news is, you don’t need an expensive, professional drip irrigation system to reap the benefits of this watering method. You can create a very simple, fast, and economical drip irrigation system using nothing more than recycled plastic bottles. This DIY project is not only cost-effective but also environmentally friendly, as it repurposes plastic bottles that would otherwise end up in landfills.
In this article, we’ll guide you step by step on how to create an easy-to-make drip irrigation system using plastic bottles.
Why Choose Drip Irrigation?
Before getting into the process, it’s important to understand why drip irrigation is beneficial for your garden:
-
Water Conservation:
Drip irrigation directly delivers water to the roots of plants, reducing water waste due to evaporation and runoff. This method ensures that plants receive the exact amount of water they need, minimizing wastage. -
Healthier Plants:
Since the water is delivered directly to the root zone, it promotes healthier plant growth. Drip irrigation prevents overwatering, which can lead to root rot, and ensures consistent moisture for plants. -
Cost-Effective:
Setting up a plastic bottle drip irrigation system is incredibly affordable compared to commercial systems. Plastic bottles are inexpensive, and if you have some lying around your home, it costs nothing to repurpose them. -
Eco-Friendly:
By using recycled plastic bottles, you’re contributing to reducing plastic waste. Instead of sending bottles to the landfill, you’ll be using them to water your plants.
Materials You Will Need
To create your simple drip irrigation system, gather the following materials:
-
1-2 plastic bottles (1 to 2 liters)
-
A small pin, nail, or needle
-
A sharp knife or scissors
-
Tape or rubber bands
-
A small tube (optional, for directing water)
-
A bucket or container to hold the water
-
A gardening stake (optional, to support the bottles)
-
Drill (optional, for making a hole in the cap)
Step-by-Step Instructions
1. Prepare the Plastic Bottles
The first step in setting up your drip irrigation system is to prepare the plastic bottles. These bottles will serve as both the water storage and delivery system.
-
Create Holes for Water Flow:
Use a pin, needle, or nail to make several small holes along the bottom half of one of the plastic bottles. These holes will allow the water to drip out slowly. The size and number of holes will control the water flow. For a slower drip, use smaller holes, while larger holes will release water faster. -
Cut the Bottle (Optional):
If you want to use the second bottle as a drip dispenser, you may need to cut the bottom off to create an opening. This will allow water to drip evenly from the bottle onto the soil.
2. Set Up the Water Reservoir
Next, you need to create a water reservoir to hold the water that will be dispensed through the system.
-
Fill the Bottle with Water:
Fill the first bottle (the one with the holes) with water. This bottle will serve as the main water reservoir for the system. You can either leave the cap on or remove it, depending on how you want to allow the water to flow. If you leave the cap on, you may need to create a small hole in the cap to allow the water to be released slowly. -
Position the Bottle for Watering:
Place the first bottle in an upright position, ensuring that it’s elevated slightly. You can use a gardening stake or place it on a raised surface like a table or platform. Elevating the bottle will help water flow out more effectively due to gravity.
3. Position the Drip Bottle Near the Plants
Once your water reservoir is set up, it’s time to position the second bottle near your plants.
-
Place the Drip Bottle:
Position the bottle with the holes near the base of the plant. If you are using a second bottle, place it near the roots of the plant where it can deliver the water directly to the soil. If you’re using one bottle, place it at a height that allows water to flow from it to your plant’s root zone. -
Direct the Water (Optional):
If you want more control over the water flow, you can attach a small tube to the neck of the second bottle and direct the water precisely to the plant’s roots. You can use tape or rubber bands to secure the tube to the neck of the bottle.
4. Test the System
Now that everything is set up, it’s time to test your system and make sure it works correctly.
-
Fill the Reservoir Bottle with Water:
Fill the first bottle with water and observe as it begins to drip out of the second bottle. Check to see if the water is flowing steadily and at a rate that is appropriate for your plants. -
Adjust the Flow Rate:
If the water is dripping too fast, reduce the size of the holes in the second bottle. If the flow is too slow, increase the size of the holes. It may take some trial and error to get the perfect drip rate, but once it’s set, the system will provide consistent watering for your plants.
5. Maintain the System
Once your drip irrigation system is set up, it will require minimal maintenance.
-
Refill the Water Bottle:
Keep an eye on the water level in the bottle. Depending on the size of the bottle and the number of plants, it may need to be refilled every few days. -
Clean the System:
Periodically check the holes in the bottle to ensure they’re not clogged with dirt or algae. Clean the bottle and the holes as needed to maintain consistent water flow. -
Adjust for New Plants:
If you add more plants or need to adjust the watering system, you can easily do so by adding more bottles or changing the water flow.
Conclusion
Creating a simple drip irrigation system with plastic bottles is an easy, quick, and economical way to water your plants. This DIY project not only saves water but also reduces plastic waste by repurposing bottles you already have. Whether you’re growing vegetables, herbs, or flowers, this system ensures your plants get the right amount of water while saving time and effort. By following these simple steps, you can set up your own plastic bottle drip irrigation system and enjoy healthier plants and a more sustainable garden.


