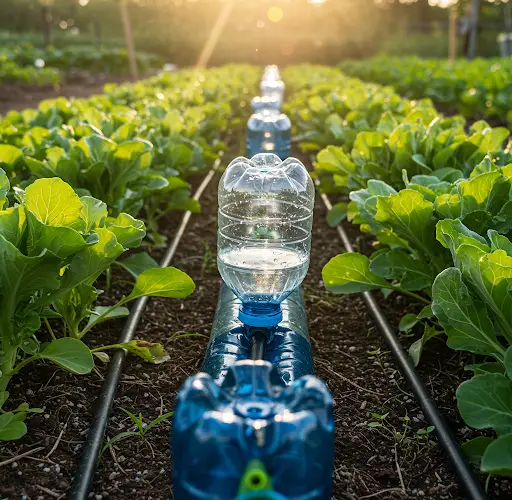
How to Make Drip Irrigation with Plastic Bottles for 15 Days of Slow Drip
Efficient watering is essential for maintaining healthy plants, especially when you cannot tend to them daily. A simple and sustainable solution is creating a slow-drip irrigation system using recycled plastic bottles. This method is ideal for gardeners who want to ensure their plants stay hydrated over extended periods, such as during vacations or dry spells. With the right setup, a properly made bottle system can deliver water consistently for up to 15 days.
Here’s a complete guide to making your own long-lasting drip irrigation system using plastic bottles.
Why Choose Plastic Bottle Drip Irrigation?
Plastic bottles are easily available, inexpensive, and reusable. Repurposing them for irrigation reduces plastic waste and saves money. A slow-drip system offers continuous, measured water delivery to the plant roots, promoting healthier growth while conserving water. With a few simple adjustments, you can build a system that lasts for about two weeks without the need for daily maintenance.
Materials You’ll Need
-
Large plastic bottles (2-liter or larger bottles are recommended)
-
A sharp needle, nail, or pin
-
A lighter or candle (to heat the needle if needed)
-
Scissors or a utility knife
-
String or wire (optional for hanging systems)
-
Clean water
Step-by-Step Instructions
1. Select the Right Bottles
For a slow drip over 15 days, choose larger plastic bottles. A 2-liter bottle is often ideal for a single medium-sized plant. For larger plants or trees, consider using 5-liter containers.
2. Clean the Bottles
Rinse the bottles thoroughly to remove any residue, dirt, or leftover liquids. Clean bottles ensure that no harmful substances reach your plants.
3. Make Small Holes
Using a heated needle, nail, or sharp pin, puncture tiny holes near the mouth of the bottle or in the cap. The holes should be extremely small to allow a very slow, steady release of water.
Tip: Test by filling the bottle with water — it should drip slowly, not stream out. If water runs too fast, seal the hole and make a new, smaller one.
4. Prepare the Bottle for Placement
-
Burying Method:
If placing the bottle directly into the soil, poke 1–2 tiny holes near the base and bury the bottle upside down or upright near the plant’s roots. Bury enough of the bottle so it remains stable while leaving the top accessible for refilling if needed. -
Cap-Drip Method:
For more controlled dripping, leave the bottle standing upright with a very small hole in the cap. This method allows you to adjust the water flow precisely.
5. Position the Bottles
Place the bottles close to the base of each plant or tree you wish to water. Ensure the holes are facing downward or sideways toward the roots to maximize water absorption.
For potted plants, you can suspend the bottle upside down above the plant using string or wire, allowing it to drip directly into the potting soil.
6. Check and Test the Flow
Before leaving the system unattended, monitor the drip rate for a few hours. Ideally, the bottle should empty very slowly over 10 to 15 days.
You may need to adjust hole size or number if the water drips too quickly or too slowly.
Additional Tips for 15-Day Efficiency
-
Use Mulch:
Applying a layer of mulch around the plants helps retain soil moisture, allowing the slow drip system to work more effectively. -
Pre-Water the Soil:
Water your plants thoroughly before installing the drip system to reduce initial water demand. -
Use Larger Bottles for Thirsty Plants:
Larger plants, like tomatoes, trees, or vines, may require bigger bottles or multiple bottles positioned around them. -
Add a Flow Regulator:
You can insert a small piece of cloth, cotton, or sponge into the bottle opening to further slow down the water release.
Advantages of a Slow-Drip Plastic Bottle System
-
Saves Time:
Reduces the need for daily watering, especially when you’re away. -
Conserves Water:
Delivers water directly to the roots with minimal evaporation. -
Low-Cost and Eco-Friendly:
Repurposes waste plastic into useful garden tools, reducing environmental impact. -
Easy to Set Up:
Requires only basic household items and minimal gardening experience.
Common Troubleshooting
-
Water Drips Too Fast:
The hole may be too large. Seal it and make a smaller one. -
Water Doesn’t Drip:
Check for clogged holes or create slightly larger holes if necessary. -
Bottle Tips Over:
Bury it deeper or secure it with garden stakes or stones to hold it in place.
Final Thoughts
Setting up a drip irrigation system using recycled plastic bottles is a practical, cost-effective, and eco-conscious way to care for your plants. With careful preparation, you can create a reliable watering solution that keeps your plants healthy for up to 15 days without additional effort. This simple technique benefits home gardens, potted plants, vegetable patches, and even small trees — making it an excellent solution for busy or traveling gardeners.


