How to Grow Spinach in Plastic Bottles for Beginners: A Step-by-Step Guide
Growing spinach in plastic bottles is an easy, space-saving, and eco-friendly way to cultivate fresh, nutritious greens at home. Whether you have limited space or want to make use of recycled materials, this method is perfect for beginners. Spinach is a fast-growing vegetable packed with vitamins, and by following this guide, you can enjoy a continuous supply of fresh leaves from your own mini-garden.
Why Grow Spinach in Plastic Bottles?
- Space-Efficient: Perfect for small balconies, patios, or even indoor setups.
- Eco-Friendly: Repurposes plastic bottles, reducing waste.
- Easy Maintenance: Requires minimal care and resources.
- Fresh Supply: Enjoy organic, homegrown spinach anytime.
- Cost-Effective: No need for large garden spaces or expensive equipment.
Materials Needed
Before you start planting, gather the following materials:
- Large plastic bottles (2-liter soda bottles work well)
- Sharp knife or scissors (for cutting the bottles)
- Drill or heated nail (to create drainage holes)
- Potting soil or compost-rich mix
- Spinach seeds (baby spinach or fast-growing varieties are best)
- Watering can or spray bottle
- Fertilizer (organic compost, vermicompost, or balanced vegetable fertilizer)
- Sunny location (at least 4-6 hours of indirect sunlight daily)
Step-by-Step Guide to Growing Spinach in Plastic Bottles
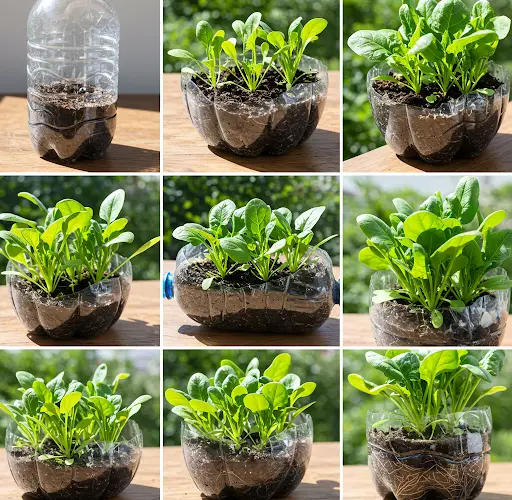
1. Preparing the Plastic Bottles
- Take a large plastic bottle and wash it thoroughly to remove any residues.
- Use a sharp knife or scissors to cut the bottle in half or make a large opening on the side (if using it horizontally).
- Poke several small drainage holes in the bottom of the bottle to prevent water from pooling.
- If you plan to hang the bottles, punch two small holes near the top and thread a string through them.
2. Filling the Bottles with Soil
- Fill the bottle with a well-draining potting mix rich in organic matter.
- Avoid heavy, compacted soil that can retain excess moisture and lead to root rot.
- Mix in a handful of compost or vermicompost for extra nutrients.
3. Planting Spinach Seeds
- Moisten the soil slightly before planting.
- Sprinkle the spinach seeds evenly over the soil surface.
- Lightly cover the seeds with a thin layer of soil (about ½ inch deep).
- Gently press down to ensure good seed-to-soil contact.
4. Watering and Moisture Management
- Keep the soil consistently moist but not waterlogged.
- Use a spray bottle or gentle watering can to avoid washing away the seeds.
- Water every 1-2 days, depending on temperature and humidity levels.
- Ensure proper drainage to prevent fungal diseases.
5. Providing Light and Temperature Control
- Place the plastic bottles in a bright location with indirect sunlight.
- Spinach grows best in cooler temperatures (50-75°F or 10-24°C).
- If growing indoors, position bottles near a south-facing window or use LED grow lights.
6. Fertilizing for Healthy Growth
- After two weeks, apply a diluted organic fertilizer (like compost tea or liquid seaweed extract).
- Avoid high-nitrogen fertilizers that can cause excessive leaf growth but weak stems.
- Repeat fertilization every 10-14 days for continued growth.
7. Thinning and Pruning Seedlings
- Once the seedlings grow 2-3 inches tall, thin them out by removing weaker plants.
- Maintain a spacing of 2-3 inches between each plant for proper growth.
- Use the removed seedlings in salads or smoothies.
8. Pest and Disease Management
- Common Pests: Aphids, leaf miners, and caterpillars.
- Use neem oil spray or insecticidal soap for organic pest control.
- Avoid overwatering to prevent fungal diseases like root rot and powdery mildew.
- Rotate planting spots if reusing soil to reduce the risk of disease buildup.
Harvesting Spinach for Maximum Yield
When to Harvest?
- Spinach leaves are ready for harvest in 30-40 days after planting.
- Pick leaves when they reach 4-6 inches in length.
- For a continuous supply, use the “cut and come again” method—harvest outer leaves first while allowing the inner ones to keep growing.
How to Harvest?
- Use sharp scissors to cut the leaves at the base.
- Avoid pulling up the entire plant to encourage multiple harvests.
- Store harvested spinach in an airtight container in the refrigerator for freshness.
Common Problems and Solutions
1. Spinach Leaves Turning Yellow
- Overwatering—reduce watering and ensure good drainage.
- Nutrient deficiency—apply organic fertilizer regularly.
2. Slow Growth or Small Leaves
- Lack of sunlight—relocate bottles to a brighter area.
- Poor soil quality—add organic compost or worm castings.
3. Bolting (Flowering Too Early)
- High temperatures—grow spinach in a shaded area during hot weather.
- Use slow-bolting spinach varieties for longer leaf production.
Conclusion
Growing spinach in plastic bottles is an excellent way for beginners to start home gardening. It’s a sustainable, space-efficient method that allows you to enjoy fresh, organic greens all year round. By following these simple steps—choosing the right soil, providing adequate water, light, and nutrients—you can successfully cultivate spinach with minimal effort. Try this method today and enjoy the benefits of homegrown, pesticide-free spinach straight from your windowsill or balcony!


