How to Grow Kohlrabi in Plastic Bottles at Home
Kohlrabi, also known as German turnip, is a cool-season vegetable in the cabbage family. It has a round, swollen stem that grows above the ground and is prized for its crisp texture and slightly sweet, nutty flavor. Growing kohlrabi at home may seem challenging for beginners, but with the right technique, it can thrive even in small spaces—including recycled plastic bottles.
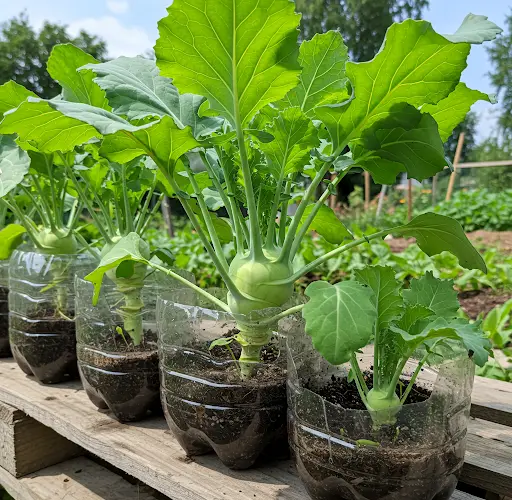
Using plastic bottles to grow kohlrabi is a great way to reduce plastic waste, save money, and enjoy fresh vegetables from your balcony, rooftop, or windowsill. Here’s a step-by-step guide to help you grow kohlrabi successfully at home using this simple method.
Why Use Plastic Bottles to Grow Kohlrabi?
Plastic bottles are easy to find, lightweight, and adaptable. They are especially helpful for:
-
Growing food in limited space
-
Repurposing waste materials
-
Reducing container costs
-
Controlling soil quality for healthier plants
This method is ideal for urban gardeners, apartment dwellers, and anyone who wants to make the most of small growing areas.
Materials You’ll Need
-
2-liter or larger plastic bottles (transparent or opaque)
-
Sharp knife or scissors
-
Nail or screwdriver (for drainage holes)
-
Potting mix (or a DIY mix of garden soil, compost, and sand)
-
Kohlrabi seeds (any variety you prefer)
-
Watering can or spray bottle
-
Sunny area (balcony, rooftop, or window with direct sunlight)
Step 1: Prepare the Plastic Bottle
Start by thoroughly cleaning the bottle to remove any labels, residue, or odors. Then:
-
Cut the top third of the bottle off horizontally. This creates an open space for planting.
-
Poke 4–6 holes at the bottom of the bottle for drainage. Use a heated nail or screwdriver to make it easier.
-
Optionally, make a few small side holes near the bottom for better aeration.
You can also keep the bottle cap on and poke a small hole in it if you want to use the bottle as a self-watering container with a water reservoir base.
Step 2: Prepare the Soil
Kohlrabi prefers loose, fertile, and well-drained soil. If you’re making your own mix, combine:
-
50% garden soil or cocopeat
-
30% compost or organic fertilizer
-
20% sand or perlite for good drainage
Mix well before filling the plastic bottle. Leave about 2–3 inches of space at the top to prevent water spillage when watering.
Step 3: Sow the Seeds
Plant 2–3 kohlrabi seeds per bottle, about ¼ inch deep. Lightly cover with soil and gently pat down. Water the soil until it’s moist, but not soaked.
Place the bottle in a location that receives at least 5–6 hours of direct sunlight daily. Kohlrabi loves the sun, especially in cooler weather.
Once the seeds germinate (usually in 5–10 days), thin the seedlings to one healthy plant per bottle. This ensures enough space for the bulb to develop properly.
Step 4: Watering and Feeding
Keep the soil evenly moist. Water every 2–3 days or whenever the top inch of soil feels dry. Avoid overwatering, which can cause root rot, especially in plastic containers with limited drainage.
Feed your plant every 2 weeks with an organic fertilizer such as:
-
Compost tea
-
Banana peel water
-
Seaweed extract
-
Diluted fish emulsion
Kohlrabi benefits from nitrogen early in growth, followed by potassium and phosphorus as the bulb starts forming.
Step 5: Care and Maintenance
Kohlrabi is relatively pest-resistant, but aphids or caterpillars may occasionally appear. Spray with neem oil or soapy water to keep pests under control.
Also:
-
Rotate the bottle every few days to ensure even sunlight exposure.
-
Remove yellowing leaves to keep the plant healthy.
-
If growing in a hot climate, provide partial shade in the afternoon to prevent bolting.
Step 6: Harvesting Kohlrabi
Kohlrabi is usually ready to harvest in 45–60 days after sowing, depending on the variety. The bulb should be about the size of a tennis ball (2–3 inches wide). Harvest early for the best texture and flavor.
To harvest:
-
Use a sharp knife to cut the stem just above the soil line.
-
You can also harvest some of the tender leaves for cooking.
Don’t wait too long, as overgrown kohlrabi can become woody and lose flavor.
Final Tips
-
Grow multiple bottles at once to create a mini kitchen garden.
-
Reuse the same bottles for your next planting cycle.
-
Try successive planting every 2–3 weeks for a continuous harvest.
-
Store harvested bulbs in the fridge; they’ll stay fresh for up to two weeks.
Conclusion
Growing kohlrabi in plastic bottles is a smart, sustainable gardening solution for modern homes. It’s cost-effective, space-saving, and beginner-friendly. With a little care and creativity, you can enjoy fresh, crisp kohlrabi straight from your balcony or kitchen window—no backyard required.
Give it a try and turn your everyday plastic waste into a thriving, edible garden!


