Garlic is a kitchen essential with countless culinary and medicinal uses, and it’s surprisingly easy to grow—even without a garden. With just a few plastic bottles and a sunny wall or window, you can grow garlic vertically at home. This space-saving method is perfect for small apartments, balconies, or anyone looking to make the most of limited space. Plus, vertical gardening with bottles is an eco-friendly way to recycle and enjoy fresh garlic greens and bulbs right from your wall.
Why Grow Garlic Vertically?
Vertical gardening allows you to grow more food in less space. By planting garlic in hanging or stacked bottles, you maximize vertical surfaces—like fences, balcony railings, or even indoor walls. Garlic’s compact growth makes it ideal for this setup. When grown vertically, you can harvest both garlic greens (for immediate use) and bulbs (with more time and care).
Plastic bottles offer excellent drainage and are easy to modify for vertical gardening. Repurposing them also reduces waste, making your garlic-growing project both efficient and sustainable.
What You’ll Need
To start your vertical garlic garden, you’ll need:
-
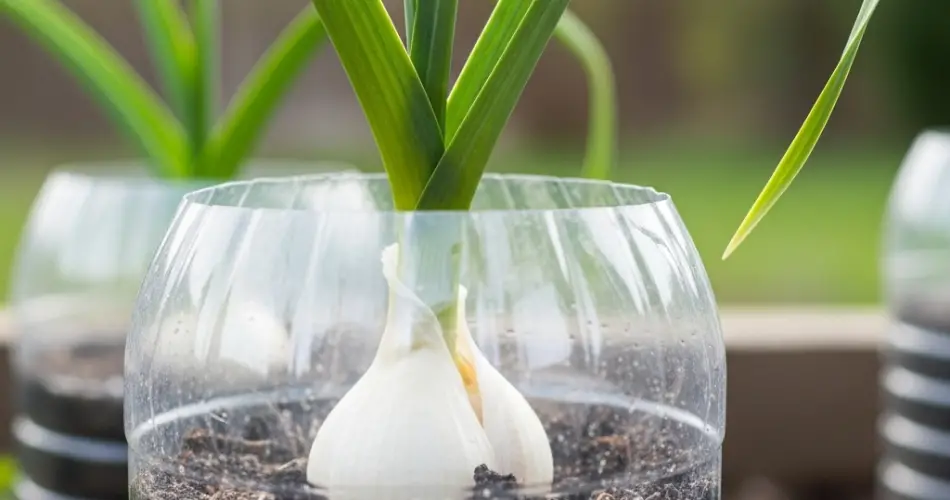
1.5L or 2L plastic bottles (transparent or lightly tinted)
-
Garlic cloves (organic or sprouted cloves work best)
-
Potting soil rich in compost
-
A craft knife or scissors
-
A small hand trowel or spoon
-
Wire, string, or hooks (for hanging)
-
Watering can or spray bottle
Choose firm, healthy garlic cloves that are already beginning to sprout, or let them sprout naturally in a dry, shaded area for a few days before planting.
Preparing the Bottles
-
Clean the Bottles: Wash thoroughly and remove any labels.
-
Cut Planting Holes: Using a craft knife, cut small openings along the side of the bottle. Each hole should be about 2–3 inches in diameter and spaced 3 inches apart vertically. Stagger the holes if adding more than one row.
-
Add Drainage: Poke several small holes in the bottom of the bottle to allow excess water to drain.
-
Create the Base Layer: Add a layer of pebbles or coarse sand at the bottom of the bottle to aid drainage.
-
Fill with Soil: Add potting mix up to the lowest planting hole, insert a garlic clove (pointy side up), and continue filling and planting as you move up the bottle.
Hanging or Stacking the Bottles
-
Hanging Setup: Use string, wire, or hooks to suspend bottles vertically on a wall, fence, or rack. Make sure they are secure and get adequate sunlight.
-
Stacked Setup: Cut off the bottoms of the bottles and stack them on top of each other, aligning the planting holes so each plant has space and light.
Place your setup in a location that receives at least 4–6 hours of sunlight daily. South-facing balconies or bright kitchen windows are ideal.
Planting Garlic Cloves
-
Insert one sprouted garlic clove into each planting hole, making sure the pointy end faces up and the base is covered by soil.
-
Press the soil gently around the clove to secure it in place.
-
Water lightly to moisten the soil—garlic doesn’t like overly wet roots.
Once planted, continue filling the bottle with soil and placing cloves until you reach the top.
Care and Maintenance
Garlic is a low-maintenance plant but benefits from regular attention:
-
Watering: Water when the top inch of soil feels dry. Avoid overwatering, especially in plastic containers.
-
Fertilizing: Feed your garlic every 2–3 weeks with a diluted organic liquid fertilizer or compost tea to support leafy growth and bulb development.
-
Sunlight: Ensure the plants receive consistent sunlight. If growing indoors, you can supplement with a grow light if natural light is insufficient.
Remove any weeds or competing growth around the cloves. As the garlic matures, the leaves will grow tall and green, then begin to yellow as harvest time approaches.
Harvesting Garlic
There are two harvest options:
1. Garlic Greens (Scapes or Leaves):
In 3–4 weeks, you can start snipping the green tops for garnishing dishes, salads, and stir-fries. Cut only a few leaves at a time to allow the plant to continue growing.
2. Garlic Bulbs:
Bulb maturity takes about 6–8 months. Wait until the lower leaves begin to dry and brown, leaving the top leaves mostly green. This signals that the bulbs are nearly ready.
To harvest, carefully remove the plant from the bottle, brush off the soil, and let the bulbs dry in a shaded, well-ventilated area for a few weeks. Once cured, they can be stored in a cool, dry place.
Replanting and Rotation
After harvesting, clean out the bottle, add fresh soil, and plant new cloves. For best results, rotate crops or alternate with leafy greens like lettuce or spinach to reduce soil fatigue.
Growing garlic vertically in bottles is a simple and rewarding way to enjoy fresh garlic greens and bulbs without needing a garden bed. It’s ideal for urban gardeners, sustainable living enthusiasts, and anyone looking to grow food in small or unconventional spaces. With a little care and creativity, you can transform plastic waste into a thriving wall of flavor, right in your home.


