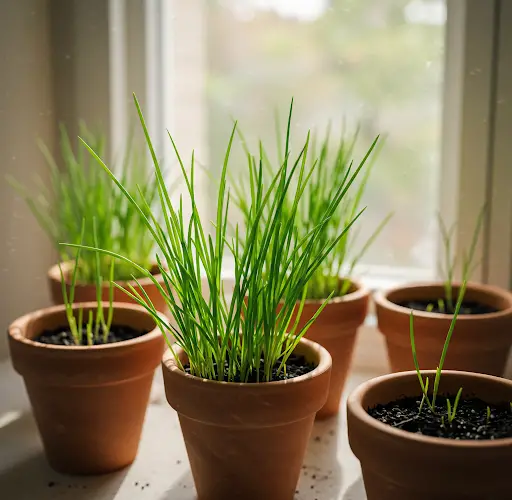
Chives are a hardy, low-maintenance herb that can easily be grown in containers, making them perfect for gardeners with limited space. Known for their mild onion flavor, chives can be used in a wide variety of dishes, from salads to soups and omelets. Growing chives from seed is a simple and rewarding process, and with a few basic tips, you can have fresh chives right at your fingertips.
This guide will take you through the steps to successfully grow chives from seed in pots, including selecting the right variety, preparing the container, sowing seeds, and caring for the plants to ensure a bountiful harvest.
1. Choosing the Right Chive Variety for Pots
While there are several varieties of chives, the most common type grown in pots is common chives (Allium schoenoprasum), which is a hardy perennial herb that grows in clumps. If you’re looking to grow a more unique variety, garlic chives (Allium tuberosum) have flat, wider leaves and a mild garlic flavor.
Recommended varieties:
-
Common Chives: The most widely grown variety, perfect for containers. It produces long, slender green leaves and delicate purple flowers.
-
Garlic Chives: If you want a garlic-flavored chive, this is the best option. Garlic chives have flat, wide leaves and produce white flowers.
Choose a variety based on your flavor preference and the appearance you want in your container.
2. Selecting the Right Container
Chives have a relatively small root system, so they don’t need a huge pot, but they do benefit from a container that provides adequate depth and drainage.
Recommended container size:
-
Choose a pot that is at least 6 to 8 inches deep and 8 to 12 inches wide. This size will give the chives enough space to grow.
-
Make sure the pot has drainage holes at the bottom to allow excess water to escape and prevent root rot.
-
If you’re using a smaller container, you can grow a few chive plants, but keep in mind that more space will allow the plants to thrive and grow more vigorously.
3. Preparing the Soil for Chives
Chives grow best in well-draining soil that is rich in organic matter. They prefer slightly acidic to neutral soil (pH 6.0 to 7.0), so be sure to use a high-quality potting mix designed for herbs or vegetables. Avoid using garden soil, as it may be too heavy for container gardening and may not drain properly.
Soil preparation:
-
Use a loamy potting mix that is well-aerated and drains well.
-
You can mix in a little compost or organic matter to enrich the soil and promote healthy growth.
It’s important to ensure that the soil remains loose and well-drained to avoid waterlogging, which can lead to root rot.
4. Sowing Chive Seeds
Chives are easy to grow from seed. You can start chive seeds indoors or directly sow them into the container once the danger of frost has passed and the soil has warmed to at least 50°F (10°C).
Steps for sowing chive seeds:
-
Sow the seeds about 1/4 inch deep in the container. You can scatter the seeds lightly or plant them in rows.
-
Space the seeds 1 to 2 inches apart, as chives will need space to grow and spread.
-
Water gently after sowing to keep the soil moist but not soaked. The soil should be kept evenly moist, especially during germination.
-
Place the container in a sunny location, as chives require full sun or at least 6 hours of direct sunlight per day.
Chive seeds typically germinate in about 10 to 14 days. Be patient, and once the seedlings have grown large enough, you can begin thinning them out.
5. Thinning Seedlings
Once your chive seedlings have developed a few leaves, it’s time to thin them out to give the remaining plants more room to grow. Thinning will also help prevent overcrowding, ensuring that your plants have access to nutrients and light.
Thinning tips:
-
Thin the seedlings to be about 4 to 6 inches apart.
-
Use scissors to snip the weaker seedlings at the soil line, avoiding disturbing the roots of the healthy plants.
-
You can use the thinned-out seedlings as a garnish or addition to salads if desired.
Thinning helps the remaining plants grow larger and healthier, so don’t skip this important step.
6. Watering and Fertilizing Chives
Chives need consistent moisture to thrive, but they don’t like to be waterlogged. It’s important to water the plants deeply, especially during hot weather, but always allow the excess water to drain from the container.
Watering tips:
-
Water regularly to keep the soil consistently moist, but avoid letting the soil become soggy.
-
Water at the base of the plant, rather than from overhead, to prevent fungal diseases.
Fertilizing:
-
Chives are not heavy feeders, but they will benefit from occasional feeding.
-
Use a balanced, slow-release fertilizer every 4 to 6 weeks during the growing season.
-
Alternatively, you can use organic compost to add nutrients to the soil.
Avoid over-fertilizing, as this can cause the chives to grow too quickly and lose some of their flavor.
7. Pests and Disease Management
Chives are generally pest-resistant but can occasionally attract aphids or slugs. Regular monitoring of the plants will help prevent these issues. Chives are also susceptible to fungal diseases like rust, so proper care and maintenance are key.
Pest management:
-
Aphids: These small, soft-bodied insects can be removed by spraying the plants with a mixture of water and mild soap or insecticidal soap.
-
Slugs: Use slug traps or sprinkle diatomaceous earth around the base of the plants to deter slugs.
To prevent fungal diseases like rust, make sure the soil is well-draining, avoid overhead watering, and space plants adequately for air circulation.
8. Harvesting Chives
One of the great things about growing chives is that you can start harvesting them as soon as they are big enough, which is usually around 6 to 8 weeks after sowing the seeds.
Harvesting tips:
-
Snip the outer leaves at the base with a clean, sharp pair of scissors. Leave the inner leaves to continue growing.
-
You can harvest chives throughout the growing season by cutting back the leaves, allowing new growth to replace them.
-
Avoid cutting the plant back too much at once—cut only about one-third of the plant at a time to ensure it continues to thrive.
Chives will continue to grow and produce leaves as long as they are regularly harvested, so you can enjoy fresh chives all season long.
9. Final Tips for Growing Chives in Pots
-
Temperature: Chives are hardy and can tolerate cool temperatures, but they prefer moderate weather. If temperatures exceed 85°F (29°C), chives may slow down their growth.
-
Companion planting: Chives grow well with many vegetables and herbs, including tomatoes, carrots, and parsley. Their strong scent helps repel pests.
-
Winter care: Chives are perennial and will survive winter in most climates. You can bring the pot indoors during the colder months to continue growing indoors.
Conclusion
Growing chives from seed in pots is a simple and rewarding gardening project that can provide you with fresh, flavorful herbs throughout the year. With proper care, your chives will thrive in containers, offering a convenient and delicious addition to your kitchen. By following these easy steps, you can enjoy your own homegrown chives in a matter of weeks, perfect for adding a mild onion flavor to a variety of dishes.