Bay leaf plants, often known as Laurus nobilis or bay laurel, are a staple in many kitchens thanks to their aromatic leaves used to flavor soups, stews, and sauces. Beyond their culinary value, these evergreen shrubs also add elegance and greenery to a backyard space. While they thrive in the ground, growing bay leaf plants in crates is a practical option for gardeners with limited space or those who want more control over soil and growing conditions. Using crates not only saves space but also allows flexibility in arranging your backyard herb garden.
Why Choose Crates for Bay Leaf Plants?
Crates provide a sturdy, portable, and rustic-looking container that can be tailored to fit your gardening space. They allow you to grow herbs in compact areas, making them perfect for backyards, patios, or even along fences. Since bay laurel has a slow growth rate and can adapt well to confined spaces, crates are ideal for keeping the plant manageable without limiting its ability to thrive.
Additionally, crates make it easier to control soil quality and drainage, both of which are essential for healthy bay leaf plants. By reusing old wooden crates, you’re also making a sustainable choice that reduces waste.
Preparing Crates for Planting
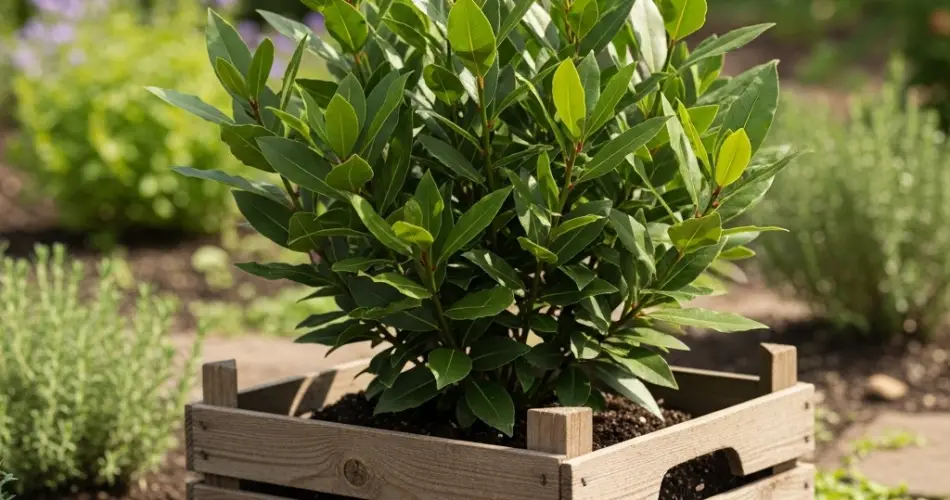
To start, select a sturdy wooden crate that is at least 16–20 inches deep and wide. Bay leaf plants develop strong root systems, so the container must have enough space for roots to grow without becoming cramped.
Drill drainage holes in the bottom of the crate to ensure excess water can escape. Poor drainage can lead to waterlogged soil, which bay laurels dislike. To prevent soil loss while still allowing water to drain, line the crate with landscape fabric, burlap, or several layers of newspaper. If your crate is untreated wood, consider applying a non-toxic sealant to protect it from weather damage.
Finally, elevate the crate slightly with bricks or pot feet to promote airflow beneath it and prevent the wood from rotting.
The Best Soil Mix for Bay Laurel
Bay leaf plants prefer well-drained, fertile soil with a slightly acidic to neutral pH (around 6.0–7.0). A balanced mix for crates can include:
-
50% high-quality potting soil for structure and aeration
-
30% compost to provide nutrients
-
20% sand or perlite to improve drainage
Bay laurel is relatively low-maintenance but benefits from rich, loose soil that won’t compact. Adding a handful of slow-release organic fertilizer at planting time will support steady growth.
Planting Bay Leaf in Crates
You can grow bay laurel from seeds, cuttings, or nursery-bought young plants. Since seeds can take a long time to germinate, many gardeners prefer starting with a small plant or rooted cutting.
Place your bay plant in the center of the crate, keeping the crown of the plant just above soil level. Backfill with your prepared soil mix, gently firming it around the roots. Water thoroughly to help the plant settle.
Position the crate in a spot where the plant receives at least 6–8 hours of direct sunlight daily. Bay laurel thrives in full sun but can also tolerate partial shade.
Watering and Feeding
Bay leaf plants don’t like soggy soil, so water only when the top 1–2 inches of soil feel dry. During hot summers, crates may dry out quickly, so check moisture levels often. In cooler months, reduce watering, as the plant’s growth slows down.
Fertilize your crate-grown bay every 6–8 weeks during the growing season using an organic, balanced fertilizer or compost tea. This provides the nutrients needed to maintain healthy, deep-green foliage.
Pruning and Maintenance
Pruning is essential to keep your bay leaf plant in good shape, especially in crate beds where space is limited. Trim back long or leggy stems in spring to encourage a bushier structure. The trimmings can be dried and stored for cooking.
Remove any yellowing leaves and check for pests such as scale insects or aphids. These are rare but can occasionally appear. If they do, simply wipe them off with a damp cloth or treat them with a mild soap spray.
Mulching the top of the soil with straw or bark chips can help retain moisture and regulate temperature in the crate.
Harvesting Bay Leaves
Bay leaves can be harvested year-round once the plant is well established, usually after the first year. For the best flavor, pick mature, dark green leaves and allow them to dry before storing. Drying enhances their fragrance and extends their shelf life.
Harvest sparingly to avoid stressing young plants. Once your bay plant is well established, you can harvest regularly without affecting its growth.
Advantages of Growing Bay Laurel in Crates
-
Mobility – Crates can be moved easily to follow sunlight or be sheltered during extreme weather.
-
Soil Control – You control the soil quality, drainage, and nutrition.
-
Space-Saving – Perfect for small backyards or patios.
-
Sustainability – Reusing old crates reduces waste and adds rustic charm.
Final Thoughts
Growing bay leaf plants in crates is a simple yet effective way to cultivate this aromatic herb in your backyard. With proper soil, sunlight, and care, your crate-grown bay laurel will reward you with a steady supply of flavorful leaves and lush evergreen beauty. Whether you’re creating a rustic herb garden or simply want fresh bay leaves for cooking, crate gardening offers flexibility, sustainability, and charm.
By turning wooden crates into thriving herb planters, you transform even small backyard spaces into productive green corners. Bay leaf plants, with their culinary and ornamental value, are a perfect choice for this method of gardening.


