Growing Queen Corn on the Balcony: How to Grow Specialty Black Corn at Home
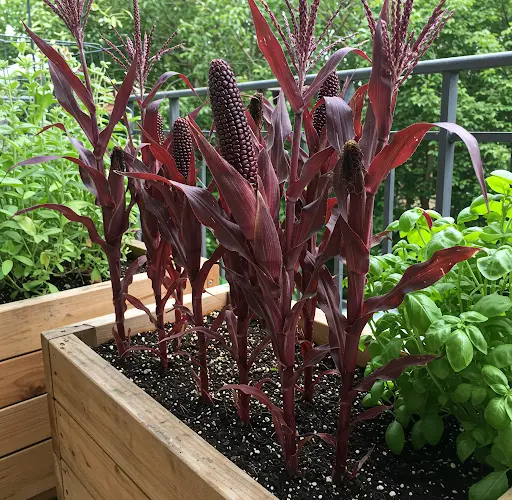
Growing corn at home might seem like something reserved for large gardens or fields, but with a little planning and the right container setup, it’s entirely possible to grow stunning, nutrient-rich black corn—often referred to as Queen Corn—right on your balcony. This special variety is not only striking in appearance, with its deep purple to almost-black kernels, but it’s also packed with antioxidants and has a rich, slightly nutty flavor that sets it apart from standard yellow corn.
Whether you’re looking to grow something unique or want to try your hand at container gardening, this guide will show you how to grow Queen Corn successfully in a small space.
Why Grow Black Corn at Home?
Queen Corn, a variety of black corn, is prized for its high anthocyanin content—a natural antioxidant known for its health benefits. Beyond its nutritional value, it’s also beautiful to look at and offers a conversation-starting addition to your homegrown produce collection.
Here are a few reasons to grow it on your balcony:
-
Space-efficient: Grows well in containers
-
Unique flavor and appearance
-
High in antioxidants
-
Fast-growing and beginner-friendly
-
Fun and educational for kids and gardening enthusiasts
Materials You’ll Need
Before planting, gather the necessary materials:
-
Large containers or pots (at least 12 inches deep and wide)
-
High-quality potting mix enriched with compost
-
Organic fertilizer (balanced or nitrogen-rich)
-
Black corn seeds (Queen Corn or other dark varieties)
-
Watering can or hose
-
Support sticks or poles (optional)
If you have a balcony that receives 6–8 hours of sunlight daily, you’re ready to go.
Step-by-Step Guide to Growing Queen Corn in Containers
1. Choose the Right Container
Corn has a shallow but spreading root system, so choose a pot that’s both deep and wide. You can plant 2–3 corn plants in a 15–20 inch diameter pot. If you’re short on space, use multiple smaller pots but group them closely—corn is wind-pollinated and needs companions nearby for good kernel development.
2. Prepare the Soil
Corn loves fertile, well-draining soil. Use a loamy potting mix blended with compost or aged manure. You can also add a slow-release organic fertilizer before planting. Make sure your containers have proper drainage holes to prevent root rot.
3. Sow the Seeds
Plant corn seeds about 1 inch deep, and space them 6–8 inches apart. If using a larger container, you can sow in a circular pattern to optimize pollination.
Keep the soil moist until the seeds germinate, which usually takes 7–10 days.
4. Provide Adequate Sunlight
Place your containers in the sunniest part of your balcony. Corn is a sun-loving crop and needs at least 6 hours of direct sunlight per day to grow healthy stalks and full ears.
5. Water Regularly
Corn requires consistent moisture, especially during the flowering and ear-forming stages. Water deeply every couple of days, making sure the soil stays evenly moist but not soggy. Avoid letting the soil dry out, as it can reduce kernel production.
6. Feed as Needed
After the plants reach 6–8 inches tall, apply a nitrogen-rich fertilizer every 2–3 weeks. You can use compost tea, diluted fish emulsion, or a balanced organic fertilizer. Corn is a heavy feeder, and extra nutrients support tall growth and healthy ears.
7. Support and Pollination
Queen Corn can grow up to 4–6 feet tall, so consider using bamboo sticks or trellises for support if your balcony is windy.
Since corn is wind-pollinated, it’s crucial to plant in clusters or groups. If you only have a few plants, you can hand-pollinate by gently shaking the tassels (the top part of the plant) to release pollen over the silks (the hair-like strands on the ears).
8. Harvesting Your Corn
Queen Corn typically matures in about 80–100 days, depending on variety and growing conditions. The ears are ready to harvest when:
-
Silks have turned brown and dry
-
Kernels are plump and fully colored
-
Pressing a kernel releases a milky liquid
To harvest, firmly grip the ear and twist downward. Let the ears dry naturally if you plan to use them for decorative or flour purposes.
Tips for Success
-
Grow at least 4–6 plants together for effective pollination
-
Keep weeds and pests under control—check for aphids and corn borers
-
Mulch the top layer of the container to retain moisture
-
Try companion planting with beans or herbs nearby to save space and improve yield
Final Thoughts
Growing Queen Corn on the balcony is not just possible—it’s rewarding and surprisingly simple. With their rich, dark kernels and tall, elegant stalks, these plants are both decorative and practical. Whether you’re growing them for flavor, nutrition, or novelty, this beautiful variety of corn offers a unique way to enjoy gardening in small spaces.
Start with a few containers, give your plants sun and care, and soon you’ll be harvesting your very own black corn—right from your balcony.


