Ginger, with its bold flavor and powerful health benefits, is a favorite in kitchens around the world. But did you know it’s also surprisingly easy to grow indoors—no matter the season? Whether you want a steady supply of fresh ginger for cooking or simply enjoy the novelty of growing tropical plants at home, cultivating ginger indoors year-round is entirely possible with the right approach.
Here’s a step-by-step guide to help you grow ginger inside your home, from selecting the right rhizome to harvesting your own flavorful roots.
Why Grow Ginger Indoors?
Ginger (Zingiber officinale) is a tropical plant that thrives in warm, humid environments with indirect sunlight—conditions that can be mimicked indoors. Growing it indoors gives you full control over temperature and moisture, protects it from pests, and allows for continuous growth without worrying about frost or cold snaps.
Other benefits include:
-
Access to fresh, organic ginger at your convenience
-
A low-maintenance addition to your indoor plant collection
-
A beautiful plant with lush green foliage that also looks decorative
Step 1: Get a Healthy Ginger Rhizome
To start growing ginger, you need a fresh rhizome (root) rather than seeds.
-
Purchase organic ginger root from a grocery store or garden center. Avoid treated ginger, which may be coated with growth inhibitors.
-
Choose a piece that is firm and plump with visible “eyes” or small growing buds.
-
If the rhizome is large, you can cut it into 1–2 inch sections, making sure each piece has at least one or two eyes.
-
Let the cut sections air-dry for a day to form a callus before planting, which helps prevent rotting.
Step 2: Choose the Right Pot
Ginger grows horizontally, so it needs wide, shallow containers rather than deep pots.
-
Choose a pot that is at least 12 inches wide and 8 inches deep.
-
Ensure it has good drainage holes to avoid waterlogging the roots.
-
If you’re growing multiple pieces of ginger, consider using a rectangular window box-style planter for ample horizontal space.
Step 3: Prepare the Ideal Soil
Ginger loves rich, well-draining soil that retains some moisture but doesn’t stay soggy.
-
Use a light potting mix with added compost or worm castings for nutrients.
-
Mix in perlite or coconut coir to improve drainage.
-
Avoid heavy clay or dense soils that can suffocate roots.
Fill your container with the soil mix, leaving about an inch of space at the top for watering.
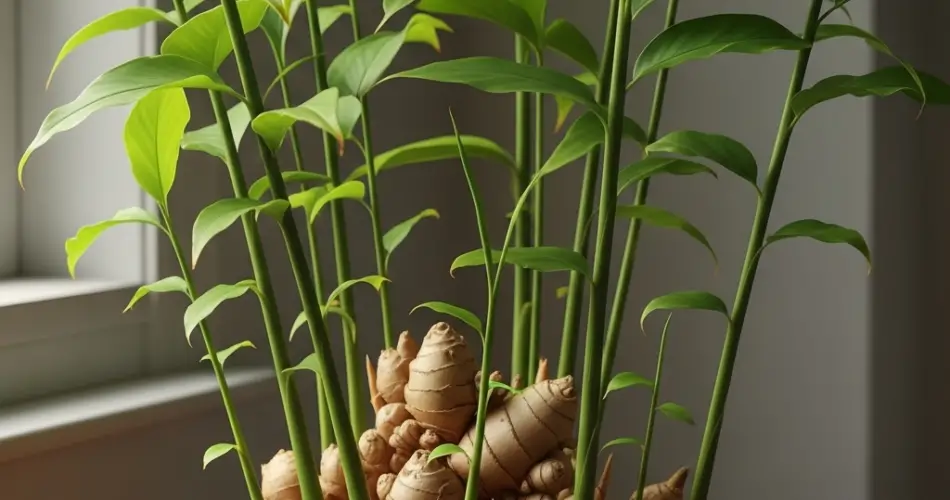
Step 4: Plant the Ginger
-
Lay the rhizome pieces horizontally on the soil with the buds facing upward.
-
Cover them lightly with 1–2 inches of soil.
-
Water the soil gently until it is evenly moist but not soaked.
Keep the container in a warm spot (around 70–85°F or 21–29°C) and out of direct sunlight until shoots appear.
Step 5: Provide the Right Growing Conditions
Once shoots emerge, place your pot in a bright area with indirect light—a north or east-facing window is ideal.
-
Humidity: Ginger thrives in humid conditions, so mist the leaves or use a humidity tray.
-
Watering: Keep the soil consistently moist but never soggy. Allow the top inch to dry out slightly between watering.
-
Feeding: Feed with a diluted liquid fertilizer every 2–4 weeks, especially during active growth in spring and summer.
Avoid over-fertilizing, as too much nitrogen can lead to lush foliage with less root development.
Step 6: Harvesting Ginger Indoors
You can start harvesting small amounts of ginger about 4–6 months after planting, once the plant has established several healthy stalks.
-
Use your hands or a trowel to gently dig into one side of the pot.
-
Cut or break off a piece of the rhizome and then cover the area with soil to let the plant keep growing.
-
For a full harvest, wait 8–10 months, when the leaves start turning yellow and the plant enters dormancy.
After harvesting, you can replant pieces of the rhizome to continue the cycle.
Tips for Success
-
Rotate the pot occasionally for even growth if your light source is from one direction.
-
Don’t let the plant dry out completely, especially during the active growing phase.
-
In winter, growth may slow down. Reduce watering and allow the plant to rest until it resumes in spring.
-
If you have the space, move your ginger pot outdoors during the warm months, then bring it back inside before temperatures drop.
Final Thoughts
Growing ginger indoors is a rewarding and simple project that requires minimal effort once established. With the right care, you can enjoy a steady supply of fresh, flavorful ginger all year long—perfect for cooking, tea, or even herbal remedies. Plus, the attractive foliage adds a lush, tropical feel to your home environment. Whether you’re a beginner or an experienced indoor gardener, ginger is a fantastic plant to grow on your windowsill or kitchen counter.


