Great Idea: Growing Celery Plants in a Mini Greenhouse
Celery is a crunchy, refreshing vegetable that adds flavor, texture, and nutrition to many dishes. Though it’s known for being a cool-weather crop that’s a little fussy to grow, starting celery in a mini greenhouse can make the process easier, more reliable, and even fun. Whether you’re an urban gardener, a beginner, or simply working with limited space, a mini greenhouse gives celery the consistent temperature and moisture it needs to thrive.
This article guides you through the step-by-step process of growing celery successfully in a mini greenhouse—from seed to harvest—using simple tools and techniques.
Why Grow Celery in a Mini Greenhouse?
Celery can be a bit particular about its growing conditions. It needs:
-
Consistent moisture
-
Mild temperatures (ideally between 60°F and 70°F / 16°C–21°C)
-
A long growing season (130 to 140 days)
A mini greenhouse helps solve many of these challenges. Here’s how:
-
Controlled temperature: Ideal for starting seeds and young plants.
-
Humidity retention: Celery loves moisture, and the enclosed environment prevents rapid drying.
-
Protection from pests: Keeps slugs, caterpillars, and insects away during early growth.
-
Extended growing season: Start earlier in spring and extend later into fall.
Whether your greenhouse is a simple plastic cover on a raised bed, a DIY cold frame, or a store-bought mini greenhouse shelf, it can make a big difference in celery’s growth and productivity.
Choosing a Celery Variety
There are two types of celery you can grow:
-
Pascal (Green) Celery – These are the traditional, long green stalks found in most grocery stores.
-
Golden (Yellow/Blanched) Celery – These have paler, tender stalks and require blanching to develop their signature look and taste.
Choose a variety suited to your local climate and available growing season. Some popular home garden options include:
-
‘Tall Utah’
-
‘Golden Boy’
-
‘Giant Pascal’
-
‘Tango’
What You’ll Need
-
Celery seeds or seedlings
-
Seed-starting trays or small pots
-
High-quality potting mix with compost
-
Mini greenhouse (cold frame, pop-up greenhouse, or covered seedling box)
-
Watering can or spray bottle
-
Organic fertilizer
-
Mulch (optional)
-
Garden bed or larger container for transplanting
Step 1: Start Seeds Indoors
Celery seeds are tiny and slow to germinate. Start seeds indoors 8–10 weeks before your last expected frost.
-
Soak seeds in warm water overnight to speed up germination.
-
Fill seed trays with a moist seed-starting mix.
-
Sprinkle seeds on the surface and gently press them in—don’t bury them too deep.
-
Cover the trays with a plastic dome or place them directly inside the mini greenhouse.
-
Keep the temperature between 70–75°F (21–24°C) for optimal sprouting.
Germination takes 10–21 days, so be patient and keep the soil consistently moist.
Step 2: Move Seedlings to the Mini Greenhouse
Once the seedlings have at least 2–3 sets of true leaves, they can be moved to your mini greenhouse for hardening off and early-stage growth.
-
Transplant into small pots or biodegradable seedling containers.
-
Space them about 2–3 inches apart.
-
Place them inside the mini greenhouse in a sunny location (at least 6 hours of sunlight daily).
-
Keep the environment humid and the soil consistently moist.
This phase allows seedlings to grow stronger before final transplanting.
Step 3: Transplant to Final Growing Space
When seedlings are 4–6 inches tall and the outside temperatures are mild, they can be moved to a garden bed, raised bed, or larger container inside the mini greenhouse.
-
Space celery plants 8–10 inches apart.
-
Choose a spot with rich, well-draining soil and full sun.
-
Mix compost or aged manure into the soil before planting.
-
Water immediately after transplanting.
If your mini greenhouse is large enough, you can continue growing celery to maturity inside it. Otherwise, remove the cover once temperatures are stable.
Step 4: Caring for Celery in a Mini Greenhouse
Celery requires steady watering. Dry soil leads to tough, stringy stalks.
-
Watering: Keep the soil moist at all times—celery has shallow roots.
-
Feeding: Apply a balanced organic fertilizer every 2–3 weeks.
-
Mulching: Add straw or leaves around the base to retain moisture.
-
Shading: If your mini greenhouse gets too hot, open vents or provide light shade during mid-summer.
Optional: Blanching for Tender Stalks
To produce the pale, tender stalks celery is known for, blanching is often done 2–3 weeks before harvest:
-
Wrap newspaper or cardboard around the lower stalks to block sunlight.
-
You can also use a milk carton or cylinder to cover the base.
-
This reduces bitterness and makes the stalks softer.
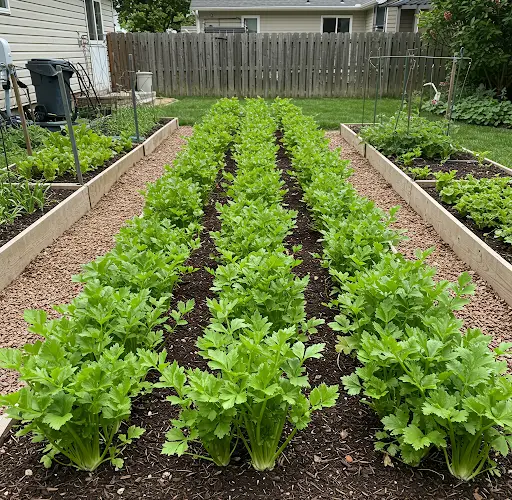
Harvesting
Celery is ready to harvest in 3–4 months from seed. You can:
-
Harvest outer stalks as needed for a continuous yield.
-
Cut the whole plant at the base for a full harvest.
The leaves are edible too—perfect for soups and stocks.
Final Thoughts
Growing celery in a mini greenhouse is a smart, practical solution for gardeners who want to enjoy fresh, homegrown produce. It gives you greater control over temperature, moisture, and pests—all crucial for a successful celery crop. With a bit of preparation and care, your greenhouse-grown celery can thrive and feed your family for months.
So if you’re looking to make the most of your gardening space, try planting celery in a mini greenhouse. It’s an easy, rewarding project that yields crisp, flavorful stalks you’ll be proud to harvest.


