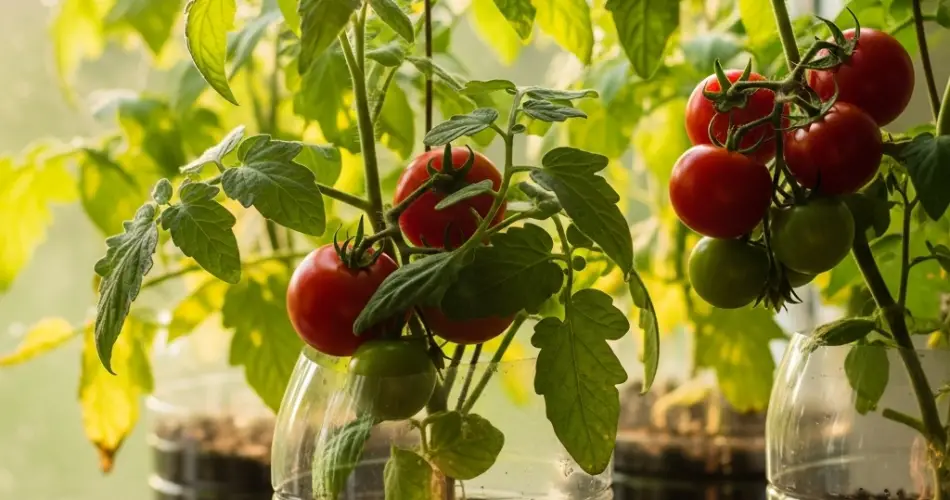
Tomatoes are one of the most rewarding vegetables to grow at home. They’re used in countless dishes, rich in nutrients, and perfect for gardeners of all skill levels. If you lack garden space, don’t worry—tomatoes can be successfully grown in large plastic bottles. This eco-friendly, space-saving method is ideal for balconies, patios, or sunny windowsills.
By recycling common plastic bottles into planters, you reduce waste while creating a compact, portable container garden. With the right technique and a little care, you can enjoy juicy, homegrown tomatoes all season long.
Why Use Plastic Bottles for Tomatoes?
Tomato plants have deep root systems, which means they need sufficient soil depth and room to grow. Large plastic bottles, especially those with a 5-liter or more capacity, can offer just that when prepared properly. Some benefits include:
-
Eco-friendly: Reduces plastic waste by giving bottles a second life
-
Space-saving: Perfect for small spaces or vertical gardening
-
Cost-effective: No need to buy planters or special pots
-
Portable: Easy to move based on light or weather needs
Materials You’ll Need
To start your tomato bottle garden, you’ll need the following:
-
Large plastic bottle (5-liter water bottle or similar)
-
Tomato seedlings or seeds (preferably compact or determinate varieties)
-
Quality potting mix with compost
-
Cutter or scissors
-
Nail or screwdriver (for drainage holes)
-
Watering can or spray bottle
-
Optional: support stake, string, or cage for plant stability
Step 1: Prepare the Bottle
Clean and Cut
Thoroughly wash your bottle and remove any labels. Cut off the top portion (about 4–5 inches from the neck) to create a wide opening. You can keep the top as a lid to protect young seedlings or compost the cap.
Create Drainage Holes
Using a heated nail or screwdriver, poke 5–6 small holes in the bottom of the bottle to allow excess water to drain. This step is crucial to avoid waterlogging and root rot.
Optional Side Windows
Cut small holes on the sides for added airflow or to observe root development, especially if using transparent bottles.
Step 2: Add Soil and Plant
Fill the Bottle
Fill the bottom of the bottle with nutrient-rich potting soil. A mix of garden soil, compost, and a bit of sand or coco peat works well for drainage and moisture retention. Leave about 1–2 inches of space from the top.
Plant Your Seedling or Seeds
If using a seedling, dig a small hole in the center, place the seedling in, and cover the roots with soil. Plant deeper than usual—tomato stems will grow roots if buried, helping develop a stronger root system.
If starting from seed, plant 2–3 seeds about ¼ inch deep. Thin out the weaker seedlings once they grow a few inches tall, leaving one strong plant per bottle.
Water Gently
Moisten the soil lightly after planting to help settle it and initiate growth.
Step 3: Provide Sunlight and Support
Sunlight
Tomatoes need at least 6–8 hours of direct sunlight daily. Place your bottle planter in the sunniest location available—near a window, on a balcony, or in the garden.
Support
As your tomato plant grows, it will need support to keep stems upright and fruits off the soil. Insert a small stake in the bottle and tie the stem loosely with soft twine. Alternatively, use a mini tomato cage if space allows.
Step 4: Water and Feed Regularly
Watering
Tomatoes like consistent moisture, but they don’t like soggy soil. Water deeply when the top inch of soil feels dry. Early morning watering is best.
Fertilizing
Once the plant starts flowering, feed it every 10–14 days with a diluted organic fertilizer or compost tea. Choose a fertilizer high in phosphorus and potassium for better flowering and fruiting.
Step 5: Pruning and Maintenance
Remove the lower leaves as the plant grows to improve air circulation and prevent disease. If you’re growing an indeterminate variety, pinch off side shoots (also called suckers) that grow between the main stem and leaf branches to focus energy on fruit production.
Keep the bottle clean and rotate it occasionally to ensure even sunlight exposure.
Step 6: Pollination
Tomatoes are self-pollinating, but you can help the process by gently shaking the plant or tapping the flowers to release pollen. This is especially helpful when growing indoors or where pollinators are limited.
Step 7: Harvesting
Depending on the variety, tomatoes will be ready for harvest 60–85 days after transplanting. Harvest when the fruits are fully colored and slightly soft to the touch. Twist gently or cut them from the stem with scissors.
Continue harvesting as fruits ripen to encourage more production throughout the season.
Final Tips
-
Use determinate (bush) varieties like ‘Patio Princess’ or ‘Roma’ for bottle planting.
-
Mulch the top layer of soil with straw or dried leaves to reduce moisture loss.
-
Start a second batch in a few weeks to keep your harvest going longer.
-
Reuse the bottle for another crop or growing cycle once the plant completes its season.
Conclusion
Growing tomatoes in plastic bottles is an easy, eco-conscious way to enjoy fresh produce without a traditional garden. This method is great for beginners and experienced gardeners alike, requiring minimal space and offering big results. With just a bottle, some soil, and sunlight, you can start harvesting flavorful, homegrown tomatoes right from your windowsill or balcony.


