Bean sprouts are a nutritious and versatile ingredient that can easily be incorporated into salads, sandwiches, stir-fries, and soups. They are not only tasty but also packed with vitamins and minerals, making them a great addition to any diet. If you’re a beginner gardener looking for a simple and cost-effective way to grow your own food at home, growing bean sprouts in plastic bottles is an excellent option. This method is straightforward, requires minimal space, and provides fresh sprouts in a short amount of time.
In this article, we’ll show you how to grow bean sprouts in plastic bottles, making it easy to enjoy homegrown, delicious, and affordable food right from your kitchen.
Why Grow Bean Sprouts?
Before diving into the growing process, it’s important to understand why bean sprouts are such a great choice for home gardening:
-
Quick Harvest: Bean sprouts grow quickly and can be harvested in as little as 3-5 days, providing fast results for impatient gardeners.
-
Low Maintenance: Growing bean sprouts is an easy and low-maintenance process, making it perfect for beginners or those with limited gardening experience.
-
Space-Efficient: You don’t need a large garden or outdoor space to grow bean sprouts. Plastic bottles are a great solution for those with limited space, such as apartment dwellers.
-
Nutrient-Rich: Bean sprouts are a great source of protein, fiber, and essential vitamins like vitamin C, B vitamins, and folate, making them a healthy addition to your meals.
Now that we know the benefits, let’s move on to the simple steps for growing bean sprouts in plastic bottles.
Materials You’ll Need
Before you start, gather the following materials:
-
Plastic bottle(s) (one bottle for each batch of sprouts)
-
Bean sprout seeds (mung beans, lentils, or soybeans are common options)
-
Sharp scissors or a knife (to cut the bottle)
-
Water (for soaking and rinsing the seeds)
-
A small piece of cloth or cheesecloth (to cover the bottle opening)
-
Rubber band or string (to secure the cloth)
-
A tray or shallow container (to catch any excess water)
With these materials in hand, you’re ready to get started.
Step-by-Step Guide to Growing Bean Sprouts in Plastic Bottles
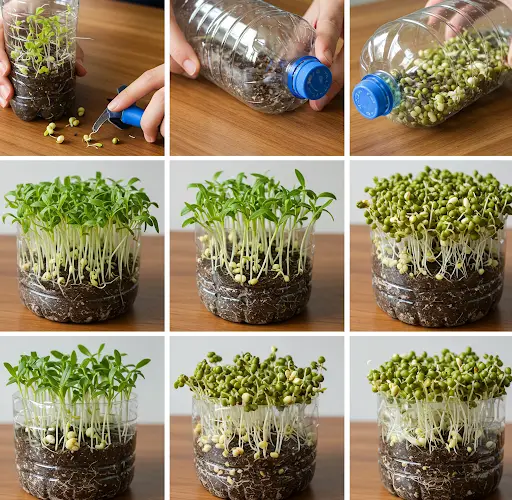
1. Prepare the Plastic Bottle
The first step is to prepare your plastic bottle. You’ll need to cut the bottle in half to create a makeshift planter. Using a sharp knife or scissors, carefully cut the bottle about halfway down. This will give you the bottom portion, which will act as the base where your bean sprouts will grow.
Once the bottle is cut, you may want to make a few small holes in the bottom of the bottle for drainage. This will ensure that excess water can escape, preventing the seeds from becoming waterlogged and rotting.
2. Soak the Seeds
Next, take your bean sprout seeds and soak them in water for 8-12 hours, depending on the type of seeds you are using. Mung beans, which are commonly used for bean sprouts, typically require about 8 hours of soaking. Soaking helps the seeds to start the germination process and ensures they grow well.
After soaking, drain the seeds thoroughly to avoid excess water from collecting in the bottle.
3. Add the Seeds to the Bottle
Once your seeds are soaked and drained, place them into the bottom portion of the plastic bottle. Spread the seeds out evenly over the base, but don’t overcrowd them. You want the seeds to have enough room to sprout and grow without competing for space. A thin layer of seeds is ideal.
4. Cover the Bottle Opening
To create a humid environment for your sprouts to thrive, cover the opening of the bottle with a small piece of cloth or cheesecloth. Secure it with a rubber band or string. This will allow airflow while keeping the moisture in, which is essential for the germination process. The cloth will also prevent dust or debris from entering the bottle.
5. Rinse and Drain the Seeds Daily
For the next 3-5 days, rinse the seeds with clean water twice a day. Simply fill the bottle with water, swirl it around, and drain it out. It’s important to keep the seeds moist but not soaking wet. This daily rinse helps the seeds to sprout and grow without mold developing.
Place the bottle in a cool, dark spot for the first few days of growth. After a couple of days, you can move the bottle to a location with indirect sunlight to encourage healthy growth.
6. Harvesting the Bean Sprouts
After about 3-5 days, your bean sprouts should be ready to harvest. The sprouts will have grown long, with the leaves starting to appear. Simply remove the cloth and gently pull the sprouts from the bottle.
Rinse the sprouts under cool water to remove any excess soil or debris. You can then use them immediately in salads, sandwiches, or any dish that calls for fresh sprouts.
Tips for Successful Bean Sprout Growth
-
Use High-Quality Seeds: For the best results, use fresh, high-quality seeds specifically labeled for sprouting. These seeds are less likely to contain pesticides or chemicals.
-
Keep It Clean: Make sure the bottle, cloth, and your hands are clean when handling the seeds to avoid contamination.
-
Monitor Moisture Levels: Keep an eye on the moisture levels of the sprouts. If they dry out, the growth will slow down, so ensure that they stay moist but not soggy.
-
Air Circulation: Good air circulation is crucial for preventing mold growth. Don’t cover the bottle too tightly, and be sure to rinse the sprouts regularly to keep them fresh.
Conclusion
Growing bean sprouts in plastic bottles is an easy, fun, and eco-friendly way to enjoy fresh, healthy food at home. It’s a perfect project for beginners, as it requires minimal space, effort, and equipment. By following the simple steps outlined above, you’ll have a steady supply of nutritious bean sprouts in just a few days.
So, if you’re looking for a cheap, fast, and sustainable way to grow food at home, try out this simple method of sprouting beans in plastic bottles. Your kitchen will be filled with fresh, crunchy sprouts that are perfect for all kinds of meals.
Happy gardening!


