Thyme (Thymus vulgaris) is a compact, aromatic herb prized for its earthy flavor and versatility in the kitchen. Whether used in roasted meats, soups, or vegetable dishes, thyme adds depth and fragrance to meals. Fortunately, this hardy herb is easy to grow indoors—even in small spaces—making it perfect for an indoor herb garden.
For a sustainable and space-saving approach, thyme can be successfully grown in upcycled plastic containers. By transforming discarded bottles into planters, you’ll reduce plastic waste and cultivate your own fresh herbs right from your windowsill. This guide will walk you through everything you need to start a thriving thyme garden indoors using recycled plastic.
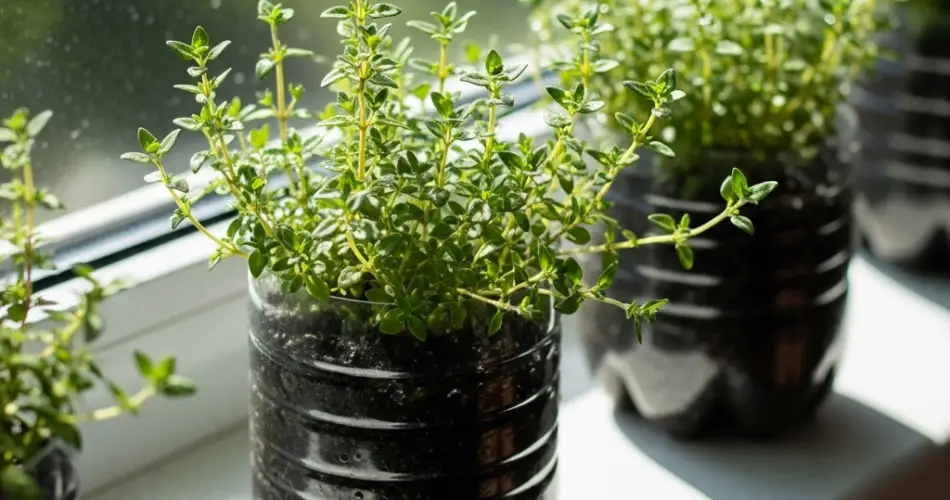
Why Grow Thyme in Recycled Plastic Bottles?
Thyme is an ideal herb for container gardening, and plastic bottles offer a practical, low-cost alternative to traditional pots. Here’s why this method works so well:
-
Eco-friendly: Gives single-use plastic a second life and helps reduce waste.
-
Compact and space-saving: Perfect for windowsills, kitchen counters, or small balconies.
-
Budget-friendly: No need to buy new pots or gardening supplies.
-
Thyme thrives in containers: This herb loves well-draining soil and controlled environments.
Whether you’re new to gardening or a seasoned grower, using recycled containers makes the process easy, sustainable, and rewarding.
What You’ll Need
To start your indoor thyme garden, gather the following materials:
-
1 clean plastic bottle (1.5 to 2 liters)
-
Potting mix suitable for herbs
-
Perlite or coarse sand (optional, for drainage)
-
Thyme seeds or cuttings
-
Scissors or a craft knife
-
Nail or skewer (to poke drainage holes)
-
Coffee filter, mesh, or breathable fabric (to line the base)
-
Marker (to guide cutting lines)
-
Spray bottle or watering can
Step-by-Step Instructions
Step 1: Prepare the Bottle
Begin by thoroughly washing and drying your plastic bottle. Remove any labels or stickers.
Using a marker, draw a line about one-third of the way up from the bottom. Carefully cut along the line to create your planting container. Alternatively, you can cut a horizontal opening along the side of the bottle and lay it flat for a longer, shallower growing surface.
Step 2: Add Drainage
Drainage is crucial for thyme, which doesn’t like soggy roots. Use a nail or skewer to poke several small holes in the bottom of the container.
Place a coffee filter or piece of mesh at the bottom to keep the soil in while still allowing water to escape.
Step 3: Prepare the Soil
Thyme prefers dry, well-draining soil. You can make your own mix by combining:
-
2 parts potting soil
-
1 part perlite or coarse sand
-
Optional: 1 part compost for added nutrients
Fill the container with the mix, leaving about an inch of space at the top.
Step 4: Planting Thyme
You can grow thyme either from seeds or stem cuttings.
From seeds:
-
Sprinkle the seeds evenly over the soil.
-
Cover lightly with a thin layer of soil or simply press them into the surface.
-
Mist with water to moisten the soil.
-
Place in a warm, sunny spot. Germination takes 10–14 days.
From cuttings:
-
Take a 3–4 inch stem cutting from a healthy thyme plant.
-
Remove the lower leaves and place the cutting in water for a few days until roots form.
-
Transplant the rooted cutting into the prepared soil.
Ideal Growing Conditions
Light: Thyme thrives in bright light and needs 6–8 hours of direct sunlight per day. A south-facing windowsill is ideal.
Watering: Let the top inch of soil dry out between waterings. Thyme is drought-tolerant and prefers slightly dry conditions over consistently wet soil.
Temperature: Keep the plant in a room with temperatures between 60–75°F (16–24°C). Avoid placing it near cold drafts or heat vents.
Care and Maintenance
-
Pruning: Trim the tops of the plant regularly to encourage bushy growth. Pruning also helps delay flowering and extends the harvest season.
-
Fertilizing: Thyme is a light feeder. Fertilize once every 4–6 weeks with a diluted liquid fertilizer during the growing season.
-
Pests: Indoors, thyme is relatively pest-free. Check occasionally for spider mites or aphids and rinse the leaves if needed.
-
Air circulation: Good airflow prevents mold and mildew. Don’t overcrowd your thyme with other plants.
Harvesting Thyme
Once the plant reaches 4–6 inches in height, you can begin harvesting.
-
Use scissors to snip off the top few inches, just above a set of leaves.
-
Harvest in the morning for the best flavor and aroma.
-
Avoid removing more than one-third of the plant at once to allow regrowth.
You can use thyme fresh or dry it for future use. To dry, hang small bundles upside down in a cool, dry area with good air circulation, or place the leaves on a tray to air dry.
Decorating Your Bottle Planter
Make your recycled thyme planter more visually appealing with a few creative touches:
-
Paint the bottle in earthy tones or bright colors.
-
Wrap it in burlap, jute, or twine for a rustic, farmhouse look.
-
Add labels or chalkboard tags to identify your herbs.
-
Place multiple bottles together to create a compact herb garden.
Final Thoughts
An indoor thyme garden grown in a recycled plastic bottle is an easy, eco-friendly way to keep fresh herbs within reach year-round. It requires minimal space, effort, and investment while offering the joy of harvesting homegrown flavor straight from your windowsill.
Whether you’re seasoning your favorite dish, brewing a herbal tea, or simply enjoying the fragrance, thyme is a valuable addition to any home. With this sustainable growing method, you not only enjoy fresh herbs but also contribute to reducing waste—one bottle at a time.


