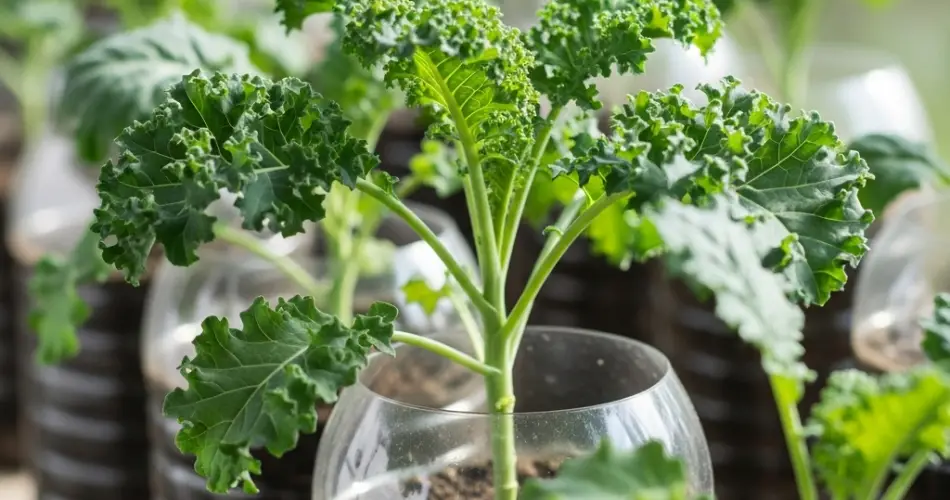
You don’t need a backyard, garden beds, or expensive tools to grow your own kale. With just a few plastic bottles, some potting soil, and kale seeds, you can create a productive and space-saving kale farm right at home. Whether you live in a small apartment or want to try sustainable gardening, this DIY kale project is perfect for maximizing space, reusing materials, and harvesting fresh, healthy greens all year round.
Why Grow Kale in Plastic Bottles?
Kale is a tough, leafy green that thrives in containers, making it one of the best crops for compact, low-maintenance gardening. It’s rich in iron, calcium, and vitamins A, C, and K, and adds incredible nutritional value to your meals. Plastic bottles, especially 1.5 to 2-liter sizes, are ideal for growing kale because they’re easy to hang or place on narrow ledges. They also allow for good water drainage and root development when properly prepared.
This method transforms waste into productivity. Instead of tossing plastic bottles into the trash, you can convert them into mini growing containers—creating a mini kale farm that fits even on a windowsill.
What You’ll Need
To set up your DIY kale farm, gather the following supplies:
-
1.5–2-liter plastic bottles (clean and label-free)
-
Scissors or a utility knife
-
Potting mix rich in organic matter
-
Kale seeds (dwarf or curly varieties are ideal)
-
Watering can or spray bottle
-
Twine, string, or wire (for hanging setups)
-
Small hand trowel (optional)
Select sturdy bottles that are transparent or lightly colored so you can observe soil moisture and root health. Ensure they are thoroughly cleaned and dried before use.
Preparing the Bottles
You can design your plastic bottle planters in two main styles: horizontal or vertical.
Horizontal Planters:
-
Lay the bottle on its side.
-
Cut a wide rectangular window from the top, leaving 1–2 inches of plastic on each side for structure.
-
Poke small drainage holes on the bottom side to prevent waterlogging.
-
Fill the bottle with potting mix, leaving about an inch from the top.
Vertical Hanging Planters:
-
Cut off the top third of the bottle.
-
Poke a few drainage holes at the bottom.
-
Use a heated metal tool or nail to make two small holes near the cut rim for hanging string or wire.
-
Fill with soil and slightly press it down.
Both styles work well—horizontal bottles can sit on windowsills or ledges, while vertical ones can be suspended from walls, railings, or window grilles.
Sowing and Germination
Sow kale seeds about 1/4 to 1/2 inch deep into the soil. For horizontal bottles, you can plant 2–3 seeds spaced 3–4 inches apart. For vertical setups, limit to one plant per bottle for best root growth.
Water gently after planting, keeping the soil consistently moist but never soggy. Kale prefers cool temperatures and can tolerate partial shade, though it will grow faster with at least 5–6 hours of sunlight daily.
Seeds should germinate within 5–10 days. Once the seedlings have grown a couple of inches tall, thin them to one strong plant per bottle if necessary.
Caring for Your Kale
Kale doesn’t need much to thrive, but consistent care ensures healthy, flavorful leaves:
-
Watering: Keep the soil slightly moist. Check daily, especially in warmer weather or if the bottles are hung outdoors.
-
Feeding: Use diluted organic liquid fertilizer every 10–14 days to boost growth.
-
Sunlight: Position your bottles in a bright area that avoids intense afternoon sun.
-
Support: As kale grows taller, especially curly varieties, you may need to gently tie the stem to a stake or the bottle itself to keep it upright.
Dealing with Pests
Kale can attract pests like aphids and cabbage worms. While the elevation from hanging bottles provides some protection, it’s important to check the leaves regularly.
If pests appear, rinse them off with water or use natural pest repellents like neem oil or garlic spray. Remove yellowing or damaged leaves to keep the plant healthy and encourage new growth.
Harvesting Your Kale
Kale is ready to harvest in about 6–8 weeks, depending on the variety. Begin harvesting when the leaves are about the size of your hand.
Use clean scissors to snip the outer leaves near the base, leaving the central leaves to continue growing. This “cut-and-come-again” method allows multiple harvests from each plant. Harvest every few days for a steady supply of greens.
If the plant starts to bolt (send up flowers), the leaves may turn bitter. At this point, it’s best to harvest all remaining leaves and compost the rest of the plant.
Replanting for Continuous Supply
After the plant finishes its life cycle, refresh the soil in the bottle or add a bit of compost before planting new seeds. To ensure a constant supply, stagger your planting by sowing a few new bottles every couple of weeks.
You can also rotate with other leafy greens like spinach, lettuce, or arugula to keep your miniature bottle farm thriving year-round.
A DIY kale farm using nothing but plastic bottles proves that home gardening doesn’t require a yard or fancy tools. With just a little effort and creativity, you can grow one of the most nutritious greens right from your windowsill or balcony. It’s a budget-friendly, eco-conscious, and satisfying way to put fresh, homegrown food on your plate.