Sage is a classic Mediterranean herb cherished for its earthy aroma, silvery-green leaves, and versatility in cooking. Whether enhancing roasted meats, seasoning stews, or adding a fragrant touch to bread and pasta, fresh sage elevates countless recipes. For those with limited space, a hanging garden made from recycled bottles offers a sustainable, space-efficient, and decorative way to grow this hardy herb at home.
This do-it-yourself bottle gardening method transforms empty plastic bottles into practical planters that can hang from a wall, balcony railing, or garden fence. Not only does it make the most of vertical space, but it also helps reduce waste by repurposing materials you might otherwise throw away.
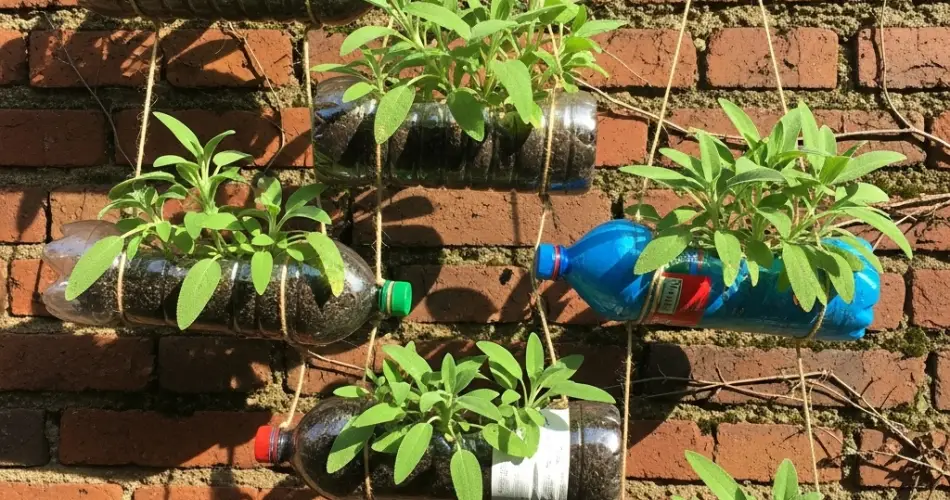
Why Use Bottles for Growing Sage?
-
Space saving – Ideal for balconies, patios, or small yards where floor space is limited.
-
Cost effective – Bottles are often free and easy to find.
-
Eco-friendly – Gives plastic bottles a second life, reducing environmental impact.
-
Customizable – Arrange the bottles in patterns or rows that suit your available space and style.
Materials You Will Need
-
Empty plastic bottles (1.5 to 2 liters are best)
-
A sharp utility knife or scissors
-
Potting mix suitable for herbs
-
Coarse sand or perlite for better drainage
-
Compost for nutrient enrichment
-
Sage seedlings or cuttings
-
Strong cord, wire, or brackets for hanging
-
Drill or heated nail to make drainage holes
Preparing the Bottles
-
Clean the bottles – Wash thoroughly to remove any residue.
-
Cut the planting opening – Make a horizontal slit on one side of the bottle large enough to plant and access your sage.
-
Add drainage holes – Drill or poke 3–4 small holes at the bottom to prevent water from pooling and causing root rot.
-
Optional decorative touch – Paint or wrap the bottles to match your balcony or garden theme, ensuring you use non-toxic, weather-resistant materials.
Creating the Hanging System
There are several ways to hang your bottle planters:
-
Horizontal hanging – Pass a cord or wire through holes on both ends of the bottle and secure it to a wall or railing.
-
Vertical stacking – Tie multiple bottles in a column using strong rope, spacing them so the plants have room to grow.
-
Wall-mounted – Fix each bottle individually to a fence or wall using metal brackets or hooks.
Make sure the structure you choose can hold the combined weight of the bottles, soil, and plants, especially after watering.
Preparing the Growing Medium
Sage thrives in well-draining soil with moderate fertility. A good mix would be:
-
2 parts potting soil
-
1 part coarse sand or perlite
-
1 part compost
This ensures the roots have enough aeration and nutrients while preventing excess moisture from lingering.
Planting the Sage
-
Fill each bottle with your prepared soil mix, leaving 2–3 cm of space at the top.
-
If using seedlings, gently remove them from their pots, taking care not to damage the roots.
-
Plant at the same depth they were growing previously, firming the soil lightly around the base.
-
Water lightly to settle the soil.
For cuttings, insert them into moist soil and place the bottles in a bright but shaded location until new growth appears, then move them into full sun.
Light and Watering Requirements
Sage is a sun-loving plant and needs at least 6 hours of direct sunlight each day. Place your hanging bottles where they will receive plenty of light, such as a south- or west-facing wall.
Water deeply but infrequently. Allow the top few centimeters of soil to dry between waterings. Overwatering can lead to root rot, especially in enclosed containers like bottles.
Ongoing Care and Maintenance
-
Pruning – Pinch back new shoots regularly to encourage a bushy shape and prevent the plant from becoming woody.
-
Fertilizing – Sage is not a heavy feeder, but you can apply a diluted liquid fertilizer every 4–6 weeks during the growing season.
-
Pest control – While generally resistant to pests, keep an eye out for aphids or spider mites. Rinse with water or apply a mild, natural insecticidal soap if needed.
-
Winter care – If you live in a colder climate, move bottles indoors or protect them with covers during frosty nights.
Harvesting Your Sage
You can begin harvesting once the plant is established, typically 2–3 months after planting. Snip off leaves as needed, starting with the outer growth and leaving the central stems intact. For drying, cut longer stems and hang them in a cool, airy place until crisp, then store in an airtight jar.
Advantages of a Bottle-Based Sage Garden
-
Fresh herbs within arm’s reach year-round
-
Attractive, green wall feature that beautifies your space
-
Sustainable use of materials that might otherwise be discarded
-
A low-maintenance, rewarding project even for beginner gardeners
Final Thoughts
A DIY hanging sage garden made from bottles is a creative and practical solution for urban gardeners. It combines sustainability, functionality, and aesthetics in a single project while delivering fresh herbs for your kitchen. With a few tools, some basic materials, and a sunny wall or railing, you can enjoy the fragrance and flavor of homegrown sage without needing a traditional garden bed.


