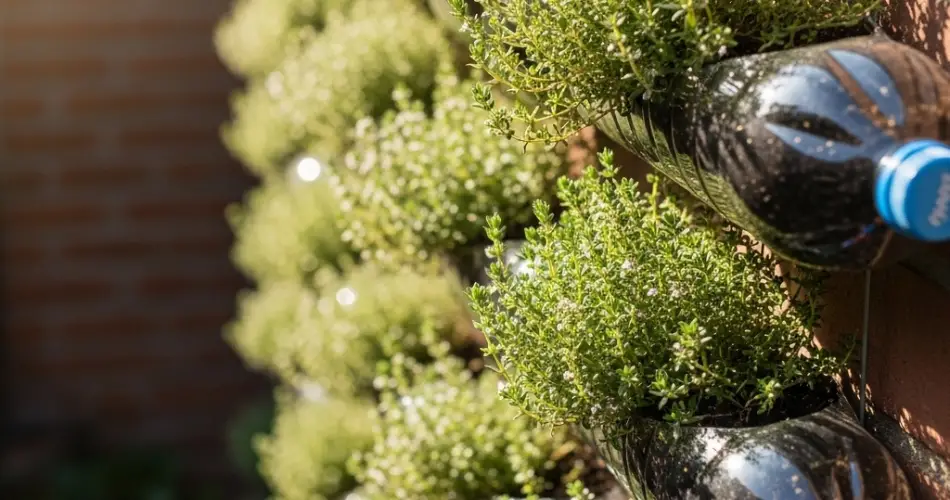
Thyme is a low-maintenance, fragrant herb that adds flavor and depth to a wide variety of dishes—from roasted vegetables to soups and marinades. Its compact size and drought tolerance make it a perfect candidate for container gardening. For those with limited space, a DIY bottle wall garden offers a creative, space-saving, and eco-friendly way to grow thyme right at home.
By reusing plastic bottles to create a vertical garden, you not only reduce waste but also make herb gardening accessible, even in small urban areas. Here’s a complete guide to growing aromatic thyme in a wall-mounted garden made entirely from repurposed plastic bottles.
Why Choose Thyme for a Bottle Wall Garden?
Thyme is an excellent herb for vertical gardening because it:
-
Has a shallow root system
-
Thrives in well-drained containers
-
Requires little water and maintenance
-
Prefers full sun, making vertical placement ideal for sunlight exposure
It also has ornamental appeal with its tiny green leaves and sometimes delicate purple or pink flowers. Plus, thyme is a perennial in many climates, meaning it will grow back each year with proper care.
What You’ll Need
To build your thyme wall garden, collect the following materials:
-
Several clean 1.5 or 2-liter plastic bottles
-
Scissors or a utility knife
-
A nail or drill for making holes
-
Sturdy twine, wire, or zip ties
-
Wall hooks, nails, or a frame for mounting
-
High-quality potting mix for herbs
-
Small thyme plants or seeds
-
Optional: small stones or charcoal for drainage
This system can be adapted to fit a balcony wall, garden fence, or even an indoor area near a sunny window.
How to Prepare the Bottles
-
Cut planting windows: Lay the bottle on its side and cut a rectangular opening on one side. This window will be used for planting and watering.
-
Drainage holes: Poke several small holes in the bottom of each bottle to prevent water buildup, which can lead to root rot.
-
Hanging holes: Make two small holes at each end of the bottle for threading twine or wire through. This is how you will suspend the bottles vertically.
-
Layer drainage material: Add a thin layer of pebbles or charcoal at the bottom of each bottle to improve drainage.
-
Fill with soil: Use a light, gritty potting mix suited for Mediterranean herbs. Leave about 1 inch of space at the top to allow room for watering.
Best Soil for Thyme
Thyme thrives in light, sandy, and well-drained soil. A heavy or moisture-retentive mix can lead to poor growth and disease.
Ideal mix:
-
2 parts potting mix
-
1 part coarse sand or perlite
-
Optional: a small amount of lime to raise soil pH
Aim for a slightly alkaline pH (around 7.0). Avoid rich, high-nutrient soils, which can result in less aromatic leaves.
Planting Thyme in Bottles
You can start thyme from seeds, but it’s slow to germinate. For faster results, use nursery-bought seedlings or stem cuttings.
-
From seeds: Sow a few seeds in each bottle, cover lightly with soil, and keep moist until germination (usually 2–3 weeks).
-
From seedlings: Gently place the plant in the soil opening, firm the soil around the base, and water thoroughly.
Place the bottles in a location that receives 6–8 hours of direct sunlight daily—this is essential for thyme to develop its full flavor and aroma.
Mounting the Bottle Wall Garden
There are several ways to arrange your thyme bottle planters:
-
Vertical stack: Use twine or wire to connect several bottles, hanging them vertically from a hook or nail.
-
Grid layout: Attach bottles to a wooden pallet or metal frame mounted on a wall or fence.
-
Horizontal railing system: Tie or clip bottles to a balcony railing in a single row for easy access.
Ensure each planter is spaced to allow airflow and sunlight to reach every plant. A drip irrigation setup or watering from the top bottle can help distribute water efficiently.
Watering and Maintenance
Thyme is drought-tolerant and prefers slightly dry conditions, so be cautious with watering.
-
Water only when the top inch of soil feels dry.
-
Avoid overwatering, especially in cooler months.
-
Ensure drainage holes are clear to prevent standing water.
Fertilizing is rarely needed. If desired, apply a diluted organic fertilizer once or twice during the growing season.
Harvesting and Pruning
Regular harvesting encourages fuller, bushier plants.
-
Begin harvesting when thyme reaches 4–6 inches tall.
-
Snip sprigs just above a leaf node using scissors or fingers.
-
Avoid removing more than one-third of the plant at a time.
-
Remove any flower buds to keep the plant focused on leaf production.
Dry harvested thyme for long-term use, or use it fresh in your favorite dishes.
Common Problems and Solutions
-
Woody growth: Prune regularly to prevent thyme from becoming too woody.
-
Yellowing leaves: May result from overwatering or poor drainage.
-
Lack of aroma: Typically caused by low light or overly rich soil.
Because thyme is naturally resistant to most pests and diseases, it is generally low-maintenance once established.
Final Thoughts
Creating a DIY bottle wall garden with thyme is an effective, sustainable, and beautiful way to grow herbs in small or unconventional spaces. With just a few tools and recycled bottles, you can enjoy the fresh scent and robust flavor of homegrown thyme year-round. This vertical solution not only conserves space but also transforms a plain wall into a vibrant, edible display of greenery and fragrance.


