Dill is a fast-growing, aromatic herb loved for its feathery leaves and tangy flavor, often used in pickles, sauces, fish dishes, and soups. Whether you’re working with a balcony, patio, or sunny wall, dill can thrive in vertical spaces—especially when grown in containers made from recycled plastic bottles. This eco-friendly, space-saving solution not only provides you with a steady supply of fresh dill but also helps reduce plastic waste.
A vertical wall garden is ideal for urban gardeners or anyone looking to maximize limited space. With just a few tools and basic materials, you can transform an empty wall or fence into a lush green herb garden filled with vibrant, fragrant dill.
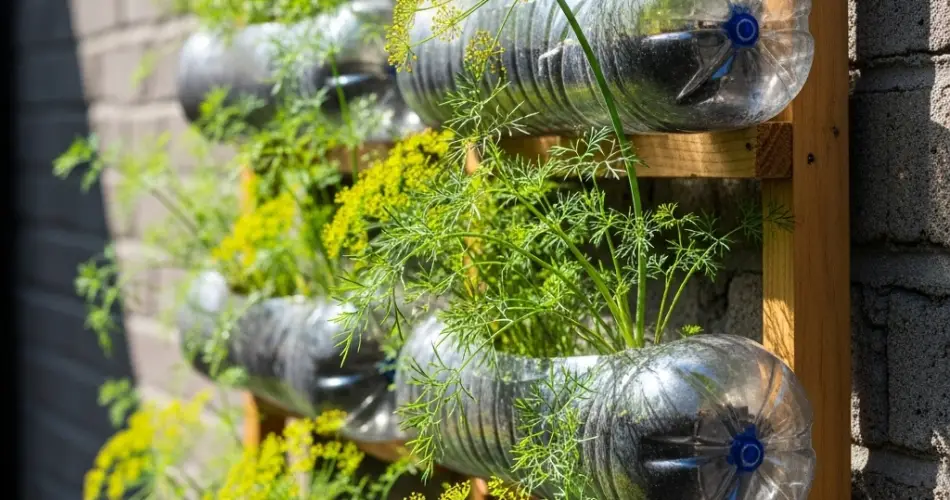
Why Grow Dill in a Vertical Bottle Garden?
Dill’s shallow root system, rapid growth, and preference for sunny spots make it a great herb for vertical gardens. Here are the benefits of growing dill in a bottle-based wall garden:
-
Space efficiency: Utilize vertical space on balconies, fences, or walls.
-
Eco-conscious gardening: Recycle plastic bottles into functional containers.
-
Easy access: Harvest fresh herbs without bending or crowding other plants.
-
Pest control: Elevated gardens often experience fewer ground-dwelling pests.
-
Visually appealing: Create a green, living wall with cascading dill foliage.
Materials You’ll Need
To build your vertical dill garden, gather the following:
-
Clean 1.5 or 2-liter plastic bottles (one for each plant)
-
Utility knife or scissors
-
Drill or heated nail (for making holes)
-
Twine, wire, or zip ties
-
Hooks, nails, or a wooden pallet for mounting
-
Lightweight potting mix
-
Dill seeds or young dill seedlings
-
Small stones or charcoal (optional for drainage)
A wall or surface that receives at least 6 hours of sunlight daily is ideal for growing healthy dill.
Preparing the Plastic Bottles
-
Cut a planting window: Lay each bottle horizontally and cut out a rectangular opening on one side. This will serve as the planting and watering access point.
-
Create drainage holes: Drill or poke 4–5 small holes in the bottom of each bottle to prevent water accumulation.
-
Add mounting holes: Create two holes on each side of the bottle, near the ends, for threading twine or attaching the bottle to a frame.
-
Add drainage layer: If desired, place a thin layer of pebbles or charcoal at the bottom of each bottle to improve drainage.
-
Add potting soil: Fill each bottle with well-draining herb-friendly potting mix, leaving about an inch at the top for watering space.
Best Soil for Dill
Dill prefers loose, well-draining soil rich in organic matter.
Recommended mix:
-
2 parts potting soil
-
1 part compost
-
1 part perlite or coarse sand
The ideal pH range for dill is between 5.5 and 6.5. Avoid compacted or soggy soil, as this can lead to root problems and stunted growth.
Planting Dill
Dill is typically grown from seed, as it has a long taproot that doesn’t transplant well.
-
Sow seeds directly into the prepared bottles, about ¼ inch deep.
-
Water gently and keep the soil moist until germination, which usually occurs within 7–10 days.
-
Once seedlings are 2 inches tall, thin them out, leaving the strongest plant in each bottle.
For a continuous harvest, sow new seeds every 2–3 weeks throughout the growing season.
Assembling the Vertical Garden
There are several creative ways to arrange your bottle planters:
-
Vertical column: Thread twine through the bottle ends and hang them in a vertical stack.
-
Wall-mounted grid: Use zip ties to fasten bottles to a wooden pallet or wire grid.
-
Balcony railing: Line bottles horizontally along the railing for a compact layout.
Ensure each bottle receives adequate light and airflow. Space the bottles about 8–10 inches apart vertically to avoid crowding and to allow dill’s feathery leaves to spread.
Watering and Feeding
Dill needs regular moisture but doesn’t tolerate waterlogged soil.
-
Water when the top inch of soil feels dry.
-
Avoid letting the soil dry out completely, especially during early growth.
-
In hot weather, water more frequently to prevent wilting.
Feed dill every 3–4 weeks with a diluted organic fertilizer or compost tea. Avoid over-fertilizing, which can lead to leggy growth and reduced flavor.
Harvesting Dill
You can begin harvesting dill leaves when the plant reaches about 6 inches tall.
-
Snip leaves with scissors or fingers, starting from the outer edges.
-
Don’t remove more than one-third of the plant at a time.
-
For dill seeds, allow some plants to flower and go to seed. Once the seed heads turn brown, cut them and hang upside down to dry.
Frequent harvesting encourages fuller growth and prevents the plant from bolting too soon.
Common Issues and Solutions
-
Bolting: In hot weather, dill may flower early. Provide partial shade during peak heat to slow bolting.
-
Yellow leaves: Usually caused by overwatering or poor drainage.
-
Aphids: Treat with a gentle spray of soapy water or neem oil if needed.
Dill generally grows well with minimal pest or disease issues when planted in well-lit, well-drained conditions.
Final Thoughts
Growing dill in a vertical wall garden using recycled plastic bottles is a smart, sustainable way to bring fresh herbs into your home—even if you don’t have much space. With just a few tools and a sunny wall, you can enjoy the flavor, fragrance, and beauty of homegrown dill all season long. Plus, the eco-friendly setup gives new life to discarded materials, turning waste into a thriving herb garden. Whether you’re pickling cucumbers or enhancing a salad, you’ll always have fresh dill right at your fingertips.


