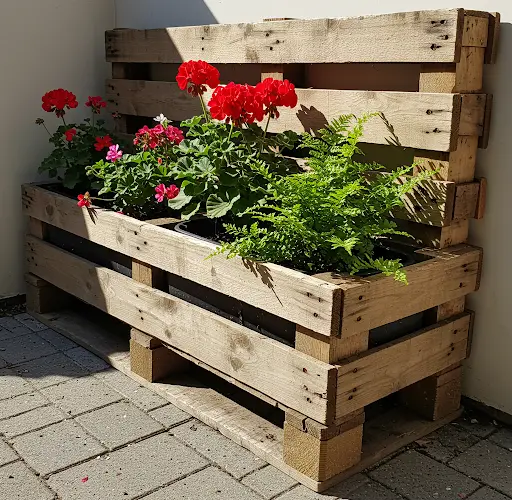
Creative Way to Upcycle Pallets into a Flower Planter Box | DIY Garden Ideas
Upcycling old pallets into a flower planter box is an excellent way to enhance your garden while promoting sustainability. Instead of letting unused pallets go to waste, you can transform them into stylish and functional planters that add charm and greenery to your outdoor space. This DIY project is not only budget-friendly but also customizable to fit your garden’s aesthetic. Whether you have a small balcony, backyard, or patio, repurposing pallets into planters is a creative solution for growing flowers, herbs, or even small vegetables.
In this guide, we will walk you through the steps to upcycle pallets into beautiful planter boxes, along with essential tips to ensure their longevity and effectiveness.
1. Why Upcycle Pallets into a Flower Planter Box?
There are several reasons why upcycling pallets for gardening is a great idea:
- Eco-Friendly: Reduces waste by repurposing materials.
- Cost-Effective: Free or inexpensive pallets are readily available.
- Customizable: Can be designed to match your garden’s style and size.
- Durable: Wooden pallets are sturdy and can support a variety of plants.
- Space-Saving: Great for small spaces and vertical gardening.
2. Choosing the Right Pallet for Your Planter Box
Before starting your project, it’s important to select a pallet that is safe and suitable for planting. Consider the following:
- Untreated Wood: Avoid chemically treated pallets, as they may leach harmful substances into the soil.
- HT (Heat-Treated) Stamp: Look for a stamp that says “HT,” which means the wood was treated with heat rather than chemicals.
- Sturdy and Undamaged: Choose a pallet that is in good condition without rot, cracks, or mold.
- Proper Size: Depending on your space, select a pallet size that fits your planter needs.
3. Materials Needed
To turn a pallet into a flower planter box, you will need:
- Wooden pallet (clean and untreated)
- Hammer or pry bar
- Saw (hand saw or circular saw)
- Screws or nails
- Drill or screwdriver
- Sandpaper
- Wood stain, paint, or sealant (optional for protection)
- Landscaping fabric or plastic liner
- Potting soil
- Flowers or plants of your choice
4. Step-by-Step Guide to Building a Pallet Planter Box
Step 1: Disassemble the Pallet (Optional)
If you want to create a customized planter box, you may need to take apart the pallet:
- Use a pry bar or hammer to carefully remove planks without breaking them.
- Remove excess nails and sand down rough edges.
- If you prefer a rustic look, you can leave the pallet intact and simply reinforce it.
Step 2: Cutting and Assembling the Box
- Measure and cut the pallet planks into the desired lengths for the base and sides.
- Arrange the cut planks into a rectangular or square shape.
- Use screws or nails to secure the pieces together, ensuring a sturdy frame.
- For added durability, reinforce the corners with additional wood pieces.
Step 3: Adding a Base and Liner
- Attach a wooden base to the planter if you want it to be a standalone box.
- Line the interior with landscaping fabric or a plastic liner to prevent soil from escaping while allowing water drainage.
- Use a staple gun to secure the liner inside the box.
Step 4: Sanding and Finishing
- Sand all surfaces to remove splinters and rough edges.
- Apply a wood stain, paint, or weather-resistant sealant to protect the planter from moisture and rot.
- Let the coating dry completely before adding soil.
Step 5: Planting Your Flowers
- Fill the planter with nutrient-rich potting soil.
- Arrange flowers or plants based on their sunlight and spacing needs.
- Water thoroughly and place the planter in your desired location.
5. Creative Design Ideas for Pallet Planters
Once you have the basic structure, you can get creative with your planter box:
- Vertical Wall Planter: Leave the pallet upright and plant flowers in the openings for a space-saving vertical garden.
- Tiered Flower Bed: Stack multiple pallet boxes to create a layered planting display.
- Hanging Planter: Attach hooks and hang the pallet on a fence or wall for a suspended planter.
- Colorful Painted Planter: Brighten up your garden by painting your pallet planter in vibrant colors.
- Wheeled Planter Box: Add wheels to the bottom for an easy-to-move flower bed.
6. Tips for Maintaining Your Pallet Planter Box
- Choose the Right Plants: Opt for flowers that suit your climate and the planter’s location.
- Drainage Considerations: Ensure proper drainage to prevent root rot.
- Regular Watering: Keep the soil moist but avoid overwatering.
- Seasonal Updates: Refresh your plants seasonally for a year-round blooming display.
- Wood Protection: Reapply sealant every few years to extend the planter’s lifespan.
7. Common Mistakes to Avoid
- Using Chemically Treated Pallets: Can be harmful to plants and the environment.
- Not Creating Drainage Holes: Leads to waterlogging and root damage.
- Skipping Sanding: Increases the risk of splinters and rough edges.
- Overloading with Soil: Too much soil can strain the structure and reduce airflow.
- Ignoring Weather Protection: Leaving wood untreated may cause it to deteriorate quickly.
8. Final Thoughts
Upcycling pallets into a flower planter box is a fun and sustainable way to add beauty to your garden. With just a few simple tools and materials, you can create a functional and stylish planter that complements your outdoor space. This DIY project is perfect for gardeners of all skill levels and offers endless possibilities for customization.
By following this guide, you’ll not only save money but also contribute to reducing waste while enjoying the satisfaction of growing your own flowers. So, grab an old pallet and start crafting your own unique planter box today!


