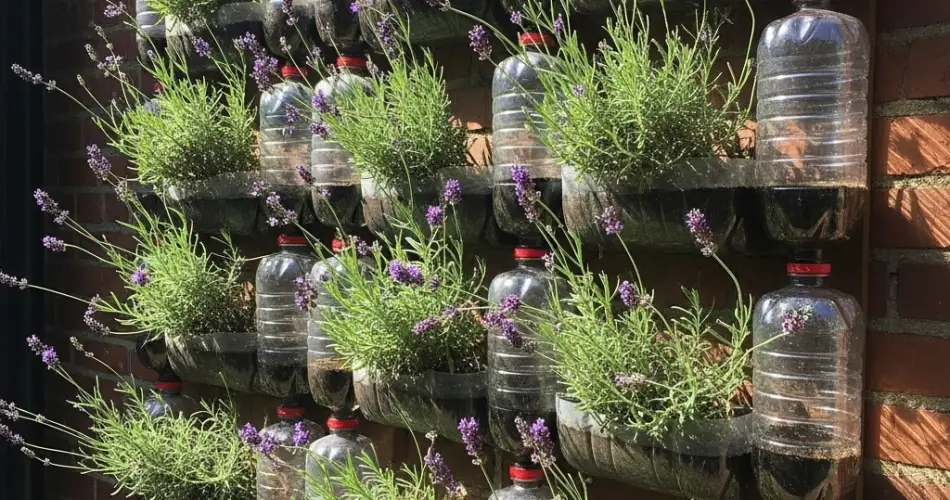
Chives are one of the easiest herbs to grow at home. With their mild onion flavor and attractive grass-like leaves, chives make an excellent garnish and a flavorful addition to countless dishes. They also produce beautiful purple flowers and are compact enough to thrive in small containers. If you’re short on gardening space but want a steady supply of fresh herbs, a vertical garden made from upcycled plastic bottles is the perfect solution.
By turning discarded bottles into wall-mounted planters, you can grow fresh chives in even the smallest urban spaces—on a balcony, kitchen wall, or backyard fence. This approach combines sustainability, simplicity, and productivity, making it ideal for beginner and seasoned gardeners alike.
Why Grow Chives Vertically?
Chives are well-suited for vertical gardening thanks to their shallow root systems and low maintenance needs. Here are a few reasons why growing them on a wall is a great idea:
-
Space-saving: Ideal for balconies or small patios where ground space is limited.
-
Eco-friendly: Upcycling bottles reduces plastic waste.
-
Accessible: Herbs are easier to harvest at eye level.
-
Visually appealing: Vertical gardens add green beauty to any wall or fence.
Chives also regrow quickly after harvesting, so you’ll always have fresh herbs at your fingertips.
What You’ll Need
To build your vertical chive garden, collect the following materials:
-
Several clean 1.5–2-liter plastic bottles
-
Sharp scissors or a utility knife
-
A nail or drill to make holes
-
Strong twine, wire, or zip ties
-
Hooks, nails, or a frame for mounting
-
Potting mix suitable for herbs
-
Chive seeds or young plants
-
Small pebbles or charcoal for drainage (optional)
A wall, fence, or any sunny vertical surface will work well for this setup.
Preparing the Bottles
-
Cut the planting window: Lay the bottle on its side and cut out a rectangular opening on one side. This opening should be wide enough to insert soil and plant the chives.
-
Make drainage holes: Drill or poke several small holes at the bottom of the bottle to prevent waterlogging.
-
Add hanging holes: Create two holes near the top and two near the bottom on each side of the bottle for threading wire or twine.
-
Layer drainage material: Add a small layer of gravel or charcoal to the bottom of the bottle to enhance drainage and keep roots healthy.
-
Add soil: Fill the bottle with a light, well-draining potting mix, leaving about an inch of space at the top for watering.
Ideal Soil for Chives
Chives grow best in well-draining, slightly rich soil that holds moisture but doesn’t become soggy.
Recommended mix:
-
2 parts potting soil
-
1 part compost
-
1 part perlite or coarse sand
This blend provides a good balance of nutrients, airflow, and drainage. A neutral to slightly acidic pH (6.0–7.0) is ideal for chives.
Planting Chives
Chives can be started from seed, transplants, or divisions from an established clump.
-
From seed: Sow seeds ¼ inch deep, water gently, and keep the soil moist until germination (7–14 days).
-
From transplants: Place the seedling or clump into the soil and firm it in gently. Water well to help it settle.
Chives thrive in full sun, so place your vertical garden in a location that receives at least 6 hours of sunlight daily. They’ll tolerate partial shade, but growth may be slower.
Assembling the Wall Garden
Once your planters are ready, you can arrange them vertically in a few ways:
-
Stacked system: Thread twine or wire through each side of the bottles and hang them in a vertical column.
-
Wall-mounted grid: Attach bottles to a pallet, metal grid, or wooden frame using zip ties.
-
Fence or railing: Fasten the bottles horizontally along a fence or balcony rail.
Space the bottles to allow adequate airflow and light for each plant. Be sure the structure is stable and easy to access for watering and harvesting.
Watering and Feeding
Chives like evenly moist soil, especially during warm weather. Water consistently, but avoid overwatering.
-
Water when the top inch of soil feels dry.
-
In hot weather, water more frequently, especially in shallow bottles.
-
Reduce watering in cooler months.
Feed chives every 3–4 weeks with a balanced liquid fertilizer or compost tea to keep the leaves lush and green.
Harvesting Chives
You can begin harvesting once chives are 6–8 inches tall.
-
Use scissors to snip leaves about 1 inch above the soil line.
-
Always cut from the outside, allowing the center to continue growing.
-
Avoid harvesting more than one-third of the plant at a time to ensure regrowth.
Regular harvesting encourages new shoots and prevents the plant from flowering too soon.
Common Issues and Solutions
-
Yellowing leaves: Often a sign of overwatering or poor drainage. Adjust watering and check drainage holes.
-
Thin or floppy growth: Usually due to low light. Move the garden to a sunnier spot.
-
Aphids: Spray with soapy water or use neem oil if pests appear.
Chives are generally disease-resistant and easy to grow with minimal attention.
Final Thoughts
A vertical wall garden made from upcycled bottles is a sustainable and space-efficient way to grow chives at home. With just a few recycled materials, you can transform any sunny wall into a productive herb garden that provides fresh, flavorful greens all year long. Whether you’re garnishing a soup, sprinkling over eggs, or whipping up a dip, homegrown chives will always be within arm’s reach—brightening your meals and your space at the same time.


