Casting Cement Pots from Plastic Bottles: A Creative and Sustainable Gardening Solution
Gardening is a rewarding hobby, and one of the most satisfying aspects is creating your own planters and pots. Rather than spending money on expensive, store-bought containers, you can make beautiful and durable pots from everyday materials. One such material that offers endless possibilities is plastic bottles. In this article, we’ll guide you through the process of casting cement pots from plastic bottles, a fun, eco-friendly, and cost-effective project that will elevate your garden or home decor.
Why Choose Cement Pots?
Cement pots are incredibly durable, offering long-lasting protection for your plants. They provide excellent insulation, keeping plant roots cool in the summer and warm in the winter. Additionally, the heavy weight of cement pots helps to prevent them from toppling over, making them a great choice for larger plants or outdoor gardening. Using plastic bottles to create these cement pots allows you to recycle materials while producing something both functional and aesthetically pleasing.
Materials You’ll Need
Before starting, gather the following materials:
-
Plastic bottles (large or medium-sized)
-
Cement (regular Portland cement works best)
-
Water
-
A mixing container (bucket or wheelbarrow)
-
A stir stick or shovel for mixing
-
A plastic sheet or old cloth to protect surfaces
-
Cooking oil or petroleum jelly for greasing
-
A pair of scissors or utility knife
-
Gloves (for safety)
-
Optional: Paint or decorative elements for finishing touches
Once you have everything ready, you’re all set to start crafting your cement pots!
Step-by-Step Instructions for Casting Cement Pots
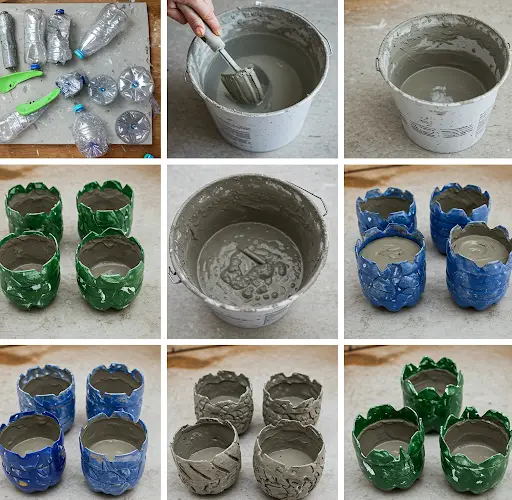
1. Prepare the Plastic Bottles
The first step in creating your cement pots is to prepare the plastic bottles. Choose bottles of different sizes depending on the size of the pots you want to make. Larger bottles will result in bigger pots, while smaller bottles are ideal for smaller plants.
Start by cutting the plastic bottles in half or into the desired height. For a simple pot, cutting the bottle in half is usually sufficient. If you want to create a pot with a unique shape, you can experiment with different cutting techniques. Remember that the bottle’s bottom will serve as the base of the pot, so make sure the cut is clean and even.
2. Grease the Bottle Mold
To ensure the cement doesn’t stick to the plastic bottle, you’ll need to grease the inside of the bottle. You can use cooking oil or petroleum jelly for this step. Apply a generous amount to the interior of the bottle, especially around the edges and where the cut is made. This will allow for easier removal once the cement has set.
3. Mix the Cement
In a large container, mix your cement with water according to the instructions on the cement packaging. Typically, the ratio is about 2 parts cement to 1 part water. Stir the mixture thoroughly until it reaches a thick, paste-like consistency. You want the cement to be thick enough to stay in place when poured into the mold but not too dry that it cracks as it sets.
If you want to add color or texture to your pots, you can mix in pigments or other materials like sand for a rustic finish. This is an optional step, but it can add a unique touch to your cement pots.
4. Pour the Cement into the Mold
Once the cement mixture is ready, pour it into the plastic bottle mold. Fill the bottle about halfway or more, depending on the size of the pot you want. Use a spoon or your hands (while wearing gloves) to press the cement mixture into the mold, ensuring there are no air bubbles. Smooth out the top of the cement to create an even surface.
At this point, you can also press small pebbles, seashells, or decorative items into the surface of the cement for added texture and visual appeal. If you prefer a smoother finish, you can use a wet cloth or sponge to gently smooth the surface after the cement has set for a few minutes.
5. Allow the Cement to Set
Now, it’s time to let the cement set and harden. Depending on the weather and humidity, this may take anywhere from 24 to 48 hours. It’s essential to let the cement cure completely before attempting to remove the plastic mold. Patience is key here, as rushing the process could cause the cement to crack or become weak.
6. Remove the Mold
Once the cement has set, it’s time to remove the plastic bottle mold. Gently cut away the plastic using a utility knife or scissors. Be careful not to damage the cement pot in the process. If you greased the inside of the bottle well, the cement should come out easily, leaving behind a smooth, solid pot.
If the pot has any rough edges or imperfections, you can lightly sand them down with sandpaper. This step is optional but will help to give your pot a more professional and polished finish.
7. Finishing Touches
Once the pot is fully removed from the mold and any rough spots are smoothed out, you can choose to paint or decorate the pot. Acrylic paint works well on cement, and you can use any color scheme or design that fits your style. Additionally, you can add decorative elements like moss, twine, or stones for a more personalized look.
8. Planting in Your New Cement Pots
After the cement pot is completely dry and finished, it’s ready for planting. Simply add soil to the pot and your choice of plants. Since cement pots are excellent at retaining moisture, it’s important to ensure proper drainage by adding a layer of small stones or gravel at the bottom of the pot. This will prevent water from pooling and keep the plant roots healthy.
Cement pots are especially good for hardy plants like succulents, herbs, or small shrubs. They’re also great for adding an industrial or modern look to your outdoor garden, patio, or balcony.
Benefits of Using Cement Pots
-
Durability: Cement pots are sturdy and long-lasting, making them perfect for outdoor use.
-
Eco-Friendly: By recycling plastic bottles, you’re reducing waste and contributing to a more sustainable lifestyle.
-
Cost-Effective: Making your own cement pots is an inexpensive alternative to buying pots from the store.
-
Customization: With cement, you can easily customize the pots to fit your personal style, making them unique to your garden.
Conclusion
Casting cement pots from plastic bottles is a simple yet highly creative gardening project that can bring a fresh, eco-friendly vibe to your home. By repurposing plastic waste and utilizing affordable materials like cement, you can create beautiful, functional pots for your plants. This DIY project not only saves money but also allows you to add a personal touch to your garden or home decor. Whether you’re a gardening enthusiast or someone who enjoys crafting, creating cement pots from plastic bottles is a fun and rewarding project worth trying!


