Growing chili peppers on your balcony is a rewarding experience that transforms even the smallest space into a vibrant and productive garden. With their compact size and colorful fruits, chili plants are perfect for containers, making them ideal for urban dwellers. Whether you’re a beginner or an experienced gardener, cultivating chili from seed to harvest is easier than you think—and the payoff is spicy, homegrown flavor right at your fingertips.
Why Grow Chili Peppers on the Balcony?
Chili peppers thrive in containers and are well-suited for balcony gardening for several reasons:
-
Compact size: Most chili varieties grow well in pots without becoming unruly.
-
Sun-loving: Balconies often provide just the right amount of direct sunlight that peppers need.
-
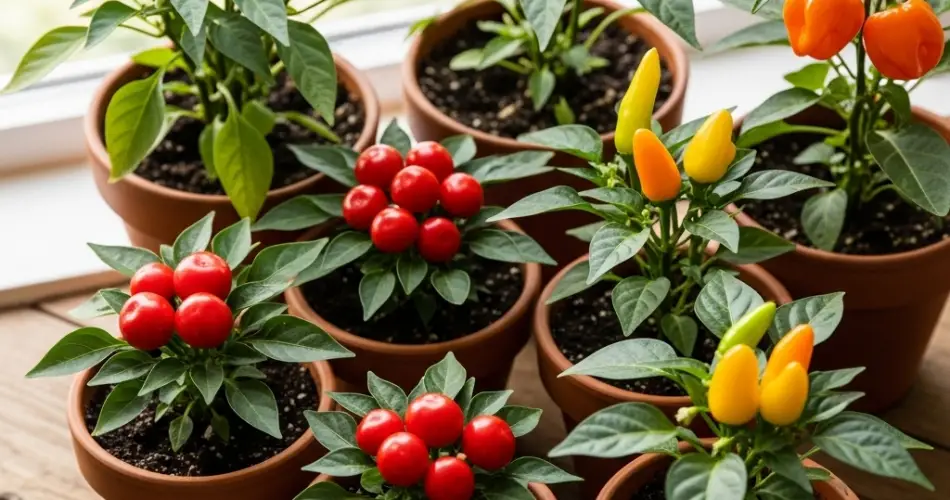
Aesthetic appeal: Chili plants add color and life to your space with their green foliage and bright red, yellow, or orange fruits.
-
Continuous harvest: Many chili varieties produce fruits for months, especially when regularly picked.
Growing chilies at home ensures you always have fresh, pesticide-free peppers for your favorite dishes.
Choosing the Right Chili Variety
Start by choosing chili varieties that match your taste preference and available space. Some compact and balcony-friendly options include:
-
Cayenne – medium-hot, ideal for drying or powdering
-
Thai chili – small but fiery, perfect for sauces and stir-fries
-
Jalapeño – mildly spicy and great for stuffing
-
Bird’s eye – compact and extremely spicy
-
Hungarian wax – moderately hot with yellow fruits
Dwarf or patio varieties are excellent choices for small containers and limited spaces.
Starting from Seed
Growing chilies from seed is easy and cost-effective. Here’s how:
-
Sow seeds indoors 6–8 weeks before the last expected frost or as early as spring.
-
Use seed trays or small pots filled with moist, well-draining seed-starting mix.
-
Place the seeds about 0.5 cm deep and cover lightly with soil.
-
Keep the soil moist and maintain a warm temperature (24–28°C or 75–82°F) to promote germination.
-
Germination typically takes 7–14 days. Use a heat mat or warm windowsill if needed.
Once seedlings develop two sets of true leaves, they can be transplanted into larger containers.
Transplanting into Balcony Pots
After the seedlings are 4–6 inches tall and outdoor temperatures are consistently warm, it’s time to move them to your balcony. Choose pots that are:
-
At least 10–12 inches deep
-
12–16 inches wide
-
Equipped with proper drainage holes
Use high-quality potting soil enriched with compost or organic fertilizer. Position the pot where it will receive at least 6 hours of full sun each day.
Caring for Your Balcony Chili Plant
Once your chilies are settled into their containers, they’ll require regular attention to thrive:
-
Watering: Keep the soil evenly moist but not soggy. Water when the top inch of soil feels dry. Avoid overhead watering to reduce disease risks.
-
Feeding: Use a balanced fertilizer every 2–3 weeks. Once flowering starts, switch to a potassium-rich fertilizer to boost fruit production.
-
Pruning: Pinch off the growing tips when plants are about 8–10 inches tall to encourage bushy growth.
-
Support: Some taller varieties may need staking to keep branches upright.
With consistent care, plants will begin flowering within 2 months and produce chilies soon after.
Pest and Disease Management
Balcony-grown chilies are less prone to pests than ground-planted ones, but occasional problems may arise:
-
Aphids: Spray with soapy water or neem oil.
-
Spider mites: Rinse leaves with water regularly and use insecticidal soap.
-
Fungal issues: Ensure good air circulation and avoid waterlogged soil.
Preventive care and regular observation will help keep your plants healthy and productive.
Harvesting Your Chilies
Most chili varieties are ready for harvest 60–90 days after transplanting. Chilies can be picked at any stage, depending on your preference:
-
Green stage: Mild and crisp
-
Fully ripe (red, orange, or yellow): More heat and sweetness
Use scissors or garden shears to snip off the fruits to avoid damaging the plant. Harvesting regularly encourages the plant to keep producing.
Uses and Preservation
Fresh chilies from your balcony garden can be used in countless recipes—salsas, sauces, stir-fries, and marinades. If you grow more than you can consume, preserve them by:
-
Drying: Hang or sun-dry for future grinding into powder.
-
Freezing: Chop and freeze in small bags.
-
Pickling: Store in vinegar and spices for a tangy condiment.
Having a steady supply of fresh and preserved chilies adds both convenience and flavor to your home cooking.
Final Tips for a Spicy Balcony Harvest
-
Start with a few plants and experiment with different heat levels.
-
Rotate pots occasionally for even sun exposure.
-
Label your varieties so you can remember their flavor and heat levels.
-
Consider companion planting with basil or marigold to naturally deter pests.
With just a little space and care, you can enjoy a steady harvest of fiery, flavorful peppers right from your balcony. Whether you’re cooking up a storm or just adding a kick to your salad, your homegrown chilies will bring bold taste and a sense of satisfaction with every bite.


