Amazing Idea: DIY Spiral Garden from Plastic Bottles for Small Spaces
If you love gardening but struggle with limited space, a DIY spiral garden made from plastic bottles is the perfect solution! This creative and eco-friendly gardening technique allows you to grow a variety of plants, including herbs, vegetables, and flowers, in a small area while repurposing plastic waste. A spiral garden maximizes vertical space, improves drainage, and creates a beautiful and functional garden design suitable for balconies, patios, and small backyards. In this guide, we will walk you through the step-by-step process of creating your own spiral garden from plastic bottles.
Why Choose a Spiral Garden Made from Plastic Bottles?
- Space-Saving: Ideal for small spaces, including balconies and urban gardens.
- Eco-Friendly: Repurposes plastic waste, reducing environmental impact.
- Easy to Maintain: Requires less weeding and watering compared to traditional gardens.
- Improves Drainage: The spiral shape allows water to flow naturally from top to bottom.
- Visually Appealing: Creates an attractive, layered garden that enhances any outdoor space.
- Cost-Effective: No need to buy expensive planters—just use recycled plastic bottles.
Materials Needed for a DIY Spiral Garden
To build your spiral garden, you will need:
- Plastic bottles (various sizes, preferably 1.5L or 2L bottles)
- Sharp knife or scissors (to cut the bottles)
- Drill or hot nail (to make drainage holes)
- Soil mix (rich in compost and organic material)
- Plants (herbs, vegetables, or flowers of your choice)
- Wooden stakes or wire (optional for extra support)
- Watering can (for easy watering)
- Paint and brushes (optional, for decoration)
Step-by-Step Guide to Creating a DIY Spiral Garden
Step 1: Planning Your Spiral Design
- Choose a Location: Select a sunny spot where your plants will get at least 6 hours of sunlight daily.
- Outline the Spiral: Use a stick or chalk to mark the spiral shape on the ground, keeping the inner circle smaller and gradually widening outward.
- Decide on the Height: Spiral gardens can be 1-3 feet high, depending on your preference.
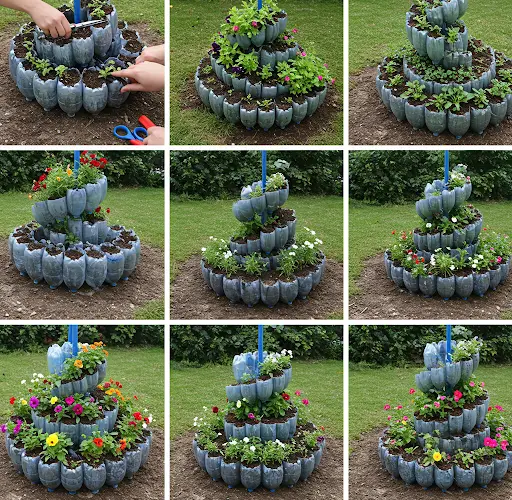
Step 2: Preparing the Plastic Bottles
- Cut the Bottles: Using a sharp knife or scissors, cut the plastic bottles horizontally, keeping the bottom half for planting.
- Make Drainage Holes: Drill small holes at the bottom of each bottle to allow excess water to drain.
- Clean and Decorate: Rinse the bottles thoroughly and paint them if you want to enhance the visual appeal of your garden.
Step 3: Arranging the Spiral Structure
- Start from the Center: Begin by placing a few bottles in a small circular formation at the center.
- Build Outward in Layers: Stack additional bottles in a spiral shape, gradually increasing the size of the layers as you move outward.
- Secure the Structure: If needed, use wooden stakes, wire, or zip ties to keep the bottles stable.
- Fill with Soil: Add a nutrient-rich soil mix into each bottle.
Step 4: Choosing and Planting Your Plants
Different plants thrive at different levels of the spiral. Here’s a simple guide:
- Top of the Spiral (Drier, More Sunlight) – Ideal for herbs like rosemary, thyme, and basil.
- Middle of the Spiral (Moderate Moisture) – Perfect for leafy greens like lettuce, spinach, and kale.
- Bottom of the Spiral (More Moisture Retention) – Best for plants like mint, parsley, and strawberries.
- Dig Small Holes: Create small holes in the soil and insert the plants or seeds.
- Water Gently: Lightly water the plants to help them settle into the new environment.
- Mulch for Moisture Retention: Add mulch around plants to retain moisture and reduce weeds.
Step 5: Caring for Your Spiral Garden
- Watering: Water the plants regularly, ensuring even moisture distribution.
- Fertilizing: Add organic compost or liquid fertilizer every two weeks for healthy growth.
- Pruning: Trim herbs and plants as needed to encourage new growth.
- Pest Control: Monitor for pests like aphids and caterpillars, using neem oil or natural solutions if necessary.
- Replenishing Soil: Over time, add compost or fresh soil to maintain nutrients.
Best Plants for a Spiral Garden
A variety of plants thrive in a spiral garden setup. Here are some great options:
- Herbs: Basil, thyme, rosemary, oregano, mint, cilantro
- Vegetables: Lettuce, kale, spinach, radishes, carrots
- Fruits: Strawberries, small peppers, cherry tomatoes
- Flowers: Marigolds, nasturtiums (which also deter pests)
Common Problems and Solutions
| Problem | Cause | Solution |
|---|---|---|
| Plants drying out | Too much sun exposure | Water more frequently, add mulch |
| Poor drainage | No holes in bottles | Ensure bottles have proper drainage holes |
| Unstable structure | Loose stacking | Secure with stakes or wire support |
| Pests attacking plants | Aphids, caterpillars | Use neem oil or companion planting |
| Yellowing leaves | Nutrient deficiency or overwatering | Adjust watering, add compost |
Additional Tips for a Successful Spiral Garden
- Use Different Bottle Sizes: Mix small and large bottles to create a more dynamic structure.
- Incorporate Vertical Supports: Add trellises or stakes for climbing plants like beans or cucumbers.
- Rotate Crops Seasonally: Grow different plants each season to keep the soil healthy.
- Decorate Creatively: Paint bottles in vibrant colors to enhance the aesthetics of your garden.
- Involve Kids in Gardening: This is a great eco-friendly DIY project for children to learn about sustainability and gardening.
Conclusion
Creating a DIY spiral garden from plastic bottles is an innovative and sustainable way to grow fresh herbs, vegetables, and flowers in a small space. This upcycled garden idea not only maximizes space but also contributes to environmental conservation by reusing plastic waste. Whether you have a tiny balcony, a rooftop, or a backyard, a spiral garden is an excellent solution for efficient gardening. Try it out and enjoy the benefits of fresh homegrown produce while making a positive impact on the environment!


