Why Growing Collard Greens in Plastic Containers is So Productive – No Need to Water!
Collard greens are a fantastic vegetable to grow at home, providing a rich source of nutrients, including vitamins A, C, and K, as well as fiber and antioxidants. Many gardeners are now turning to plastic container gardening for growing collard greens due to its high productivity, minimal maintenance, and ability to conserve water. But why is this method so effective? Let’s explore the secret behind growing collard greens in plastic containers and how you can do it successfully at home with almost no watering required!
The Secret to Growing Collard Greens in Plastic Containers
Growing collard greens in plastic containers offers several advantages over traditional ground planting. Here’s why this method is so productive:
✔ Water Retention – Plastic containers prevent excessive evaporation, allowing soil to stay moist for longer. ✔ Control Over Soil Quality – You can use nutrient-rich soil that ensures better growth. ✔ Root Health & Drainage – Containers allow you to control drainage, preventing waterlogging while keeping soil damp. ✔ Pest & Disease Management – Growing in containers reduces the risk of pests and soil-borne diseases. ✔ Portable & Space-Saving – Ideal for those with limited garden space or balconies.
With the right setup, your collard greens can thrive without daily watering and still produce large, healthy leaves!
Step-by-Step Guide to Growing Collard Greens in Plastic Containers
Step 1: Choosing the Right Container
To achieve optimal growth, select a container that meets these requirements:
✔ Size: Choose a container that is at least 12-18 inches deep and wide enough to allow roots to spread. ✔ Material: Plastic containers retain moisture better than clay or ceramic pots. ✔ Drainage Holes: Ensure proper drainage to prevent waterlogging. ✔ Self-Watering Containers (Optional): These are great for reducing watering frequency while keeping soil hydrated.
Step 2: Preparing the Soil Mixture
A well-balanced soil mix is crucial for ensuring healthy, productive collard greens.
✔ Use a high-quality potting mix with good drainage. ✔ Mix in compost or organic matter to boost nutrients. ✔ Add perlite or vermiculite to improve aeration. ✔ Maintain a soil pH of 6.0-6.8 for optimal growth. ✔ Consider adding slow-release organic fertilizer to reduce the need for frequent feeding.
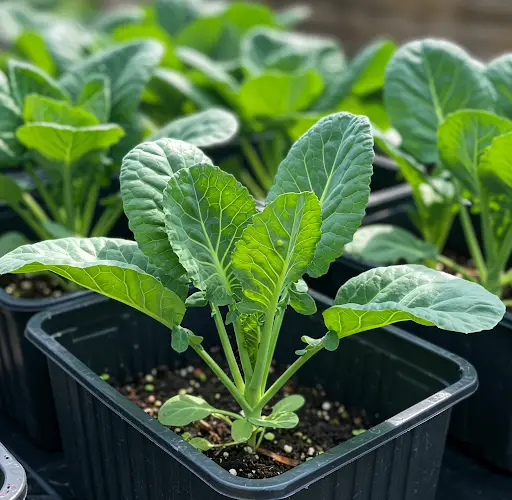
Step 3: Planting the Collard Greens
✔ Starting from Seeds:
- Sow seeds ½ inch deep and space them 6-12 inches apart.
- Keep the soil moist until germination occurs (usually in 5-10 days).
✔ Starting from Seedlings:
- Transplant seedlings when they are 3-4 inches tall.
- Gently loosen the roots before planting to encourage better establishment.
- Space plants at least 8-12 inches apart.
Step 4: The No-Water Secret – Mulching & Moisture Retention
One of the biggest advantages of growing collard greens in plastic containers is the ability to retain moisture effectively. You can almost eliminate the need for daily watering by using these techniques:
✔ Mulching: Apply a thick layer of mulch (straw, grass clippings, or wood chips) to help retain moisture and reduce water evaporation. ✔ Self-Watering Systems: If using a self-watering container, it will draw water from the reservoir as needed. ✔ Hydrogel Crystals: These can be mixed into the soil to hold moisture longer and slowly release it to the roots. ✔ Shade Placement: During hot months, placing containers in partial shade can reduce evaporation while still ensuring enough sunlight. ✔ Deep Watering Method: When watering, soak the soil deeply rather than frequently. This encourages roots to grow deeper, making the plants more drought-resistant.
Step 5: Sunlight & Temperature Requirements
✔ Sunlight: Collard greens thrive in full sun (6-8 hours daily) but can tolerate partial shade. ✔ Temperature: Best grown in cooler temperatures (50-75°F / 10-24°C). ✔ Protection from Frost: In colder regions, use row covers or bring containers indoors.
Step 6: Fertilizing for Maximum Yield
✔ Balanced Fertilizer: Use a 10-10-10 or organic compost tea once every 2-3 weeks. ✔ Nitrogen Boost: Collards benefit from nitrogen-rich fertilizers like fish emulsion or aged manure. ✔ Avoid Overfeeding: Too much fertilizer can cause excessive leafy growth with weak stems.
Step 7: Harvesting for Continuous Growth
✔ First Harvest: Begins 6-8 weeks after planting. ✔ Pick Outer Leaves First: Allow the plant to continue producing new leaves. ✔ Harvest Frequently: Regular harvesting encourages continuous growth and prevents the leaves from turning bitter. ✔ Leave the Central Growth Tip: This ensures new leaves continue forming. ✔ Storing: Keep fresh collard greens in the refrigerator for up to 10 days or blanch and freeze them for longer storage.
Common Problems & Solutions
✔ Yellowing Leaves: Could be caused by overwatering or nutrient deficiency – adjust soil moisture and apply balanced fertilizer. ✔ Pests (Aphids, Caterpillars): Use neem oil or introduce beneficial insects like ladybugs. ✔ Bolting (Going to Seed Early): Happens when exposed to too much heat – move to a cooler spot or use shade cloth. ✔ Root Rot: Ensure proper drainage and avoid overwatering.
Final Thoughts – The Best Way to Grow Collard Greens Effortlessly!
Growing collard greens in plastic containers is not only productive but also a low-maintenance way to ensure a steady supply of nutritious greens for your family. By retaining moisture effectively, using mulch, and leveraging self-watering systems, you can drastically reduce watering needs while still enjoying lush, healthy collards year-round.
So why wait? Try this method today and enjoy a bountiful harvest of fresh, delicious collard greens with minimal effort!
Happy Gardening!