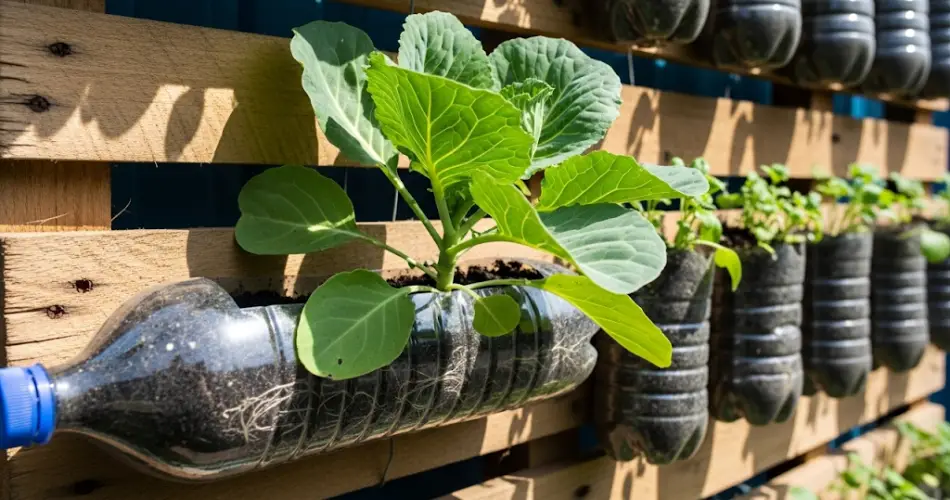
Cabbage might not be the first vegetable you associate with vertical gardening, but with the right setup and smart techniques, this leafy green grows remarkably well in bottle planters. Whether you’re working with a small balcony, a sunny wall, or just trying to maximize limited space, vertical bottle gardening offers a creative and sustainable way to cultivate compact cabbage varieties.
By turning plastic bottles into planters, gardeners can grow nutritious cabbage heads without traditional garden beds, conserving space and recycling materials in the process.
Why Choose Bottle Gardening for Cabbage?
Growing cabbage in a vertical garden made from bottles has many benefits:
-
Saves Space: Vertical setups maximize wall space and free up the ground.
-
Reuses Materials: Repurpose used plastic bottles instead of throwing them away.
-
Portable & Modular: Easy to rearrange bottles or replace individual plants.
-
Drainage Control: Plastic bottles allow for excellent drainage when designed correctly.
-
Ideal for Urban Settings: Perfect for apartments, patios, or rooftops with limited square footage.
Cabbage thrives in containers if its root system has enough room and the soil remains fertile and consistently moist. With good light and regular care, a healthy cabbage head will form even in a suspended bottle planter.
Best Cabbage Varieties for Bottle Planting
Choose small or fast-maturing cabbage types, as they’re better suited for vertical containers with limited root space. Some good varieties include:
-
‘Golden Acre’ – Compact, round green heads with a quick harvest time.
-
‘Pixie’ – Grows small, firm heads, ideal for container culture.
-
‘Red Express’ – A small red cabbage known for early maturity.
-
‘Mini Gonzales’ – A tight, miniature cabbage that’s perfect for tight spots.
These varieties don’t require sprawling root systems or large spaces and perform well with consistent watering and feeding.
Materials Needed
To start your vertical cabbage garden with bottles, gather the following supplies:
-
Large plastic bottles (5-liter size or more works best)
-
Sharp knife or scissors
-
Nail or drill for drainage holes
-
Strong wall or support structure (wooden frame, fence, or metal rack)
-
Quality potting mix enriched with compost
-
Organic or balanced liquid fertilizer
-
Cabbage seeds or seedlings
-
Twine, wire, or zip ties for mounting
How to Prepare the Bottles
-
Clean and Cut the Bottles
Wash your bottles thoroughly. Using a knife or scissors, cut a wide window on one side to create an opening for planting. Leave the bottom intact, and keep the cap on for mounting. Drill or poke several holes in the base for drainage. -
Mount the Bottles
Attach the bottles horizontally or vertically to your chosen support using wire or zip ties. Position them securely so they can bear the weight of the soil and plant. Leave about 12 to 18 inches of space between bottles to give each cabbage plant enough breathing room. -
Fill with Soil
Add a well-draining, nutrient-rich potting mix to each bottle. Mix in compost or slow-release organic fertilizer to prepare the soil for healthy root development.
Planting Cabbage
Start with seedlings or sow seeds directly into the bottle. If planting seeds, place 2–3 seeds per bottle at about ¼ inch depth. Once the seedlings emerge, thin them out to leave only the strongest one.
Place your vertical garden where it will get at least 4–6 hours of sunlight per day. Cabbage prefers cooler temperatures, so if you’re in a hot climate, provide some light afternoon shade.
Watering and Fertilizing
Cabbage requires steady moisture. Since bottles have limited soil volume, they dry out faster. Check the soil daily—water when the top inch is dry. During warmer days, you may need to water more frequently.
Feed the plants every 2–3 weeks using a diluted liquid fertilizer, compost tea, or organic plant food. This helps ensure the cabbage develops firm heads.
Managing Pests and Diseases
Even in a bottle garden, cabbage can face pest threats like aphids, caterpillars, and flea beetles. Keep an eye out for signs of infestation, especially under the leaves.
Tips to reduce pest problems:
-
Use neem oil or insecticidal soap.
-
Introduce beneficial insects like ladybugs.
-
Hang netting or lightweight row cover over your garden.
-
Remove any yellowing leaves or damaged plant parts.
Regular inspection and early intervention are key to keeping your plants healthy.
Supporting Cabbage Growth
Although cabbage doesn’t climb, as the head forms and gains weight, some support may be helpful, especially in a vertical position. If necessary, gently tie the plant base to the frame with soft fabric or garden twine.
Ensure each bottle is firmly mounted and check for shifting or tilting over time.
Harvesting Your Cabbage
Cabbage is ready to harvest when the head feels firm and full. This typically takes 60–90 days depending on the variety. Use a sharp knife to cut the head at its base. You can leave the root system in place to potentially encourage a smaller second crop of leaves.
Final Tips for Success
-
Rotate crops between seasons to avoid disease buildup in the soil.
-
Refresh the potting mix between plantings to maintain fertility.
-
Combine cabbage with herbs like thyme or rosemary nearby to deter pests naturally.
-
Be mindful of airflow; good ventilation helps prevent fungal issues.
Growing cabbage vertically in bottles is a smart solution for urban and small-space gardeners. With a little setup and regular care, you can enjoy fresh, crisp cabbage heads right from your wall-mounted bottle garden. It’s an efficient, low-cost method that turns recycled materials into nutritious food—perfect for sustainable living.


