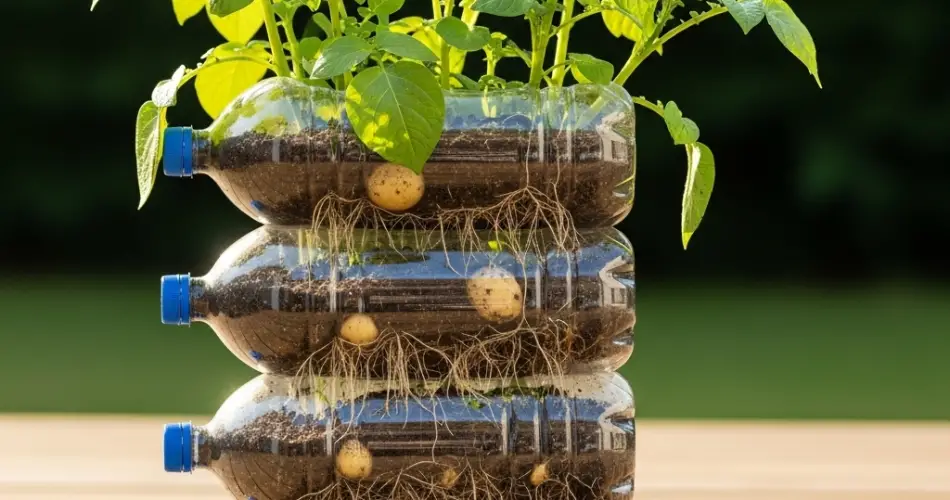
Potatoes, or spuds as they are fondly called, are a staple in many kitchens and gardens around the world. Traditionally, they are grown from seed potatoes or tubers planted directly in the ground. However, an innovative and sustainable way to propagate potatoes is by using cuttings and rooting them in upcycled plastic bottles. This method not only reduces waste but also provides an easy way to start plants indoors before moving them outdoors.
Bottle propagation is ideal for small-space gardeners, urban dwellers, or anyone who wants to experiment with a creative and eco-friendly gardening technique. By turning discarded bottles into miniature growing systems, you can observe root development, save money, and enjoy a rewarding hands-on project.
Why Propagate Potatoes in Bottles?
Potatoes are versatile plants that can sprout new growth not just from their tubers but also from their stems. When given the right conditions, stem cuttings can develop roots and grow into full plants. Using bottles to propagate spuds offers several benefits:
-
Recycling advantage: Old bottles get repurposed into planters instead of being thrown away.
-
Compact and convenient: Perfect for windowsills, balconies, or indoor spaces with limited room.
-
Visual progress: Clear bottles allow you to monitor root growth easily.
-
Low cost: You can grow plants from scraps or sprouted potatoes without purchasing new seed stock.
What You’ll Need
To get started, gather the following items:
-
A clear plastic bottle (1–2 liters works best)
-
A sharp knife or scissors
-
Healthy potato cuttings or sprouted sections
-
Clean water
-
Optional: potting soil if transitioning cuttings later
-
A bright indoor spot or windowsill
Preparing the Bottle
-
Select and clean the bottle: Choose a transparent bottle so you can see root development. Wash thoroughly to remove residue.
-
Cut the bottle: Slice the bottle about one-third from the top. The bottom section will serve as your planter.
-
Optional adjustments: If you’re rooting in soil, poke small drainage holes at the bottom. For water propagation, leave the base intact.
With this setup, you now have a functional container ready for potato cuttings.
Preparing the Potato Cuttings
-
Select healthy, sprouted potato sections or green stems from potato vines.
-
Cut them into pieces around 2–3 inches long, ensuring each piece has a sprout or growth node.
-
Let the cuttings air-dry for several hours to form a protective skin that reduces the risk of rot when placed in water or soil.
Two Methods of Propagation
1. Rooting in Water
This is the easiest way to watch roots form.
-
Fill the bottom of the bottle with a few inches of fresh water.
-
Place the potato cuttings inside, making sure the sprouted portion stays above water while the lower part touches the water.
-
Position the bottle in a bright spot with indirect sunlight.
-
Replace the water every 2–3 days to keep it clean and oxygenated.
Within one to two weeks, delicate white roots should begin to appear.
2. Rooting in Soil
If you want a sturdier start, try soil propagation.
-
Fill the bottom of the bottle halfway with moist potting mix.
-
Insert the potato cuttings into the soil, leaving the sprout or top exposed.
-
Water lightly, making sure the soil is damp but not soggy.
-
Place in a sunny windowsill or under a grow light.
New roots and leafy growth usually appear within two weeks. Once established, the cuttings can be transferred to larger pots or garden beds.
Caring for Rooted Cuttings
Once your potato cuttings begin to establish roots, proper care is key to success:
-
Light: Ensure they receive at least six hours of indirect or direct sunlight daily.
-
Water: Keep water fresh in bottle setups or maintain evenly moist soil for soil-grown cuttings.
-
Temperature: Spuds thrive in cooler conditions, ideally 15–20°C (59–68°F).
-
Transition: If transplanting outdoors, harden the plants by gradually exposing them to outdoor conditions over a week.
Benefits of the Bottle Method
-
Eco-friendly: Gives new life to discarded bottles.
-
Educational: A clear container makes it easy to observe the rooting process—perfect for children or beginner gardeners.
-
Affordable: Makes use of potato scraps that might otherwise go to waste.
-
Compact: Fits neatly on a windowsill, requiring little space.
Harvest Expectations
Although plants grown from cuttings may produce slightly fewer potatoes than those from seed tubers, they can still provide a satisfying harvest. With attentive care, you can expect fresh, homegrown spuds that are ideal for cooking. The method also provides valuable starter plants if you want to expand your garden later.
Conclusion
Propagating potatoes in upcycled bottles is a simple, eco-conscious, and rewarding way to grow food at home. Whether you use water or soil, the process is straightforward and educational, allowing you to watch roots develop and plants flourish.
This method not only helps reduce waste by repurposing plastic bottles but also offers a cost-effective way to multiply your potato plants. For those who enjoy experimenting with sustainable gardening, the bottle technique is an excellent addition to your indoor or small-space growing toolkit.


