Strawberries are one of the most beloved fruits to grow at home. Their sweet flavor, versatility in the kitchen, and attractive appearance make them a favorite for gardeners of all levels. However, many people think strawberries require large garden beds or specialized containers to thrive. In reality, you can start strawberries in something as simple as a recycled plastic bottle. With a bit of creativity, a plastic bottle can be transformed into a miniature planter that works perfectly as a strawberry starter kit. This method is budget-friendly, sustainable, and ideal for small spaces such as balconies, patios, or sunny windowsills.
Why Use Bottles for Strawberry Starters?
Strawberry plants thrive in well-drained soil and benefit from good air circulation around their roots. Bottles provide both, especially when adapted as vertical or hanging planters. They allow gardeners to control soil quality, reduce pest problems, and save space. Additionally, bottles create a portable environment, meaning you can move your strawberry starters easily to capture more sunlight or protect them from bad weather.
Another major advantage is sustainability. Repurposing bottles reduces plastic waste while giving you a functional container for growing healthy plants. For beginners, this approach also offers a low-cost way to experiment with strawberry cultivation before committing to larger setups.
Choosing the Right Bottle
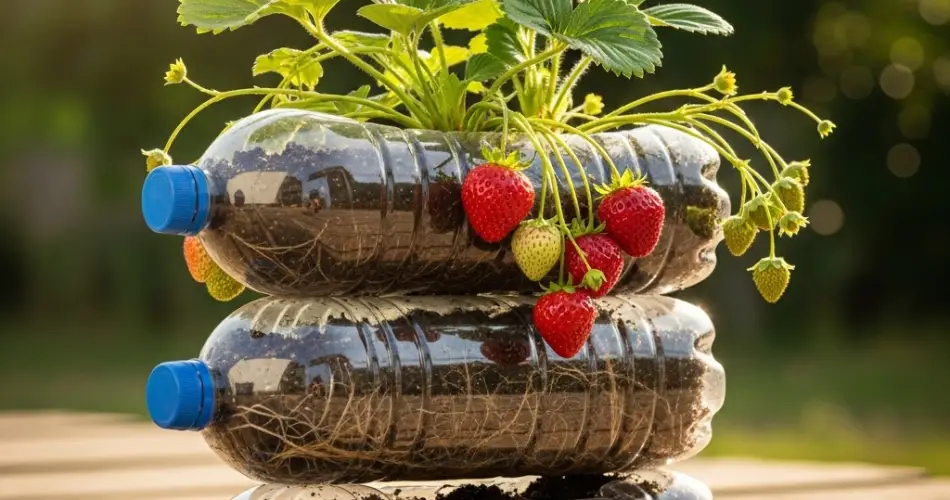
Clear or semi-transparent plastic bottles, such as soda or water bottles, work best. A two-liter bottle offers enough room for root development while being lightweight and manageable. Before using, wash the bottle thoroughly and remove any labels to ensure maximum sunlight penetration. You’ll also need a sharp knife or scissors to cut openings for planting and drainage.
Preparing the Bottle Planter
-
Cutting the Opening – Begin by cutting a rectangular or circular opening in the side of the bottle, large enough to accommodate a strawberry seedling. This opening will serve as the planting pocket. Alternatively, if you prefer a vertical garden, you can cut several small holes along the bottle’s length to plant multiple seedlings.
-
Drainage – Poke a few small holes in the bottom of the bottle to allow excess water to drain. Strawberries dislike soggy roots, so proper drainage is essential.
-
Support Options – Bottles can be placed horizontally on a windowsill or vertically hung with string or wire. Hanging options are especially useful for saving space and preventing slugs or other ground pests from reaching the plants.
Soil Mix for Strawberries
Strawberries prefer rich, well-draining soil with a slightly acidic pH between 5.5 and 6.5. Create a mix of garden soil, compost, and a bit of sand or perlite to ensure good drainage and aeration. Fill the bottle with the prepared soil, leaving some space at the top to prevent overflow during watering.
Planting Strawberry Starters
You can start strawberries either from seeds, runners, or small nursery seedlings.
-
Seeds: Sprinkle strawberry seeds on the soil surface and cover lightly with a thin layer of soil. Seeds can take two to three weeks to germinate, so patience is required.
-
Runners: If you have an existing strawberry plant, snip off runners with young root nodules and plant them in the bottle. This method establishes new plants faster.
-
Seedlings: Place a purchased or homegrown strawberry seedling into the opening, firming the soil around its roots.
Once planted, water gently until the soil is evenly moist.
Caring for Bottle-Grown Strawberries
Strawberries need at least six hours of direct sunlight daily, so position your bottle where it receives plenty of light. Rotate hanging bottles occasionally to ensure all sides get equal exposure.
Water consistently, keeping the soil moist but not waterlogged. Bottles can dry out quickly due to their limited soil volume, so monitor moisture levels closely, especially on hot days. To improve nutrient supply, apply a diluted liquid fertilizer every two weeks during the growing season.
Managing Growth
As your strawberry plants grow, you may notice runners forming. These can be trimmed if you want to concentrate energy on fruit production. Alternatively, runners can be propagated in new bottles to expand your strawberry patch.
If multiple seedlings share a single bottle, thin weaker ones early to give the strongest plant more room to develop. This ensures better fruiting and healthier growth.
Harvesting from Bottle Starters
Within a few months, depending on the variety and growing conditions, your strawberry plants will begin flowering. Small green fruits will soon appear, gradually ripening to red. Harvest strawberries as soon as they are fully colored and firm. Frequent picking encourages the plant to produce more fruit throughout the season.
Benefits of Bottle Strawberry Kits
This method offers a range of advantages:
-
Space-saving: Perfect for balconies, patios, or window gardens.
-
Pest control: Elevating bottles off the ground keeps fruits cleaner and reduces pest access.
-
Sustainability: Repurposes plastic bottles while minimizing the need for large pots.
-
Accessibility: Portable bottles allow even novice gardeners to try growing strawberries without special tools.
Conclusion
Transforming a plastic bottle into a strawberry starter kit is a simple yet effective way to grow your own fruit. With the right preparation and care, bottle planters provide the ideal environment for strawberry seedlings to thrive. They save space, reduce waste, and allow you to enjoy the satisfaction of harvesting homegrown strawberries—even in the smallest of spaces. Whether you’re a beginner or an experienced gardener, this creative approach makes it possible to savor fresh, juicy strawberries straight from your own DIY starter kit.


