Try These Tips on Growing Bell Peppers in Plastic Bottles – You Won’t Have to Buy Peppers Again!
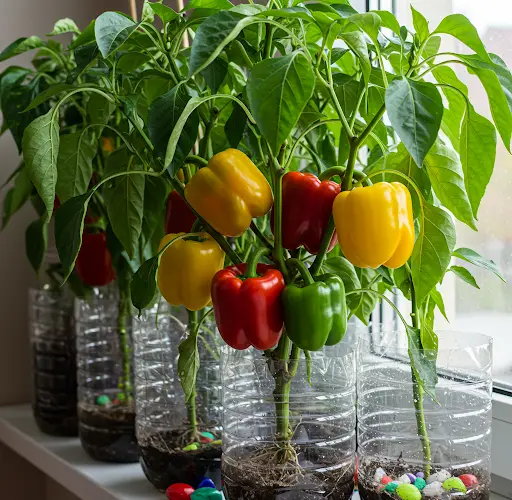
Growing your own vegetables at home is an excellent way to ensure fresh, organic produce while saving money. One of the best vegetables to cultivate in small spaces is bell peppers, and you can do so easily using recycled plastic bottles. This DIY gardening method not only helps reduce plastic waste but also provides an affordable and space-saving way to grow your own peppers year-round.
In this guide, we will explore step-by-step instructions on growing bell peppers in plastic bottles, along with essential tips to ensure a bountiful harvest. Whether you have a small balcony, a rooftop garden, or just a sunny windowsill, you can successfully grow bell peppers with this simple and eco-friendly method.
Why Grow Bell Peppers in Plastic Bottles?
There are numerous advantages to growing bell peppers in plastic bottles:
- Cost-Effective: No need to buy expensive pots—recycling plastic bottles saves money.
- Eco-Friendly: Reduces plastic waste by giving bottles a second life.
- Space-Saving: Ideal for urban gardeners with limited space.
- Easy Maintenance: Portable and simple to care for.
- Year-Round Harvest: Grow peppers indoors or outdoors, depending on the season.
Materials Needed
- Large plastic bottles (1.5L to 2L work best)
- A sharp cutter or scissors
- Sandpaper (optional, to smooth rough edges)
- A drill or hole punch (for drainage holes)
- Potting soil (rich in organic matter)
- Bell pepper seeds or seedlings
- Organic fertilizer or compost
- Watering can or spray bottle
- Support sticks (optional, for plant stability)
Step-by-Step Guide to Growing Bell Peppers in Plastic Bottles
Step 1: Prepare the Plastic Bottles
Choose large plastic bottles to provide enough space for root growth. Rinse them thoroughly and remove any labels or stickers. If needed, soak them in warm, soapy water to make the labels easier to remove.
Cut the bottles according to your preferred growing method:
- Vertical Planter: Cut off the top portion and use the bottom as a pot.
- Horizontal Planter: Cut a large opening along the side, keeping both ends intact.
- Hanging Planter: Cut an opening on the side and hang the bottle with ropes or wires.
Use sandpaper to smooth the edges and prevent injuries.
Step 2: Create Drainage Holes
Bell peppers require well-draining soil to prevent root rot. Use a drill or hole punch to make small drainage holes at the bottom of the bottle. For hanging planters, make a few extra holes along the sides to improve aeration.
Step 3: Fill with Soil
Use high-quality potting soil that is rich in organic matter. Bell peppers thrive in soil with good drainage and aeration. You can also mix in compost or organic fertilizer to boost nutrients.
Step 4: Plant the Bell Pepper Seeds or Seedlings
- If using seeds, plant 2-3 seeds per bottle about ¼ inch deep.
- If using seedlings, carefully transplant them into the bottle, making sure the roots are well-covered with soil.
- Gently press the soil around the plant to provide support.
Water lightly after planting.
Step 5: Provide Adequate Sunlight
Bell peppers require at least 6-8 hours of sunlight daily. Place your planters in a sunny location, such as a balcony, terrace, or windowsill. If growing indoors, consider using grow lights to ensure adequate light exposure.
Step 6: Watering and Fertilization
- Watering: Keep the soil moist but not waterlogged. Water when the top inch of soil feels dry.
- Fertilization: Use an organic fertilizer every 2-3 weeks to provide essential nutrients.
- Mulching: Adding a thin layer of mulch helps retain moisture and prevent weeds.
Step 7: Support and Pruning
As bell peppers grow, they may need support to prevent bending. Use small sticks or stakes to provide stability.
- Prune any weak or yellow leaves to encourage healthy growth.
- Pinch off early flowers to allow the plant to develop strong roots first.
Step 8: Pollination and Pest Control
- If growing indoors, hand-pollinate by gently shaking the flowers or using a small brush to transfer pollen.
- Keep an eye out for pests like aphids and spider mites. Use organic pest control methods such as neem oil or soap spray to keep them at bay.
Step 9: Harvesting Bell Peppers
Bell peppers take 60-90 days to mature. You’ll know they are ready for harvest when they reach full size and develop their characteristic color (green, red, yellow, or orange, depending on the variety).
- Use scissors or a sharp knife to cut the peppers off the plant, leaving a small stem attached.
- Regular harvesting encourages more fruit production.
Common Problems and Solutions
| Problem | Cause | Solution |
|---|---|---|
| Yellowing Leaves | Overwatering or nutrient deficiency | Adjust watering and add organic fertilizer |
| Small or Deformed Peppers | Lack of pollination or poor soil nutrients | Hand-pollinate and use nutrient-rich soil |
| Pest Infestation | Aphids, spider mites, or caterpillars | Use organic insecticides like neem oil |
| Blossom End Rot | Calcium deficiency or irregular watering | Maintain consistent watering and add calcium sources (eggshells) |
Tips for Maximizing Yield
- Use Large Bottles: Bigger bottles provide more root space, leading to healthier plants.
- Rotate Your Plants: If growing indoors, rotate bottles regularly for even light exposure.
- Add Companion Plants: Basil, marigolds, and onions help repel pests and promote growth.
- Replenish Soil Nutrients: Refresh the soil mix every few months for continuous healthy growth.
- Collect Seeds: Save seeds from harvested peppers for future planting.
Conclusion
Growing bell peppers in plastic bottles is a fantastic way to enjoy fresh, homegrown produce while reducing waste. This method is perfect for urban gardeners, small-space dwellers, or anyone looking for an easy, cost-effective way to grow their own food. By following these simple steps, you can cultivate a continuous supply of bell peppers and never have to buy them again!
So why wait? Start your plastic bottle garden today and enjoy the rewards of sustainable, homegrown bell peppers all year round!


