Tomatoes are one of the most rewarding crops for home gardeners. They’re easy to grow, highly productive, and versatile in the kitchen. Starting tomato seedlings in plastic bottles is a practical and space-saving method that allows you to germinate seeds indoors or on a balcony using minimal resources.
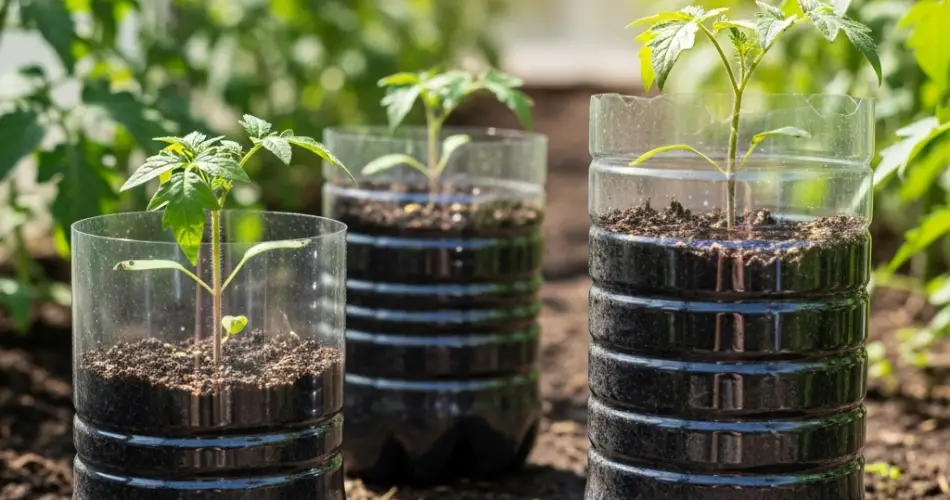
This method is ideal for small spaces and urban settings, offering an efficient way to give your tomato plants a strong start. The transparent plastic makes it easy to observe root development, manage watering, and maintain a healthy growing environment for your seedlings.
Why Use Bottles for Tomato Seedlings?
Plastic bottles provide a controlled microclimate for seed germination and early growth. Their compact size makes them perfect for windowsills, balconies, or patios. Here’s why bottles work well:
-
Reuses waste: Gives new life to plastic bottles while reducing trash
-
Saves space: Fits neatly in small areas
-
Retains moisture: Acts like a mini greenhouse
-
Easy to monitor: Transparent walls allow you to watch root development and soil moisture
-
Portable: Bottles are easy to move based on light and temperature needs
With the right setup, you can raise strong tomato seedlings ready for transplanting into containers, crates, or garden beds.
What You’ll Need
To start propagating tomatoes in bottles, gather the following:
-
1-liter or 1.5-liter clear plastic bottles
-
Sharp scissors or a craft knife
-
Good-quality potting or seed-starting mix
-
Tomato seeds (any variety you like)
-
Watering can or spray bottle
-
Optional: marker for labeling, small pebbles or coco coir for drainage
Preparing the Bottles
-
Clean Thoroughly
Wash each bottle with soapy water and rinse well to remove any residue. Let them dry completely. -
Cut the Bottles
Use scissors or a knife to cut horizontally about 10–12 cm from the base. The bottom part will serve as your propagation cup. Save the upper part to use as a humidity dome if desired. -
Poke Drainage Holes
Make 4–6 small holes in the base of the bottle to ensure excess water drains freely. -
Add a Drainage Layer (Optional)
A thin layer of pebbles or rice hulls at the bottom improves airflow and drainage.
Choosing and Sowing Seeds
Select high-quality tomato seeds, preferably from a variety known to do well in your climate. For small spaces, consider determinate or dwarf varieties like ‘Patio Princess’, ‘Tiny Tim’, or ‘Roma’.
-
Prepare the Soil
Use a loose, well-draining mix:-
1 part compost
-
1 part garden soil (sifted)
-
1 part coco peat or sand for aeration
Moisten the soil slightly before filling your bottle bases—damp but not soggy.
-
-
Fill the Bottle Bases
Fill each container about 80% full with the prepared soil. -
Plant the Seeds
Sow 2–3 seeds per bottle, planting them about 0.5–1 cm deep. Cover lightly with soil and press gently. -
Water Gently
Use a spray bottle or fine watering can to moisten the surface without disturbing the seeds. -
Cover (Optional)
Place the top of the bottle back over the base to act as a humidity dome. Remove the dome daily for ventilation.
Germination and Seedling Care
Tomato seeds typically germinate in 5–10 days under the right conditions. Place the bottles in a bright, warm spot with indirect sunlight. Maintain a temperature between 20–27°C (68–81°F) for best results.
Water when the topsoil feels dry, but avoid overwatering. Once the seedlings emerge:
-
Remove the humidity dome
-
Rotate the bottles daily to ensure even light exposure
-
Continue to mist or water lightly to maintain consistent moisture
Thinning and Transplanting
When the seedlings develop their first true leaves (the second set after the initial sprout), it’s time to thin them. Choose the strongest seedling in each bottle and snip the others at the base using small scissors.
Once the chosen seedlings reach 10–15 cm tall, they’re ready for transplanting. Prepare a larger container, grow bag, crate, or garden bed with rich, loose soil.
To transplant:
-
Water the seedling a few hours before transplanting.
-
Gently squeeze the sides of the bottle to loosen the soil.
-
Slide the seedling out with the root ball intact.
-
Transplant it deeper than it was growing in the bottle—tomato stems can produce roots along buried sections, making the plant stronger.
Continued Tomato Care
After transplanting:
-
Place plants in a sunny spot with 6–8 hours of direct sunlight daily.
-
Water regularly, keeping the soil evenly moist but not soggy.
-
Support taller varieties with stakes or cages.
-
Use organic fertilizer every 2–3 weeks to encourage healthy growth and flowering.
Mulch around the base of the plants to retain moisture and suppress weeds.
Final Thoughts
Starting tomato seedlings in bottles is an efficient and sustainable way to propagate one of the most popular homegrown vegetables. It allows you to control every stage of early development, reuse materials, and save space—making it perfect for urban gardeners, beginners, or anyone looking for a cleaner, smarter way to grow.
With just a few seeds, soil, and bottles, you’ll be on your way to harvesting vibrant, juicy tomatoes in no time.


