Tomato cultivation is a rewarding gardening venture, and with the right approach, even small spaces can yield bountiful harvests. For over 90 years, one seasoned gardener has shared an innovative method for growing tomatoes in high-yield plastic bottles, and it’s a technique that can transform your gardening experience. By following this simple, yet highly effective method, you can grow healthy, fruitful tomato plants right at home, regardless of how much space you have.
Here’s how you can replicate the method to maximize your tomato harvest:
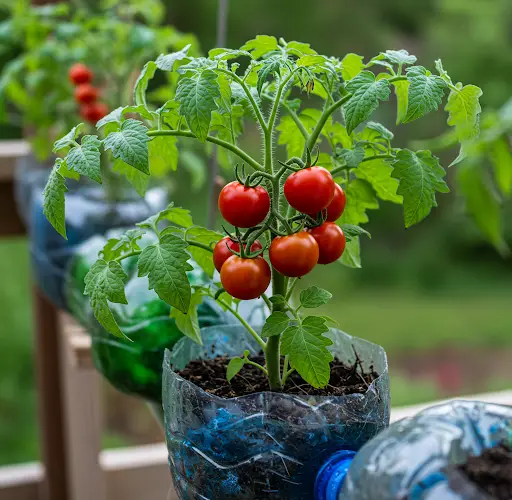
Why Plastic Bottles?
Plastic bottles are an excellent option for growing tomatoes because they offer several advantages. Not only are they readily available, but they are also perfect for creating mini-greenhouses that help trap heat and moisture, encouraging faster growth. The confined space allows for root growth in a concentrated environment, ensuring that your tomatoes receive optimal nutrients.
Plastic bottles also help with drainage. With a few modifications, they can become the perfect self-watering container for your tomatoes. Plus, this approach helps minimize pests and weeds, giving your plants the best chance for success.
Materials You Will Need
To get started, gather the following materials:
-
Plastic Bottles – 2-liter or 5-liter bottles work well.
-
Scissors or a Knife – To make cuts in the bottle.
-
Soil – Choose high-quality potting soil.
-
Tomato Seeds or Seedlings – Opt for a variety suited to container growing.
-
Watering Can or Bottle – For watering your plants.
-
Fertilizer – A balanced organic fertilizer for tomato plants.
Step-by-Step Guide for Growing Tomatoes in Plastic Bottles
1. Preparing the Plastic Bottles
Start by thoroughly cleaning your plastic bottles to remove any labels and residue. This ensures that the soil remains free of chemicals or any unwanted materials.
Next, cut the plastic bottles in half or make a slit around the middle. This will allow you to create a reservoir at the bottom of the bottle, which will collect excess water and allow the plant roots to access moisture when needed. Leave the top part of the bottle attached to the bottom so that it can act as a funnel for water. You can also poke several small holes in the bottom of the bottle for drainage.
2. Create a Proper Drainage System
To avoid waterlogging, it’s important to ensure good drainage. As mentioned earlier, poke several holes at the bottom of the bottle, which will allow excess water to escape. This will keep the roots from becoming waterlogged, which can lead to diseases such as root rot. Adding a layer of small stones or gravel at the bottom of the bottle can also help improve drainage.
3. Filling the Bottle with Soil
Fill the bottom of the plastic bottle with a good-quality potting mix, leaving about an inch or two from the top. You want the soil to be loose enough to allow for proper root growth while being dense enough to retain moisture.
When filling the bottle, avoid compacting the soil too much, as tomatoes need plenty of air around their roots to grow healthy. Gently pack the soil, leaving space for planting.
4. Planting the Tomato Seedlings
If you’re planting seedlings, carefully dig a hole in the soil and plant them deep enough that the roots are fully covered. For best results, plant the tomato seedlings a little deeper than they were in their original containers. Tomatoes can develop roots along their stems, so burying them deeper will encourage a stronger root system.
Alternatively, you can plant tomato seeds, but keep in mind that it will take longer for them to grow. Plant the seeds about half an inch deep and cover with soil. Water gently to keep the soil moist but not soggy.
5. Watering and Maintaining the Plants
One of the main benefits of using plastic bottles is their ability to act as self-watering systems. After filling the bottle, you can pour water into the top, which will slowly trickle down to the plant’s roots. However, be sure to keep an eye on the moisture level. If the soil feels dry, add more water, but avoid over-watering, as this can lead to root rot.
Tomato plants typically need a lot of water, especially during the hotter months. However, watering the plants deeply once a week should suffice. Ensure that the soil remains consistently moist but not drenched.
6. Providing Adequate Light and Temperature
Tomatoes thrive in full sun, so make sure your plastic bottle planters are placed in a location that receives plenty of sunlight. Aim for at least 6–8 hours of sunlight per day.
Tomatoes grow best in warm conditions, so if you live in a cooler climate, consider using a plastic bottle greenhouse or placing your plants in a warmer, sunny area. A temperature range between 65°F to 75°F (18°C to 24°C) is ideal for healthy growth.
7. Pruning and Supporting the Plants
As the tomatoes grow, it’s important to prune away any dead or yellowing leaves to encourage new growth. Also, remove any suckers – the small shoots that grow between the main stem and branches – to ensure that the plant’s energy goes into producing fruit rather than excessive foliage.
Supporting your tomato plants with stakes or small trellises can help keep the plants upright as they grow. Since tomatoes are heavy, especially when they start fruiting, it’s important to provide support so the plant doesn’t collapse under its own weight.
8. Harvesting the Tomatoes
Once your tomatoes start to ripen, they will gradually change color from green to red (or yellow, depending on the variety). Gently pick the ripe tomatoes by hand, being careful not to damage the plant.
By following these simple steps, you can enjoy a bountiful harvest of tomatoes, even in small spaces. This technique, passed down through generations, offers a straightforward, environmentally friendly way to grow your own tomatoes without needing large garden plots. Give it a try, and you’ll be amazed at the results!


