Tips for Growing Melons on the Terrace – Very Fruitful and Easy for Beginners
Growing melons on your terrace is a rewarding and enjoyable experience, even if you are a beginner. With the right techniques, you can cultivate sweet, juicy melons in limited space and enjoy a high yield. Whether you have a small balcony, a rooftop garden, or a spacious terrace, this guide will provide you with everything you need to grow healthy and productive melon plants.
Why Grow Melons on the Terrace?
Melons are a delicious and refreshing fruit that can be easily grown in containers. Here are some reasons why growing melons on the terrace is a great idea:
- Space-Saving: You can grow them in pots, grow bags, or hanging containers.
- High Yield: Proper care can lead to a bountiful harvest.
- Fresh and Organic: Homegrown melons are free from chemicals and pesticides.
- Cost-Effective: Save money by growing your own sweet melons.
- Beautiful Greenery: Melon vines create a lush and beautiful environment on your terrace.
Choosing the Right Melon Variety
Selecting the right variety of melons is crucial for terrace gardening. Some of the best varieties for container growing include:
- Cantaloupe: Sweet and aromatic with netted skin.
- Honeydew: Smooth-skinned with juicy flesh.
- Watermelon (Dwarf Varieties): Perfect for small spaces.
- Galia Melon: A hybrid variety with a tropical flavor.
- Sugar Baby Watermelon: Small and ideal for container growth.
Choose a variety that suits your taste and available space.
Step 1: Selecting the Right Container
Melons need space to grow, so choosing the right container is essential.
- Size: A minimum of 10-15 gallons (40-60 liters) is recommended.
- Material: Use plastic, clay, or fabric grow bags.
- Drainage: Ensure the container has proper drainage holes to prevent root rot.
Step 2: Preparing the Best Soil for Melons
Melons thrive in nutrient-rich, well-draining soil. The ideal soil mix includes:
- 40% Garden Soil: Provides structure for plant roots.
- 30% Compost: Supplies essential nutrients for growth.
- 20% Sand or Perlite: Ensures good drainage.
- 10% Coco Coir or Peat Moss: Helps retain moisture.
- pH Level: Slightly acidic to neutral (pH 6.0-7.0) is ideal.
Step 3: Planting Melon Seeds or Seedlings
You can start melons from seeds or seedlings.
- Starting from Seeds:
- Soak seeds in warm water for 4-6 hours to speed up germination.
- Plant seeds 1 inch deep in the soil.
- Keep the soil moist and warm (70-85°F / 21-29°C).
- Germination takes 5-10 days.
- Starting from Seedlings:
- Transplant seedlings when they have 2-3 true leaves.
- Handle the roots carefully to avoid transplant shock.
Step 4: Providing Proper Sunlight and Support
Melons need full sunlight to thrive.
- Sunlight: Ensure at least 6-8 hours of direct sunlight daily.
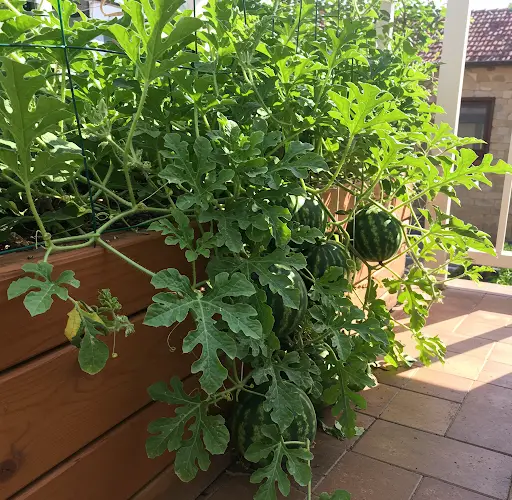
- Support: Use a trellis or stakes to support vines and keep fruits off the ground.
- Hanging Method: Melons can be grown in hanging baskets with proper support for fruits.
Step 5: Watering and Fertilizing Melon Plants
- Watering:
- Keep the soil consistently moist but not soggy.
- Water deeply 2-3 times a week, especially in hot weather.
- Avoid wetting the leaves to prevent fungal diseases.
- Fertilizing:
- Apply a balanced fertilizer (10-10-10) once a month.
- Use organic compost or manure for natural growth.
- Increase potassium and phosphorus when flowering starts.
Step 6: Pollination for Higher Yield
Melons require pollination for fruit development.
- Hand Pollination:
- Use a small brush to transfer pollen from male to female flowers.
- This increases fruit set in terrace gardens where bees may be scarce.
- Encourage Bees: Plant flowers nearby to attract natural pollinators.
Step 7: Managing Pests and Diseases
Common problems include:
- Powdery Mildew: Prevent with good air circulation and avoid overhead watering.
- Aphids & Spider Mites: Control with neem oil or insecticidal soap.
- Fungal Diseases: Use organic fungicides and maintain proper spacing.
Step 8: Harvesting Melons at the Right Time
Knowing when to harvest is crucial for getting sweet and juicy melons.
- Signs of Ripeness:
- The fruit changes color and develops a fragrant smell.
- The stem begins to dry and easily detaches.
- Watermelons sound hollow when tapped.
- Harvesting Tip: Use a sharp knife or scissors to cut the fruit, leaving a small portion of the stem attached.
Bonus: Storing and Enjoying Your Homegrown Melons
- Fresh Storage: Keep whole melons in the fridge for up to 2 weeks.
- Cut Storage: Store slices in an airtight container for up to 5 days.
- Creative Uses: Enjoy fresh, in smoothies, salads, or desserts.
Common Mistakes to Avoid
- Overcrowding: Leaves need space for proper air circulation.
- Overwatering: Leads to root rot and fungal infections.
- Poor Pollination: Results in small or deformed fruits.
- Lack of Support: Fruits may touch the soil and rot.
Conclusion
Growing melons on your terrace is easier than you think! By following these simple steps, you can enjoy a bountiful harvest of sweet and delicious melons. Whether you are a beginner or an experienced gardener, these tips will help you maximize your yield and make the most of your space. Start your melon-growing journey today and enjoy fresh, homegrown fruits right from your terrace!