Tips for Growing Kale in Plastic Bottles Without Care
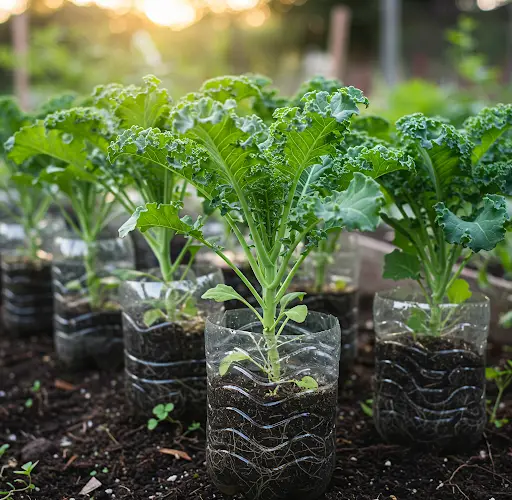
Kale is one of the most nutritious and versatile leafy greens, rich in vitamins, minerals, and antioxidants. But did you know you can grow it effortlessly at home using recycled plastic bottles? This method is perfect for those with limited space, allowing you to enjoy fresh, organic kale without needing much care. Whether you live in an apartment, have a small balcony, or simply want an easy gardening project, growing kale in plastic bottles is a sustainable and efficient solution.
In this guide, we will show you how to grow kale in plastic bottles with minimal effort, from choosing the right variety to harvesting healthy, vibrant leaves.
Why Grow Kale in Plastic Bottles?
Using plastic bottles as plant containers comes with several advantages:
- Saves Space: Perfect for vertical gardening, balconies, or small areas.
- Recycles Waste: Helps reduce plastic pollution by repurposing bottles.
- Requires Minimal Maintenance: Needs little watering and no weeding.
- Portable: You can move them easily to adjust for sunlight and weather conditions.
- Grows Year-Round: Suitable for indoor and outdoor cultivation.
Step-by-Step Guide to Growing Kale in Plastic Bottles
Materials Needed:
- Plastic bottles (1.5L or larger)
- Kale seeds or seedlings
- Potting soil or compost-rich garden soil
- Organic fertilizer (compost, banana peel tea, or fish emulsion)
- Watering can or spray bottle
- Sharp knife or scissors
- Drill or nail (for drainage holes)
- Mulch (optional for moisture retention)
Step 1: Choosing the Right Kale Variety
Several kale varieties thrive in containers, including:
- Curly Kale: Most common, with ruffled leaves and a mild flavor.
- Lacinato (Dinosaur) Kale: Dark green, bumpy leaves with a sweeter taste.
- Red Russian Kale: Purple-tinged leaves with a tender texture.
- Siberian Kale: Hardy variety that grows well in cool and warm conditions.
All these varieties adapt well to small spaces and require little maintenance.
Step 2: Preparing the Plastic Bottles
- Cut the Bottle: Use a sharp knife or scissors to cut a large opening on the side of the plastic bottle. Leave enough space for soil and roots to grow.
- Create Drainage Holes: Use a drill or nail to poke 3-5 small holes at the bottom to prevent waterlogging.
- Fill with Soil: Use well-draining soil mixed with compost to provide essential nutrients.
For hanging planters, you can punch holes on the top and insert string for easy suspension.
Step 3: Planting Kale Seeds or Seedlings
Starting from Seeds:
- Sow 2-3 seeds per bottle, about ¼ inch deep.
- Lightly cover with soil and mist with water.
- Place bottles in a sunny spot (6-8 hours of light per day).
- Germination occurs in 5-10 days.
- Thin seedlings, leaving only the strongest one per bottle.
Transplanting Seedlings:
- If using seedlings, make a hole in the soil deep enough for the roots.
- Gently place the seedling inside and cover with soil.
- Water immediately to help roots establish.
Step 4: Watering and Mulching
- Water regularly, keeping the soil moist but not soggy.
- Use a spray bottle to mist the leaves in hot weather.
- Apply mulch (dry leaves or straw) to retain moisture and prevent soil drying.
Since plastic bottles retain heat, avoid overwatering to prevent root rot.
Step 5: Fertilizing for Healthy Growth
- Apply a liquid organic fertilizer every 2-3 weeks (compost tea, banana peel tea, or diluted fish emulsion).
- Sprinkle crushed eggshells around the base for extra calcium.
- Avoid excessive nitrogen to prevent too much leafy growth with weak stems.
Step 6: Managing Pests and Diseases
| Common Issue | Cause | Solution |
|---|---|---|
| Aphids | Sap-sucking pests on leaves | Spray with neem oil or soapy water |
| Cabbage Worms | Caterpillars chewing leaves | Hand-pick or use floating row covers |
| Yellowing Leaves | Overwatering or lack of nutrients | Adjust watering and apply compost |
| Powdery Mildew | Humidity and poor airflow | Ensure proper spacing and airflow |
Since plastic bottles are compact, pests are easier to control manually than in traditional gardens.
Step 7: Harvesting Kale
- Kale is ready to harvest in 50-70 days after planting.
- Pick outer leaves first, allowing the inner leaves to continue growing.
- Harvest regularly to encourage continuous growth.
- Leaves taste sweeter after cool nights or light frost.
Kale will continue producing for several months, providing a fresh supply with minimal effort.
Bonus Tips for Effortless Kale Gardening
- Rotate Bottles: Move them to follow the sunlight for optimal growth.
- Interplant with Herbs: Growing basil, garlic, or chives nearby helps repel pests.
- Use Self-Watering Bottles: Modify the bottle by adding a wick system to reduce watering frequency.
- Grow Indoors in Winter: Place near a sunny window or under grow lights for year-round harvest.
- Replenish Soil: After a few months, refresh the soil with compost or organic amendments to maintain nutrient levels.
Final Thoughts
Growing kale in plastic bottles is an easy, low-maintenance, and space-saving way to enjoy fresh greens at home. With minimal care, you can harvest nutritious kale for months while reducing plastic waste. Whether you have a backyard, balcony, or windowsill, this method ensures a steady supply of organic kale with little effort.
Try this simple, eco-friendly gardening technique today and enjoy fresh, homegrown kale with ease!


