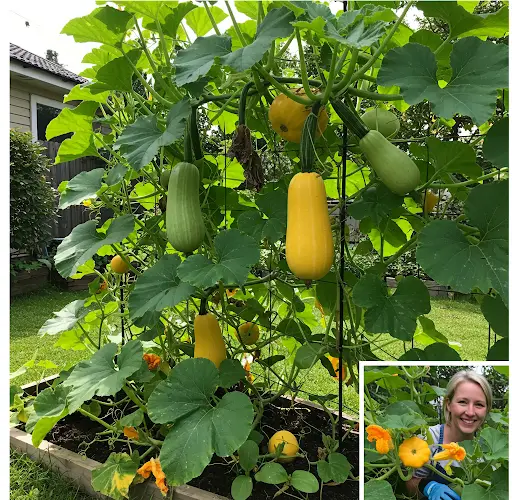
How I Grow Pumpkins and Squash for My Family to Eat All Year Round
Growing pumpkins and squash is one of the most rewarding gardening experiences because these crops provide a bountiful harvest that can be stored and enjoyed throughout the year. Whether you’re looking to grow pumpkins for delicious homemade pies, roasted squash for soups, or nutritious additions to family meals, learning the right techniques can maximize your yield and ensure a year-round supply.
In this guide, I’ll share my step-by-step process for growing pumpkins and squash successfully, from choosing the right varieties to proper harvesting and storage techniques.
Why Grow Pumpkins and Squash?
Pumpkins and squash are not only delicious and versatile in the kitchen, but they also have numerous benefits:
- Nutrient-rich: Packed with vitamins A, C, and fiber, supporting overall health.
- Easy to grow: Low maintenance once established.
- High yield: A few plants can produce enough squash for months.
- Long storage life: Winter squash and pumpkins can last for several months if stored properly.
- Saves money: Homegrown produce eliminates the need to buy store-bought squash.
Step 1: Choosing the Right Pumpkin and Squash Varieties
There are two main types of squash: summer squash and winter squash. Choosing the right variety depends on your climate, space, and preference.
Summer Squash (Best for Fresh Eating)
- Zucchini – Fast-growing, perfect for stir-fries, roasting, and salads.
- Pattypan squash – Unique shape, mild flavor, great for grilling.
- Yellow crookneck squash – Tasty and easy to grow.
🌱 Tip: Summer squash varieties produce quickly and continuously throughout the season, making them ideal for fresh consumption.
Winter Squash & Pumpkins (Best for Long Storage)
- Butternut squash – Creamy texture, excellent for soups and roasting.
- Acorn squash – Small, easy to store, and great for baking.
- Spaghetti squash – Healthy pasta alternative with stringy flesh.
- Sugar pie pumpkins – Ideal for baking and making pumpkin puree.
- Large carving pumpkins – Fun for Halloween but also edible!
🌱 Tip: Winter squash and pumpkins take longer to mature but store well for months.
Step 2: Preparing the Planting Area
Pumpkins and squash thrive in warm, well-draining soil with plenty of sunlight. Proper preparation ensures healthy plants and high yields.
Soil Preparation
- Choose a Sunny Spot: These crops need at least 6-8 hours of direct sunlight daily.
- Loosen the Soil: Dig 12 inches deep and remove any weeds.
- Improve Drainage: If the soil is heavy, mix in sand or compost to prevent waterlogging.
- Add Organic Matter: Pumpkins love nutrient-rich soil, so mix in well-aged compost or manure before planting.
- pH Level Check: Aim for a soil pH between 6.0 – 6.8 for optimal growth.
🌱 Tip: Squash plants are heavy feeders, so applying a balanced organic fertilizer at planting time is beneficial.
Step 3: Planting Pumpkins and Squash
Direct Seeding (Best Method)
- Wait for Warm Weather: Sow seeds directly into the garden after the last frost.
- Create Mounds: Make small hills of soil 2-3 feet apart to improve drainage and encourage strong root development.
- Plant Seeds: Place 2-3 seeds per hill, about 1 inch deep.
- Thin the Seedlings: Once they sprout, leave the strongest plant per hill.
Transplanting (For Early Start)
- Start Seeds Indoors: About 3-4 weeks before the last frost.
- Use Biodegradable Pots: This minimizes root disturbance when transplanting.
- Harden Off Plants: Acclimate seedlings to outdoor conditions before transplanting.
- Transplant Carefully: Keep the soil moist and avoid damaging roots.
🌱 Tip: Pumpkins and squash need plenty of space, so avoid overcrowding.
Step 4: Watering and Mulching
- Water Deeply: Provide 1-2 inches of water per week, preferably in the morning.
- Use Soaker Hoses or Drip Irrigation: Prevents water from splashing onto leaves, reducing disease risk.
- Mulch Heavily: Apply straw or dried leaves around plants to retain moisture, regulate temperature, and prevent weeds.
🌱 Tip: Avoid overhead watering to prevent powdery mildew and fungal issues.
Step 5: Fertilizing and Supporting Growth
- Early Growth: Use a nitrogen-rich fertilizer to encourage leaf and vine development.
- Flowering Stage: Switch to a phosphorus-rich fertilizer to promote fruit production.
- Hand Pollinate (If Needed): If bees are scarce, transfer pollen from male to female flowers using a small brush.
🌱 Tip: To increase pumpkin size, remove excess fruits and allow 2-3 per vine to grow large.
Step 6: Harvesting and Storing for Year-Round Supply
When to Harvest
- Summer squash: Pick when young and tender, about 6-8 inches long.
- Winter squash and pumpkins: Harvest when the rind is hard and deep-colored.
- Check the Stem: A mature pumpkin/squash has a dry, woody stem.
How to Store for Year-Round Use
- Cure the Harvest: Leave winter squash and pumpkins in a warm, dry place for 10-14 days to toughen the skin.
- Cool, Dark Storage: Keep them in a dry place between 50-60°F (cellars or pantries work well).
- Refrigeration: For summer squash, store in the fridge for 1-2 weeks.
- Freezing and Canning: Puree, slice, or dice for freezing; pressure-can pumpkin for long-term storage.
🌱 Tip: Regularly check stored squash and remove any that show signs of rot.
Final Thoughts
Growing pumpkins and squash is one of the best ways to ensure a continuous food supply for your family. By choosing the right varieties, planting correctly, and following simple care techniques, you can enjoy these delicious vegetables all year round.
Whether you have a large backyard garden or a small urban space, these tips will help you maximize your harvest and store your squash successfully.
So why not start planting today? With a little effort and planning, you can enjoy homegrown pumpkins and squash in your family meals for months to come!
🌱 Happy Gardening! 🎃🥒


