Tree grafting is one of the most effective horticultural techniques to improve fruit quality, increase yields, and rejuvenate old or damaged trees. While it may seem like a complex process reserved for professionals, there are simple tricks and techniques that even beginners can use with great success.
This guide explains an easy and effective grafting method that works particularly well on fruit trees, including mango, guava, citrus, apple, and pear. With a few basic tools and materials, you can merge two different tree parts into one thriving plant that produces stronger, more resilient, and better-fruiting branches.
What is Grafting?
Grafting is the process of joining a scion (a young shoot or twig from a desired plant variety) to the rootstock or branch of another tree. When done correctly, the scion and rootstock grow together as a single plant, combining their best traits.
-
Scion: The upper part of the graft, selected for its fruiting quality.
-
Rootstock: The base plant that provides strength, disease resistance, or adaptability to soil and climate.
Why Use Grafting?
-
Faster fruiting: Grafted trees can bear fruit in 1–2 years compared to 4–5 years for seedlings.
-
Improved quality: You can control the variety and ensure consistent taste, size, and yield.
-
Disease resistance: Use hardy rootstocks to protect against pests and soil-borne diseases.
-
Multi-variety trees: Grow different fruit varieties on one tree (e.g., lemon and orange).
Materials You’ll Need
-
Sharp grafting knife or blade
-
Sterilized pruning shears
-
Grafting tape or plastic wrap
-
Clean cloth and rubbing alcohol (for sterilizing tools)
-
Scion wood (healthy twigs from a mature, fruiting tree)
-
Rootstock tree (well-established and disease-free)
Optional:
-
Natural plant hormone or aloe vera gel (to stimulate faster union)
-
Cling film or parafilm to cover and protect the graft
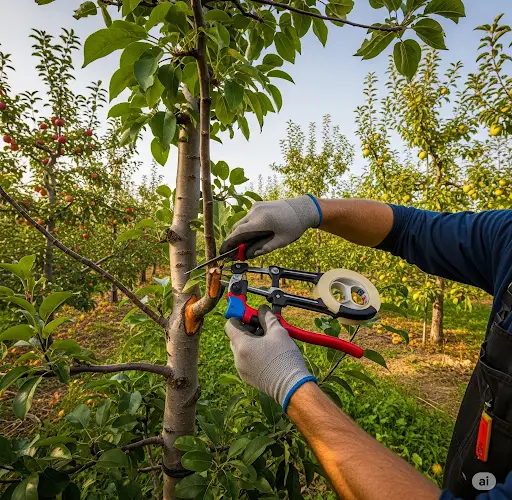
The Grafting Trick: Simple Cleft Graft
One of the easiest and most reliable grafting methods is the cleft graft, especially effective for fruit trees with branches around 1–2 cm thick. Here’s a step-by-step guide:
Step 1: Select the Right Time and Material
-
The best time to graft is during early spring or late winter, when the tree is coming out of dormancy and sap flow is active.
-
Choose scion wood that is healthy, pencil-thick, and has at least 3–4 buds.
-
Rootstock should be actively growing but not flowering.
Step 2: Prepare the Rootstock
-
Using a sterilized knife or pruning tool, cut the branch of the rootstock tree horizontally.
-
Make a clean vertical split in the center of the cut, about 3–4 cm deep, to create a cleft.
Step 3: Prepare the Scion
-
Trim the base of the scion into a wedge shape, tapering both sides evenly to form a V.
-
The cut should be about 3 cm long and clean, to ensure good contact with the cambium layer (the active growth zone between bark and wood).
Step 4: Insert the Scion into the Rootstock
-
Gently push the V-shaped scion into the cleft on the rootstock.
-
Make sure at least one side of the scion’s cambium layer touches the rootstock’s cambium. Perfect alignment is crucial for successful grafting.
Step 5: Secure the Graft
-
Wrap the graft union tightly with grafting tape, plastic wrap, or even strips of recycled plastic bag.
-
Ensure the joint is sealed completely to prevent moisture loss and infection.
-
Optionally, apply aloe vera gel or a natural rooting hormone to stimulate faster bonding.
Step 6: Aftercare and Observation
-
Place the grafted tree in partial shade and water lightly.
-
Avoid direct sun and heavy watering in the first 10–14 days.
-
After 2–3 weeks, check for signs of growth—new leaves or buds on the scion indicate successful grafting.
-
Remove the wrapping after 3–4 weeks or once the graft appears well bonded.
Pro Tips for Success
-
Use only sterilized tools to prevent contamination.
-
Graft early in the morning when temperatures are cooler and plants are hydrated.
-
Use fresh scions—never graft dry or wilted material.
-
Label grafts with the scion variety and date for tracking results.
-
Practice on multiple grafts—success rate increases with experience.
Benefits You’ll Notice
-
Faster growth and earlier fruiting on young trees.
-
Rejuvenation of old or non-productive trees by replacing their branches with productive varieties.
-
More consistent fruit quality across your orchard or garden.
-
Ability to grow multiple varieties on one tree, saving space in small gardens.
Conclusion
Grafting may seem intimidating at first, but with this easy cleft grafting trick, you can transform your trees and enjoy better yields in less time. It’s a rewarding, sustainable gardening practice that puts more control in your hands and reduces dependency on nursery-bought trees. Whether you’re a home gardener or a small-scale grower, this technique offers a practical way to propagate and enhance your orchard naturally.
Give it a try—and watch your trees flourish with new life.


